*
Welcome, Guest. Please login or register.
April 25, 2024, 10:18:10 AM

Login with username, password and session length

Donate

We Appreciate Your Support

Members
Stats
  • Total Posts: 1690625
  • Total Topics: 118340
  • Online Today: 866
  • Online Ever: 2235
  • (October 29, 2023, 01:32:45 AM)
Users Online

Recent

Author Topic: Lord Kelvin's Infernal Galvanic Lightning Cannon - a step-by-step report  (Read 18332 times)

Offline Admiral Benbow

  • The Queen's Own Gizmologist
  • Scatterbrained Genius
  • Posts: 2743
  • "Creativity is a drug I cannot live without."
    • The Benbow Workshop
What follows is a step-by-step report about building and painting my VSF Galvanic Lightning Cannon, entered in the Lead Painter's League Season 1 in July 2008. Yes, it's pretty long since I announced a report, first I had some delay due to other engagements, then I might just simply have forgotten it; my age shows again.  :` Anyway, better late than never, so let's start with
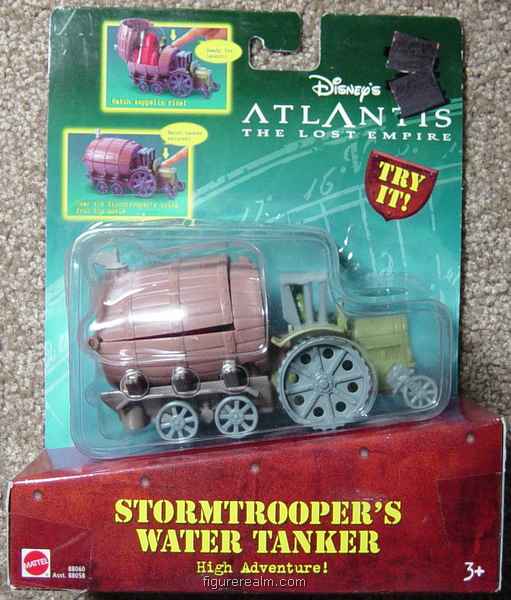
Materials

The tractor started as "Stormtroopers's Water Tanker" from the Disney ATLANTIS toy line shown below. My construction was heavily influenced by a similar conversion made by the great Herb Gundt from HG WALLS, unfortunately no longer online with his massive site of beautiful terrain making and conversions of all kind.


For the gun I used two sets of these laboratory things by Ral Partha, don't know the exact name; it could be used to build kind of a Dr Frankenstein laboratory. Two of the blocky things on the right were used for the gun body, filed flat and glued together back by back.


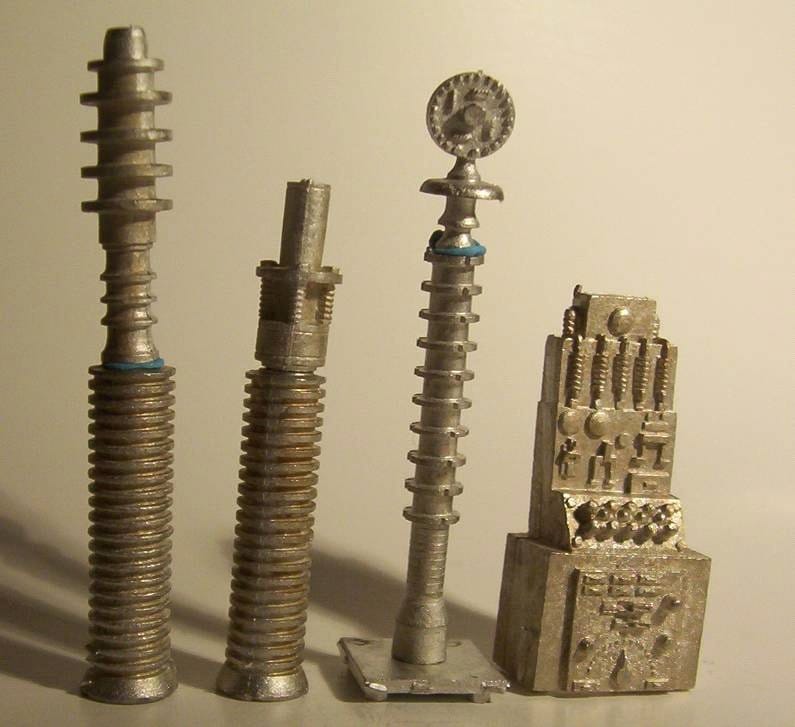
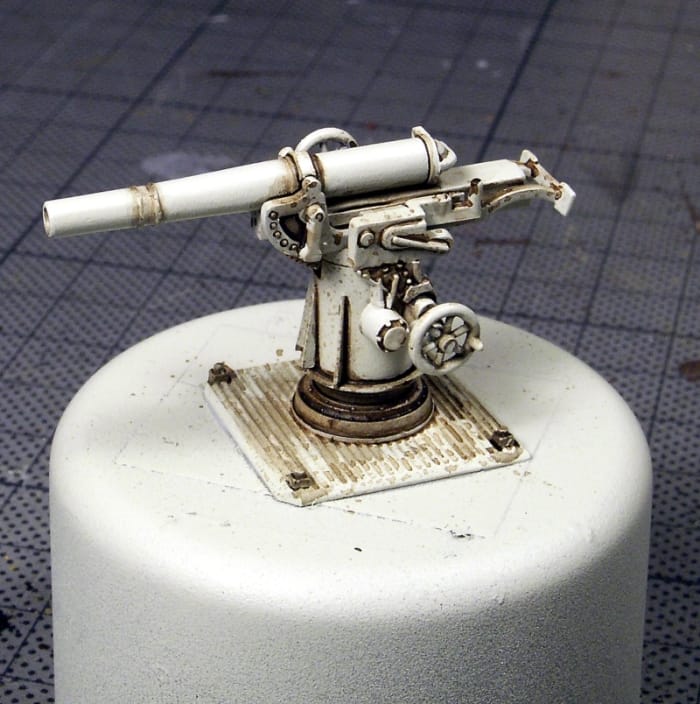
Another item provided the idea for the smaller tractor gun: I had scratchbuilt this little gun years ago for a colonial steamer project which was never realized (till now at least ..). As you see, it was constructed from many parts of my scrapboxes, among them some 1/72 scale 8.8 gun parts. I really love this kind of "creative gizmology" as a fellow modeller called it once.


Construction of the gun tractor

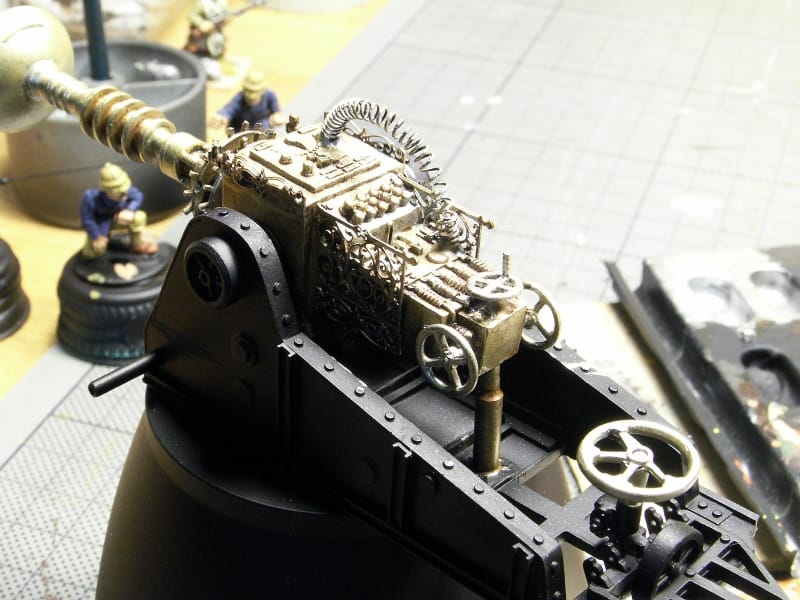
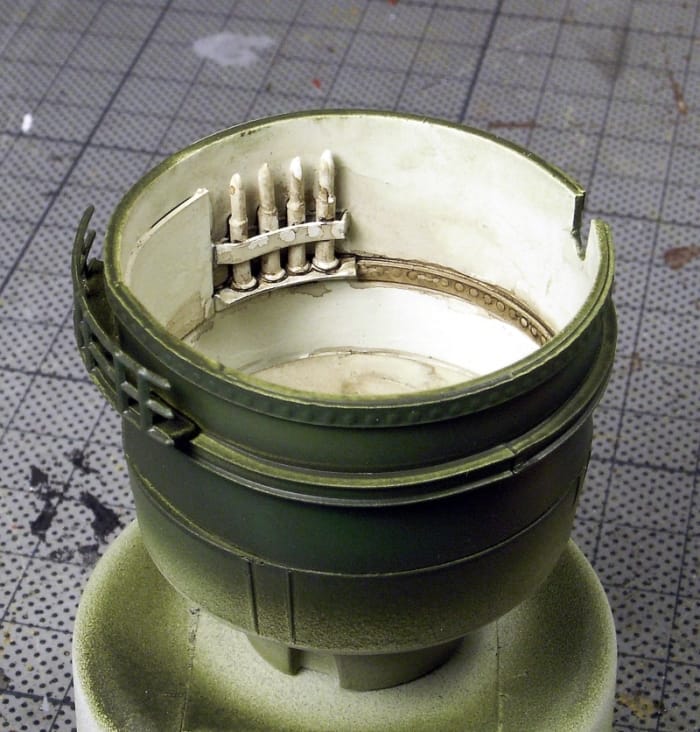
The following pics show the main conversions of the Atlantis toy and building up cabin and main body from plasticard. The rotating open gun turret was constructed over a leg part from AMT's StarWars AT-AT walker (a plethora of useful parts, might be a bit blasphemic for collectors ... 8)) and decorated with rivet strips cut from the very handy riveted sheet of plasticard from Antenocitie's workshop. 
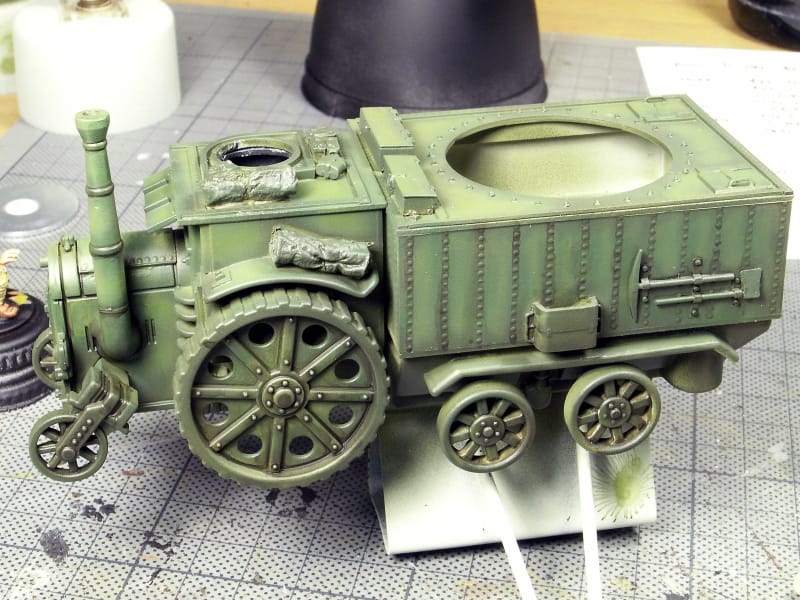
http://www.barrule.com/workshop/products.html
Driver's compartment and body were designed quite square and bulky, as I was after that destinct WWI-look of heavy and clumsy looking machinery, and also riveted heavily, as you never can have too many rivets on VSF-vehicles, can't you?


At a later stage I added a lot of details like tools and tool boxes, ammo boxes and an ammunition rack for the turret gun, the front smoke stack (from a gun barrel and a scale ship's part) and, yes, you guessed it; more rivets.


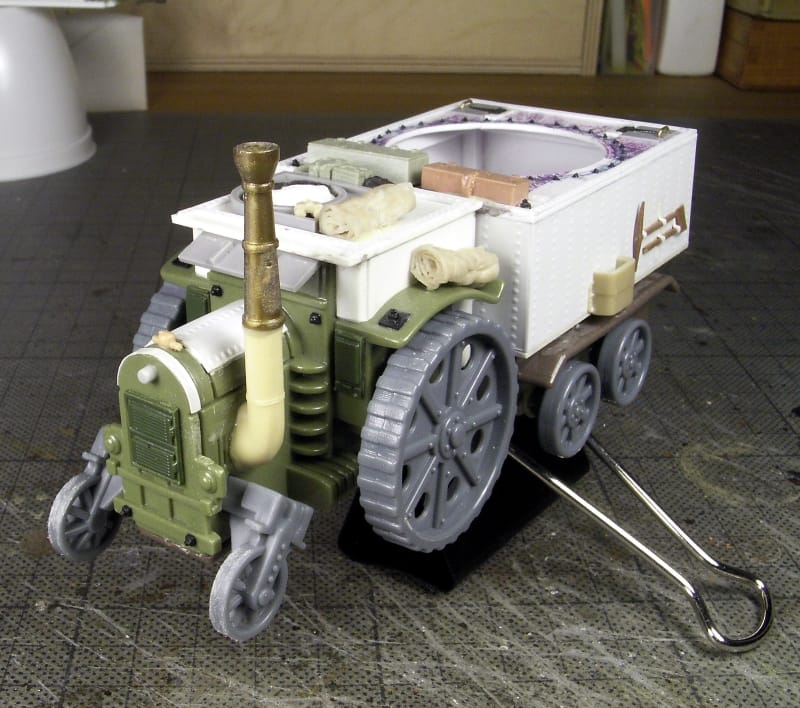
The machine gunner from Foundry's Boer War MG set was slightly modified to change the head position at bit, the weapon converted to fit into the MG-mount on the cabin top and a bullet belt added.


Construction of the Lightning Cannon

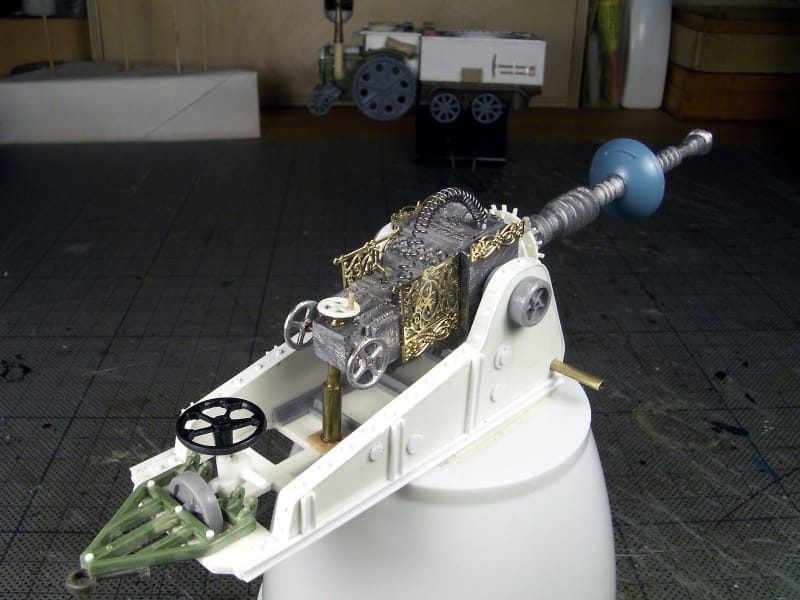
I had some nice looking white metal heavy wheels laying around, got them from a UK trader who always has his booth at the Intermodellbau (one of the largest modelling shows in Europe). The gun carriage was cut from 3 mm styrene, detailed and heavily riveted, this time with my trusty punch-and-die-set. I used some brass rod for the axle and decorated the gun's body with etched brass parts from scale railway accessories. This gives the gun a nice victorian touch.


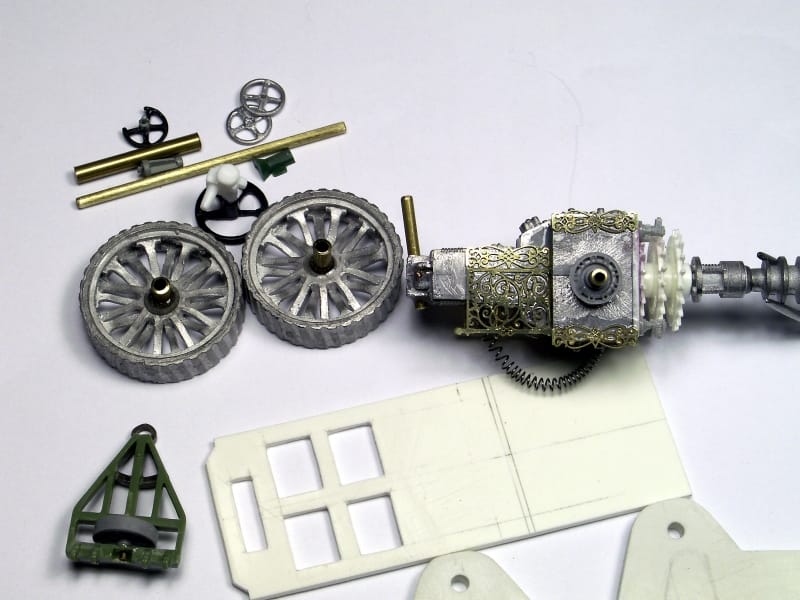
Main construction problem with the gun was to get all the quite heavy white metal barrel parts straight amd in line, and on top everything had to be build sturdy enough to stand the usual wargame handling. In the end I pinned just every piece with long pieces of silver wire and glued with two part epoxy. Till now the gun had seen some handling through our games at shows and the barrel kept straight. I added some more handrails and smaller details, and the gun was ready for priming.


One of the gunners got an extra long (for keeping electrical hazards away ... :o) firing mechanism into his hands, and then everything was primed a light grey colour and painting started.

Painting

Painting was a quite straightforward process: the tractor got some light airbrushed coats with Vallejo Model Air colour, using two different greens, the gun was airbrushed black, followed by brass hand painting. Then some washes with sepia and dark brown mixes with some added future-like fluids and alcohol for better spreading, some drybrushing and pastel work for that grime and dusted finish. Before adding pastels the pieces got two coats of varnish, one gloss and one flat. I let the pics speak for themselves, and if you would like to know more about any detail techniques or colours, please just ask.


I really enjoyed building this VSF artillery set and had the first time opportunity to test the Vallejo Model Air line of airbrush colours. I was quite impressed about their good flowing abilities and colour range, and just use them currently for my next VSF project ...

This time it's no tank, gun, robot or airship, but a steam-powered victorian harbour crane! So stay tuned ...
 8)


Offline marianas_gamer

  • Scatterbrained Genius
  • Posts: 3905
  • Our Man on Guam Watchman in the East
Re: Lord Kelvin's Infernal Galvanic Lightning Cannon - a step-by-step report
« Reply #1 on: September 09, 2009, 09:28:24 PM »
Nice tutorial, can't wait to see the crane!
LB
Got to kick at the darkness till it bleeds daylight.

Offline VSF Gamer

  • Scientist
  • Posts: 255
Re: Lord Kelvin's Infernal Galvanic Lightning Cannon - a step-by-step report
« Reply #2 on: September 09, 2009, 09:41:59 PM »
Absolutely Awesome...well done and thanks for the step by step!!

Offline Svennn

  • Galactic Brain
  • Posts: 5334
  • Balding bloke with a 'V'
    • Svenns Little Men
Re: Lord Kelvin's Infernal Galvanic Lightning Cannon - a step-by-step report
« Reply #3 on: September 09, 2009, 09:57:25 PM »
Faultless. :-* :-* :-*
"A jewelled sceptre plucked by order to serve their cause"

Offline OSHIROmodels

  • Supporting Adventurer
  • Elder God
  • *
  • Posts: 27764
  • Custom terrain a speciality.
    • Oshiro modelterrain
Re: Lord Kelvin's Infernal Galvanic Lightning Cannon - a step-by-step report
« Reply #4 on: September 09, 2009, 10:08:35 PM »
Wonderful  :-*   :-*  :-*

A real inspiration  :D

cheers

James
cheers

James

https://www.oshiromodels.co.uk/

Twitter account -     @OSHIROmodels
Instagram account - oshiromodels

http://redplanetminiatures.blogspot.co.uk/
http://jimbibblyblog.blogspot.com/

Offline blackstone

  • Mastermind
  • Posts: 1203
    • Toad King Castings
Re: Lord Kelvin's Infernal Galvanic Lightning Cannon - a step-by-step report
« Reply #5 on: September 09, 2009, 10:19:39 PM »
Skill, taste, and sublety in everything from build to painting. Beautiful weathering.

Offline Plynkes

  • The Royal Bastard
  • Elder God
  • Posts: 10225
  • I killed Mufasa!
    • http://misterplynkes.blogspot.com/
Re: Lord Kelvin's Infernal Galvanic Lightning Cannon - a step-by-step report
« Reply #6 on: September 09, 2009, 10:22:46 PM »
Real little beauty. A right corker. So many cool little touches. Proper job VSF, none of your gluing rivets to a Land Raider nonsense that gets my goat so much.  :)

The jury from Plynkestan say: "Douze points."
With Cat-Like Tread
Upon our prey we steal...

Offline argsilverson

  • Scatterbrained Genius
  • Posts: 2580
Re: Lord Kelvin's Infernal Galvanic Lightning Cannon - a step-by-step report
« Reply #7 on: September 09, 2009, 11:46:18 PM »
Yes it is a marvellous piece!
argsilverson

Offline Ray Rivers

  • Galactic Brain
  • Posts: 5917
Re: Lord Kelvin's Infernal Galvanic Lightning Cannon - a step-by-step report
« Reply #8 on: September 10, 2009, 02:10:54 AM »
 :o

Madness, I tell you!

Offline Chairface

  • Scatterbrained Genius
  • Posts: 3811
Re: Lord Kelvin's Infernal Galvanic Lightning Cannon - a step-by-step report
« Reply #9 on: September 10, 2009, 02:24:12 AM »
Stunning! Absolutely stunning!

Offline Bako

  • Scatterbrained Genius
  • Posts: 2990
  • Loopy as a clock-work orange.
    • Hitting Dirtside
Re: Lord Kelvin's Infernal Galvanic Lightning Cannon - a step-by-step report
« Reply #10 on: September 10, 2009, 06:41:20 AM »
Wow, top bit. And all at once! High quality painting and workmanship. Top grades to you, sir! :)
Everything is better with lizardmen.

Offline gamer Mac

  • Galactic Brain
  • Posts: 8213
Re: Lord Kelvin's Infernal Galvanic Lightning Cannon - a step-by-step report
« Reply #11 on: September 10, 2009, 09:17:58 AM »
I have been looking for this for ages and I had thought I had missed it.
Stunning work.  :o :-* :o :-*
The level of detail is great. It’s the little bits of detail that really bring it to life. :-* :-*
The paint job is great as well. :-*
I keep thinking I should try airbrushing the results look outstanding in an experts hands.
Very inspirational.
Looking forward to your next project.

Couple of questions if you don’t mind? :D
How did you bend the plastic beam around the turret?
Where did the bullet belt come from?
Thanks

Offline Thunderchicken

  • Supporting Adventurer
  • Scatterbrained Genius
  • *
  • Posts: 3897
  • Amusingly clumsy.
Re: Lord Kelvin's Infernal Galvanic Lightning Cannon - a step-by-step report
« Reply #12 on: September 10, 2009, 09:48:40 AM »
I need to go and have a bit of a sit down. Wow!
Don't!

Offline Geudens

  • Mastermind
  • Posts: 1115
  • 39th generation heir of Charles Martel (no joke!)
    • http://www.rudi-geudens.be/
Re: Lord Kelvin's Infernal Galvanic Lightning Cannon - a step-by-step report
« Reply #13 on: September 10, 2009, 10:25:03 AM »
For once... I've lost my speech...  ;D :o :P :-* etc

Rudi
do visit my websites & photobucket:
http://www.rudi-geudens.be/
http://www.tsoa.be/
http://s298.photobucket.com/albums/mm262/geudens_photos/

Offline Admiral Benbow

  • The Queen's Own Gizmologist
  • Scatterbrained Genius
  • Posts: 2743
  • "Creativity is a drug I cannot live without."
    • The Benbow Workshop
Re: Lord Kelvin's Infernal Galvanic Lightning Cannon - a step-by-step report
« Reply #14 on: September 10, 2009, 10:33:01 AM »
Couple of questions if you don’t mind? :D
How did you bend the plastic beam around the turret?
Where did the bullet belt come from?
Thanks

First thanks to everybody for your nice comments; this will encourage me to finish that harbour crane in due time ...  :)

The styrene u-beam is from Plastruct and was just glued to the round turret body using a liquid plastic cement (like Tamiya's super thin); if you start with a small part of the strip first, let it harden a bit and then be patient enough not to hurry, you would be able to glue it around the turret step by step. Then fix the end pieces with a clamp and let dry thoroughly.

Can't remember the whereabouts of the bullet belt, must be some 1/35 scale item from a set of ammunition I bought many years ago at a show. But I'm sure there must be a lot of useful aftermarket products from 1/48 scale military stuff as well. I often look for useful things for my 28s at 1/35 and 1/48 scales kits and stuff, you'd wonder how many pieces fit in nicely.


Related Topics

  Subject / Started by Replies Last post
19 Replies
14813 Views
Last post July 12, 2008, 02:20:18 PM
by Admiral Benbow
19 Replies
6777 Views
Last post September 07, 2009, 05:06:40 PM
by Admiral Benbow
2 Replies
2941 Views
Last post December 13, 2013, 07:27:03 PM
by aggro84
2 Replies
1573 Views
Last post June 07, 2014, 12:01:54 PM
by Steve63
9 Replies
3184 Views
Last post August 12, 2014, 06:58:56 AM
by Mick_in_Switzerland