I managed to finally get in a game of Scubusters and here is the After Action Review.
The complete write up (with more pictures) is at my blog
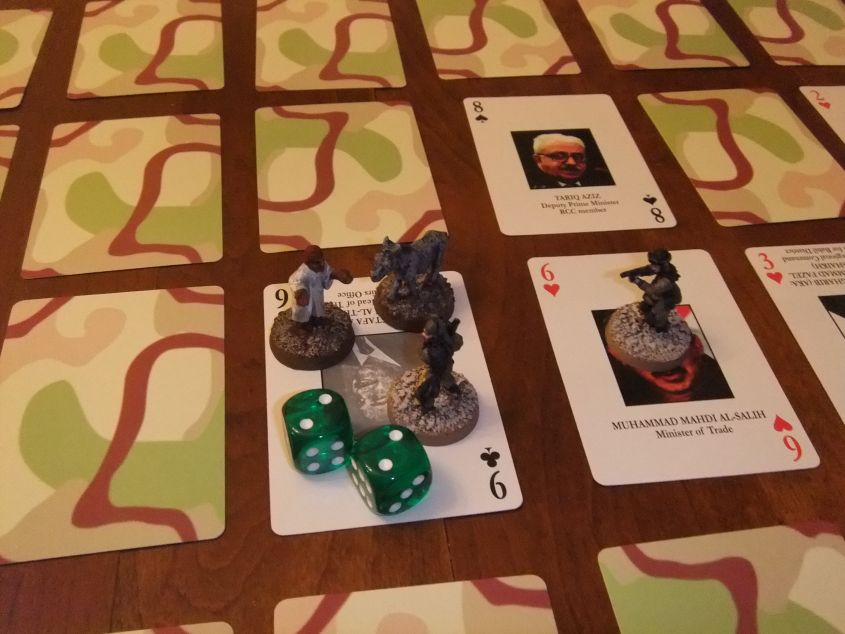
http://captainapathy.wordpress.com/2011/01/13/scudbusters-ii-first-game-of-2011/This scenario calls for two Special Forces teams to go behind enemy lines in search of an Iraqi Scud Missile Launcher. The scenario starts with a Strategic Map of the environment. The Strategic Map is made from a regular deck of playing cards with the face cards and jokers removed. The remaining 40 cards are placed face down in an array 5 x 8. Both SF teams are placed on the starting card and will move to a new location (card) in search of the objective (the Ace of Spades).

The Strategic Map with Alpha Team and Bravo Team in the starting position.

Turn 1, both teams move out and uncover empty desert terrain (Hearts and Diamonds). Turn 2, more empty desert.

Turn 3, both teams encounter Iraqi troops (Spades). At this stage the options are to Hide, Bluff or Fight. Both teams decide to try to Bluff their way past the Iraqi troops
and both succeed by rolling under their Bottle score of 9. In Scudbusters individual special forces soldiers and Iraqi units have a Bottle score ranging from 2-11. Bottle represents training, expertise, morale, and firepower all in one. One interesting feature of Scubusters is the Bottle score can degrade or improve over time based on combat and exposure to the elements.
Turn 4, Bravo Team finds more empty Desert, while Alpha Team encounters civilian goat herders (Clubs). Alpha Team now has the option to Hide, Bluff, or Slaughter the civilians. Both Hiding and Bluffing carry the risk of being detected and reported to the Iraqi military, putting the Iraqis on alert. If the team decides to Slaughter the civilians then the Iraqi military will not be altered. However there is a very good chance the teams morale (Bottle) will suffer reducing their overall effectiveness or even losing team members to desertion. Alpha Team decides to Hide and is again successful.

Turn 5, both teams spread out and discover more empty desert. It is at this stage that the teams receive some actionable intelligence and decide to converge on the same location. In actuality I decided to speed things up a bit and peeked under the cards until I found the objective (Ace of Spades) and moved it.
Turn 6, the intelligence (card swap) pays off and both teams converge on the objective.
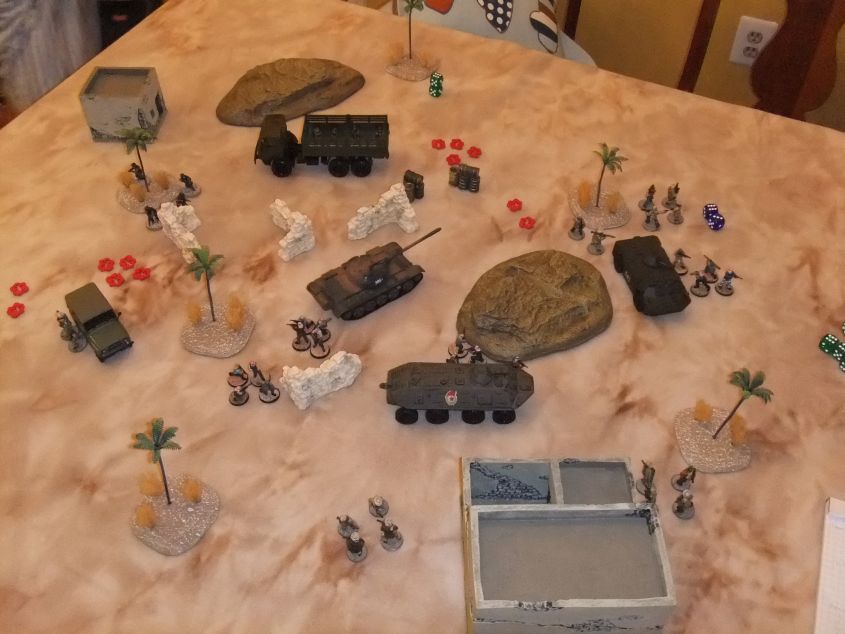
Now that the teams have reached the objective it is time to switch modes and break out the Tactical Map. This is where the real fun begins.

The Tactical Map is setup on a 4 x 4 table. Both teams start in the North West corner of the map. The objective is in the middle of the map and surrounded by two platoons of Iraqi soldiers. I dont have access to a missile launcher in the appropriate scale so the T-54 in the middle of the map will represent the Scud launcher. Also, it is at this point that I realize I dont have nearly enough miniatures to field two full platoons of Iraqi soldiers. I improvise by using my Taliban and insurgent miniatures and I still come up two teams short. Oh well, no big deal. Now for some fun.

Tactical Turns 1 & 2, the Alpha and Bravo Teams have surprise so I gave them a free turn to move and shoot. Both teams advance on the objective with Alpha Team heading East and Bravo Team heading South. Both teams manage to roll a success and a critical success for their attacks, each wounding and eliminating Iraqi fire teams. A wounded Iraqi unit drops from a Bottle of 5 to a Bottle of 3. once a units Bottle score drops below 2 it is eliminated.

Tactical Turn 3, Alpha Team advances using the4 cargo truck for cover.
Alpha Team then fires from cover and manages to wound another Iraqi fire team.

At the same time Bravo Team advances East directly for the objective taking cover behind some ruined walls.
Bravo Team decides to shoot the jeep. They score a critical success and destroy the jeep as well as the wounded fire team hiding behind it.
During the Iraqi units turn we checked the reaction tables and majority of the Iraqi units retreated for cover. A few units managed to compose themselves long enough to fire back but with no success. Also, four Iraqi fire teams rolled a result of Flee and left the battlefield completely.
By the end of turn 3 the battlefield is looking pretty thin with the Iraqi soldiers on the run.

Tactical Turn 4, Alpha Team advances toward cover behind several barrels while Braco Team rushes the objective to plant explosives.
Alpha Team scores another success and wounds another Iraqi unit, while Bravo Team plants the explosives. Several Iraqi units manage to rally and advance. Two fire teams score successes, and wounding both Alpha and Bravo Teams (reducing their Bottle scores to 7).

Tactical Turn 5, with the explosives planted and the Iraqi soldiers on the move both teams fall back to the truck as a means of escaping the battlefield quickly.
Both teams manage to wound different Iraqi units and get the truck started on the first try.

Tactical Turn 6, the battlefield is littered with bodies and both teams manage to escape wounded but with their mission completed. At this point I could have gone back to the Strategic map and moved the units back across the desert to the extraction point, but I figured there was no need. Game Over.


 Welcome, Guest. Please
  April 25, 2024, 06:21:27 PM


