Since I posted the pics of my Perry WOTR mercenaries a few days ago, Ive had a few requests for a step-by-step on an example figure.
Im no expert, and Im sure there are very many people with expertise in building GW plastic figures who know a lot more about this than I do - but for what its worth, Im happy to oblige, so here goes

First, a few points for the would-be plastic figure builder to bear in mind...
1. Modern liquid polystyrene cement (I use the revell stuff, with a needle dispenser) is a wonderful magic substance. Not only does it glue bits together - it dissolves and melds plastic, acts as a smoother, filler and concealer of joins. It sticks almost immediately, and sets hard within 30 mins. In short, its very versatile and its your friend.
2. These figures are made from pleasingly soft hard plastic. In other words, compared to soft polythene (e.g. most 1/72 scale) figures, this stuff is rigid and hard. But it is not so hard or brittle that its remotely difficult to work with. In fact, its ludicrously soft and easy to cut, shave, and scrape. Its very biddable.
3. Look beyond the pieces provided to see their potential. A hand holding a sword is a hand holding a sword. It doesnt necessarily have to live on the end of the arm it came with. You can slice that hand off and glue it to any other arm in the box for a different effect. And you can angle your cut slightly to achieve very different attitudes in the resulting figure. In short, the components provided are not fixed in stone they are an endlessly flexible set of resources.
4. Natural posture is everything. The trick with these figures is to arrive at combinations of bodies, arms, heads and equipment, which have a ring of truth. Its very easy to bosh these figures together quickly - and some of them will look pretty unconvincing. The slight angling of an arm here or tilt of a head there, makes a monumental difference to whether that figure looks real or not. So take your time to try things out. Just look at real people moving and you should instinctively know whether a pose looks natural or not.
5. Waste nothing! All those little bits you cut off - yes even the shavings of sprue - are potentially useful down the line. Pop em all in a little box and save them. Its all good stuff.
6. You have to break a few eggs to make an omelette. These figures are (relatively) inexpensive. Once you start chopping and changing bits, things will go wrong, and you may end up using a few more bits than you intended. Its no big deal. Buy another box. Like I say, most leftover bits come in useful somewhere down the line anyway.
So, for this little demo, Im going to build a fairly generic figure for the period. Not sure yet if hes going to be a mercenary or an Englishman probably the latter. In any event, hes quality, so Im going to use the long-coated / skirted Merc command body with the breastplate peeping through.
However I dont want to use the armoured legs that come with that body. Partly because I feel they are a bit short, but also because I want a less fully-armoured look. More like a young gentleman-at-arms or a squire.
So, first job is to pair the desired torso with some new legs.
There are 12 standard bodies and legs the same carcasses in both WOTR and Mercs boxes - and they are almost all completely interchangeable, so it doesnt matter too much which you choose. Ive gone for these rather shapely legs from one of the unarmoured bodies, which look like theyre standing or just about to start walking.
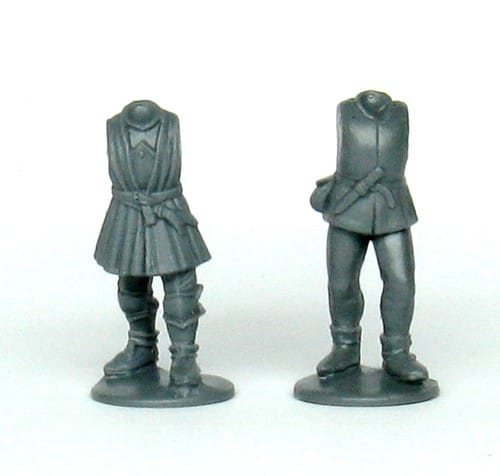
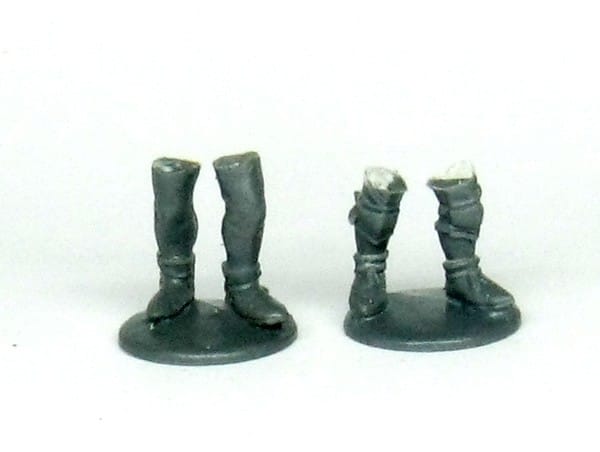
Its the work of a few seconds with a Stanley knife to chop through the legs on both figures, so you are left with...
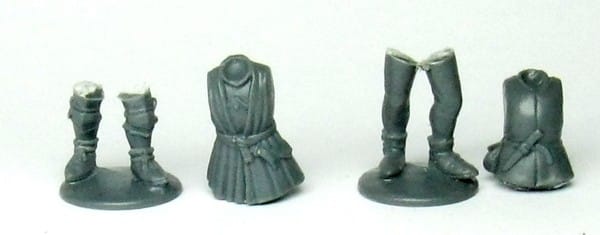
Now I want to make my coat wearing figure look a bit taller, so Ive pared down the new legs a bit from the top - but not as short as the ones which I took off.
Offer the legs up and see how they fit to the torso. Shave / scrape a little plastic away on either component, a dab of liquid polystyrene cement, and Bobs your uncle. The join is so good, it doesnt require any filling at all (although I have just run a thin line of liquid polystyrene cement around the join to make sure it all melds in and will be invisible to the eye).


So, thats the basic body sorted out. Next job arms.
Again, I want unarmoured arms, that look like they belong to the coat.
Ive gone back to the long-sleeved bowmen arms in the original WOTR box.
The posture I want for this figure is to hold a polearm out in his left hand whilst hefting a sword in his right hand.
The best right arm I can find is the vaguely unspecific arm which is meant to be reaching for an arrow or something. This arm, Im going to use as is, but slice the open hand off, and replace it with a hand holding a sword.
Unfortunately, there isnt a left arm in the attitude I want that is also in a matching style of dress. So Im going to have to do a tiny bit more surgery to get what I want.

In this case, as well as cutting away the longbow, it means a few seconds shaving away the upper sleeve and the bowmans bracer. Job done. Before and after.

As you can see, this is no longer an arm firing a longbow its now just an arm held at full length, and could be holding anything in its fist... a flagpole, a dead chicken, a flaming torch, anything.
I've mounted this arm onto the body. Note, the shoulder slightly raised to create the illusion of the cloth gathering above the joint...

The other arm is fixed, with a new sword hand attached, taken from one of the Merc command arms.

Now to attach the polearm. I dont need to drill out the hand here Im just going to glue one of the new spare polearm heads straight on top of the hand essential that you get it pretty straight obviously, so it looks like the haft is being held in the clenched fist. To do this, you need to wait a few minutes for the glue to half-set, then adjust it to its finished position.

Next I need to glue the figure onto a base (I use a standard 25mm washer for all my figures) so that the lower part of the polearm (a length of cut down pikestaff) can be glued to the underside of the hand, and also (at the foot) to the base itself, to give it some strength and rigidity. Again, clearly, it takes a bit of care to try to make sure the top and bottom pieces of the polearm line up and look like they are a single whole held by the hand concerned.

Ive run a line of liquid polystyrene cement around the arm joints to conceal the join.

Next comes the head.
Im using a soft hatted head the kind of young-looking one from the WOTR box command frame. It goes with the look Im after for this figure - a bit of a popinjay.
The head is vitally important to the success of the figure... a tiny dab of glue and I can try it out...
Should it look left

Right

Or straight ahead?

Slightly up or slightly down? Tilted to one side or the other? This makes all the difference to your finished figure, so its worth trying it out before deciding how you want it.
I find the heads sometimes sit a little low on the shoulders with some of these figures, so I tend to put a little drop of liquid polystyrene cement in the neck socket, then drop a shaving or two of plastic into it. Leave it to dissolve for a few seconds, then pop your head on. It just helps the head to sit up that little bit and makes ( I think) for a slightly better attitude.
Ive decided that for this figure, looking slightly to the right makes for a more natural and interesting look.
Generally with these figures, staring straight to the front is not the best look. Always try to do something more interesting with the head... It pays big dividends.
Im not finished though. First - since he has a ruddy great sword in his hand - my figure needs an empty scabbard: duly added at the allotted point on his baldric.
And finally, Im going to add a feather in his cap. Dont ask me why. Just instinct I suppose.
I dont much like this new head from the Mercs box but I do rather like the feather...

Again, its the work of a few seconds to slice it off, sharpen the end slightly, and glue it onto the cap of my young Lord - hanging down at a suitable angle (If youve ever worn feathers in your hat, youll know they hang down naturally, but dont stand up too well in real life... )

And thats it.
Finally finally - once the glue has all set hard after an hour or two - run the edge of a craft knife quickly over his seams and joins to get rid of any residual mould lines, and stray bits of plastic.
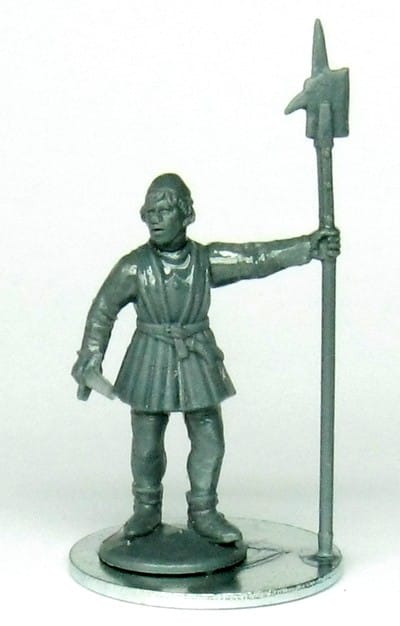
And here he is, undercoated and ready for painting.


Can you see the joins?

Hope thats useful.
I would say (taking pictures apart), no more than 30 minutes work - thinking, cutting, trying out and gluing - from start to finish. Time well spent for a unique figure.
Cheers
Richard


 Welcome, Guest. Please
  April 27, 2024, 01:53:13 AM


