Roight, I'm currently recuperating from last weekend's Go Modelling in Vienna Army Museum. Not sure if I'll manage to cobble together a show report as I was extremely busy at my table throughout the whole weekend. I didn't have time to get up and take some photos at all.
Instead for now I'll provide you with another 15mm Sharp Practice battle report.
BackgroundOnce more Cpt.Shandy invited me over for a game of Sharp Practice 2. The scenario is worked out by him again, and as usual is based on a historical event, specifically the Skirmish at Wall's Bridge. This skirmish happened at the tail end of Grierson's Raid. Since April 17 Grierson's Unionist cavalry had raided in Confederate country from Tennessee throughout Mississippi and into Louisiana. They blew up railways, set fire to Confederate storages, freed slaves and all the other things. This wasn't only to annoy and hinder the Confederate war effort, but also to distract from Grant's planned attack on Vicksburg.

(source:
https://warfarehistorynetwork.com/daily/civil-war/griersons-raid-wrecking-the-railroad-with-the-butternut-guerrillas/)
The Conferate army had several detachments dedicated to catch the raiders. More by accident 9th Louisiana Cavalry ('Partisan Rangers') managed to do just that on May 1st 1863 at Wall's Bridge. Well, almost. This very event is what we depict in your game. Let's see if they managed at least on the gaming table.
ScenarioCpt.Shandy already had tested this scenario a while ago. you can see the report of this game here:
https://wargamingraft.wordpress.com/2017/05/12/walls-bridge-sharp-practice-aar/In this report you can also read a bit more about the background and the special rules of the scenario. Basically it's about this: 7th Illinois Cavalry (the vanguard of Grierson's command) come to the aid of scouts consisting of Butternut Guerillas (Union scouts in confederate uniform) who had been found out and caught in a firefight with actual Confederate scouts guarding the bridge. They are to link up and break through the Confederate force to avoid being caught between them and the larger Confederate force in pursuit of the Grierson's raiders.
This is made even harder by the fact that the Union cavalrymen are exhausted. They've been constantly ridin', fightin' and raidin' through unknown enemy territory for weeks (more then 600 miles at that point). Also: The vanguard (the Union force in this scenario) won't show up all together, because the single units are drawn apart by a fair amount.
In game terms each side's goal is to reduce the enemy force morale to 0 to win. After a more or less randomly determined number of turns the Union player (Cpt.Shandy) may deploy the main part of the cavalry force. However, the game also ends after a more or less randomly determined number of turns (at the end of each turn a d6 is rolled and added up. If the total amounts to a certain number things happen) the Confederate pursuit force catches up with Grierson's Raiders and the rebels player (me) wins.
Advantages for the
Union side (Butternut Guerilla Skirmishers, 2x 2 groups of cavalry, 1x Woodruff Gun with crew) is the superior quality of troops and equipment (breech-loading repeating carbines and the [very] light Woodruff Gun).
Advantages for the
Rebel force (1x Skirmishers, 3x Infantry, 2x Cavalry) are time (which is on my side. Yes, it is.), a slight advantage in numbers and the enemy's exhaustion (= a higher probability of random events happening to Union force)
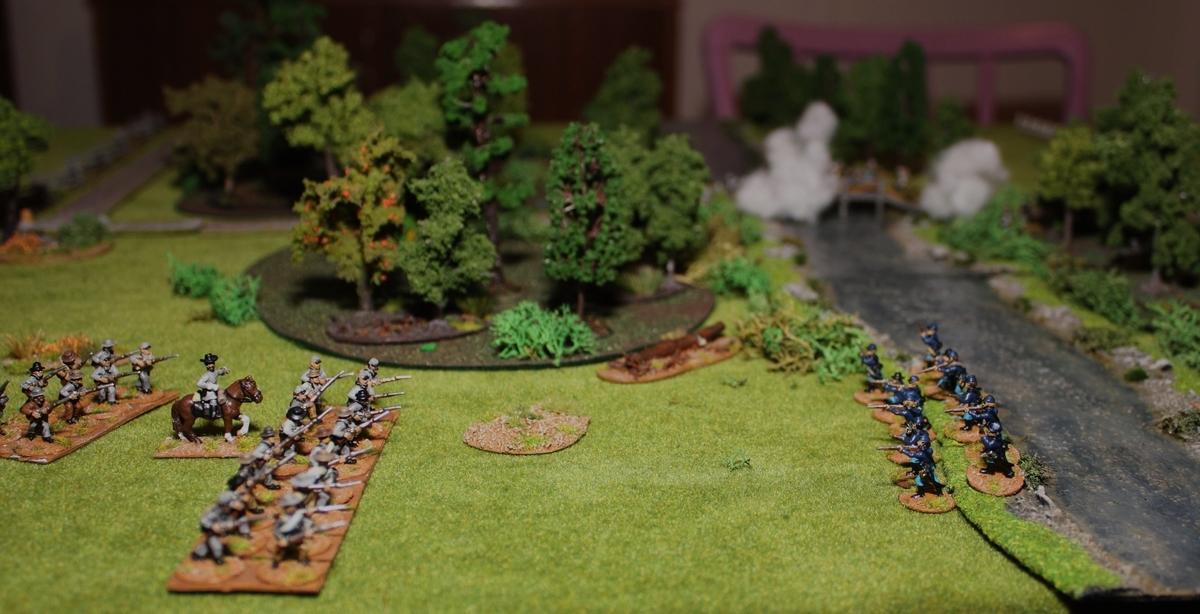
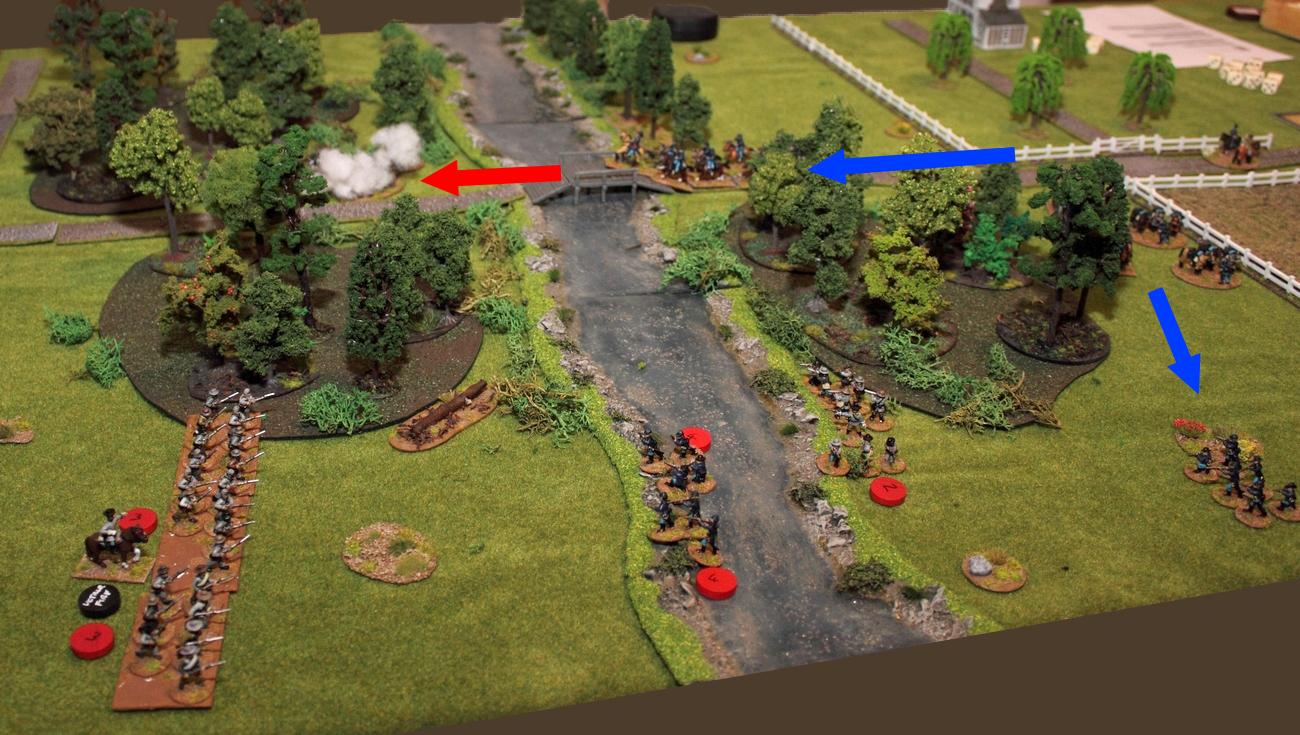
The GameThe beginning of the game throws us right into the action: Across the bridge the Butternut Guerrillas, their cover blown, with their leader shot and 2 points of shock, sit in a firefight with Confederate skirmishers across the road.
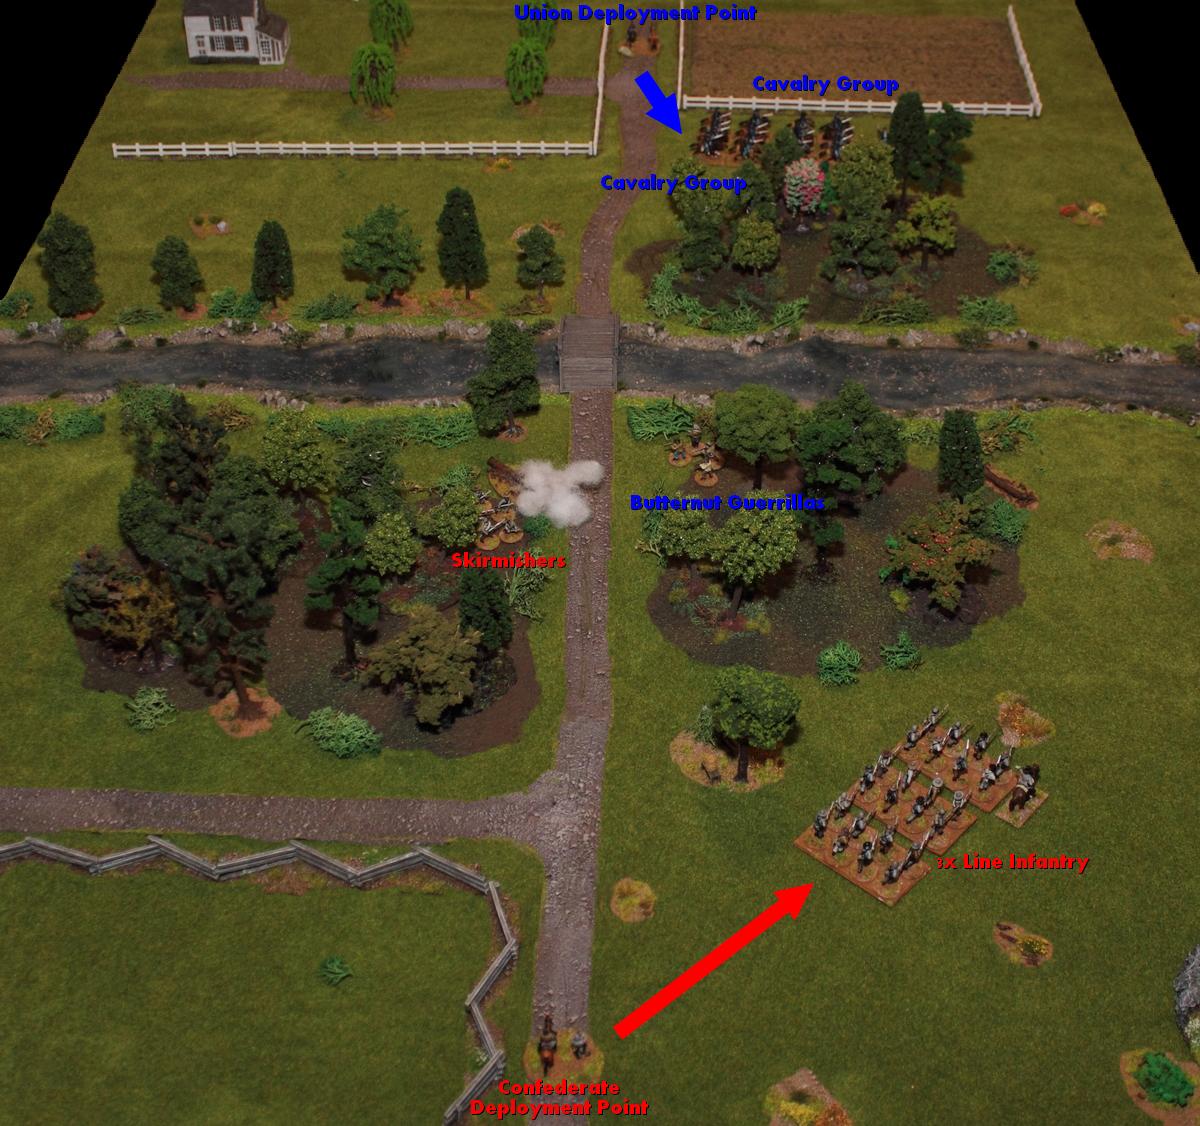
Swiftly Cpt.Shandy gets his first two groups of cavalry on the table and they move toward my right. I react by deploying my 3 groups of infantry (all just militia troops, but oh well) who march off to the right flank to meet the enemy and hinder them from crossing over.
Naturally, the Yankee cavalry is faster. They dismount, reach the river bank and deploy in cover.
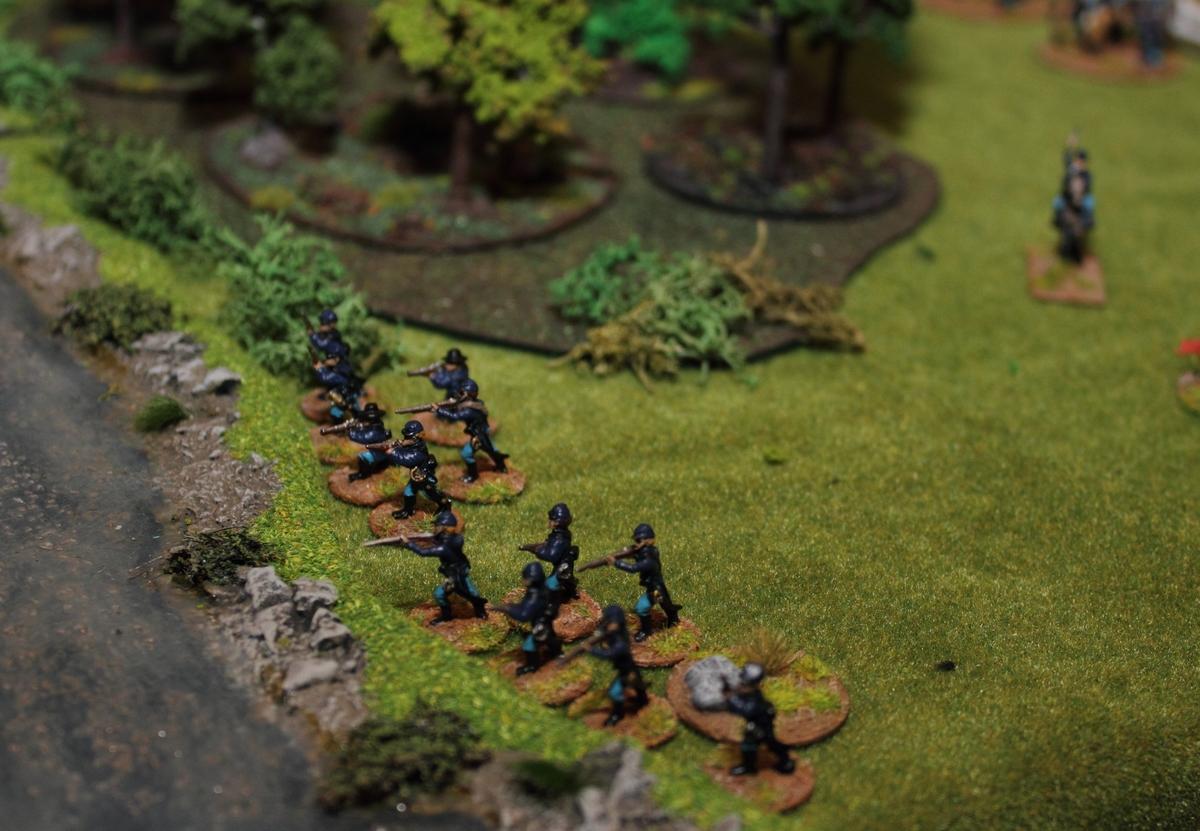
I have encountered smaller groups of Union cavalry with breech-loading carbines before, so I knew that these are potentially very scary. Add to this the excellent cover the dastardly Northern Aggressors have in their position. And the fact that my troops advance far less swiftly than I'd like them to. AS USUAL. Hence I decide no to seek a direct confrontation for now and have my infantry heroically hide behind the forest.
In the mean time our skirmishers fight back and forth at the bridge.
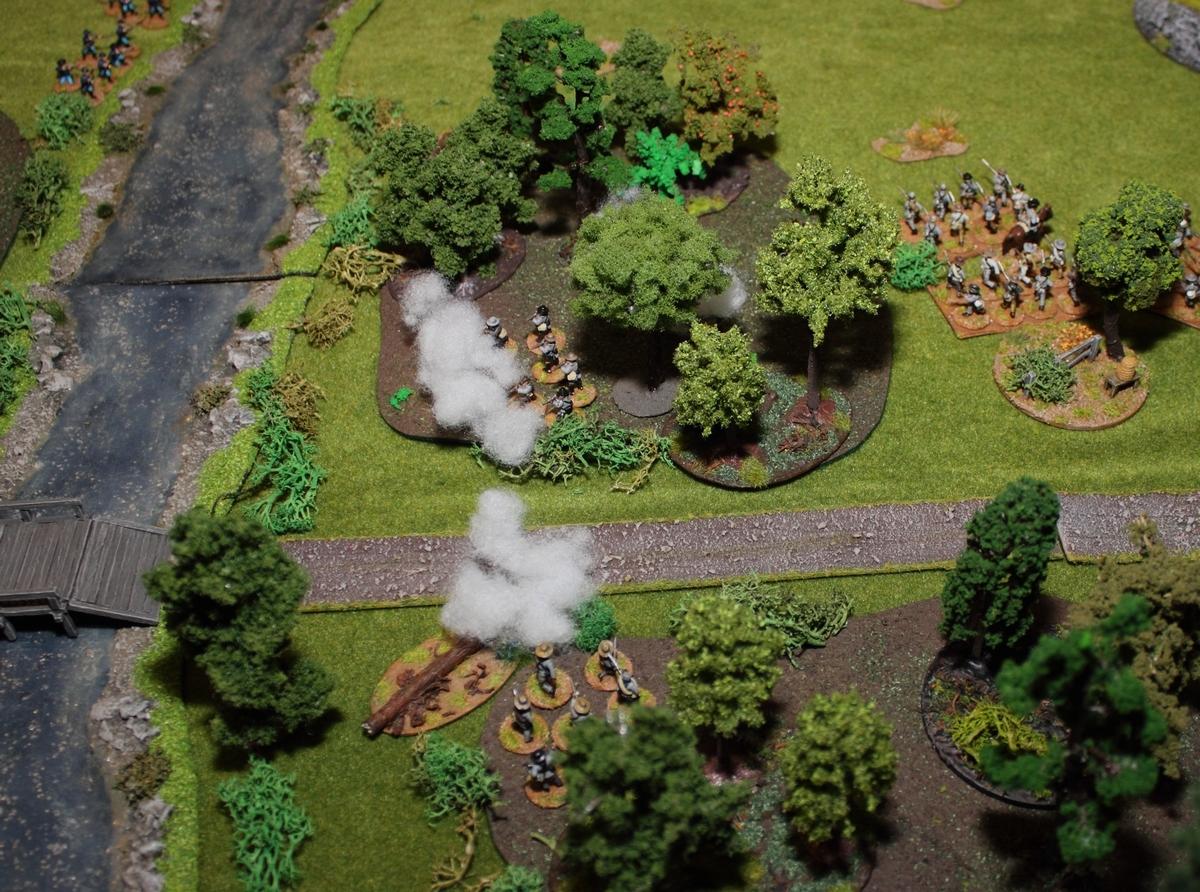
Being a leader short and with starting shock points the Butternut Guerillas are under a lot of pressure.
Here's an overview of the starting phases of the game:
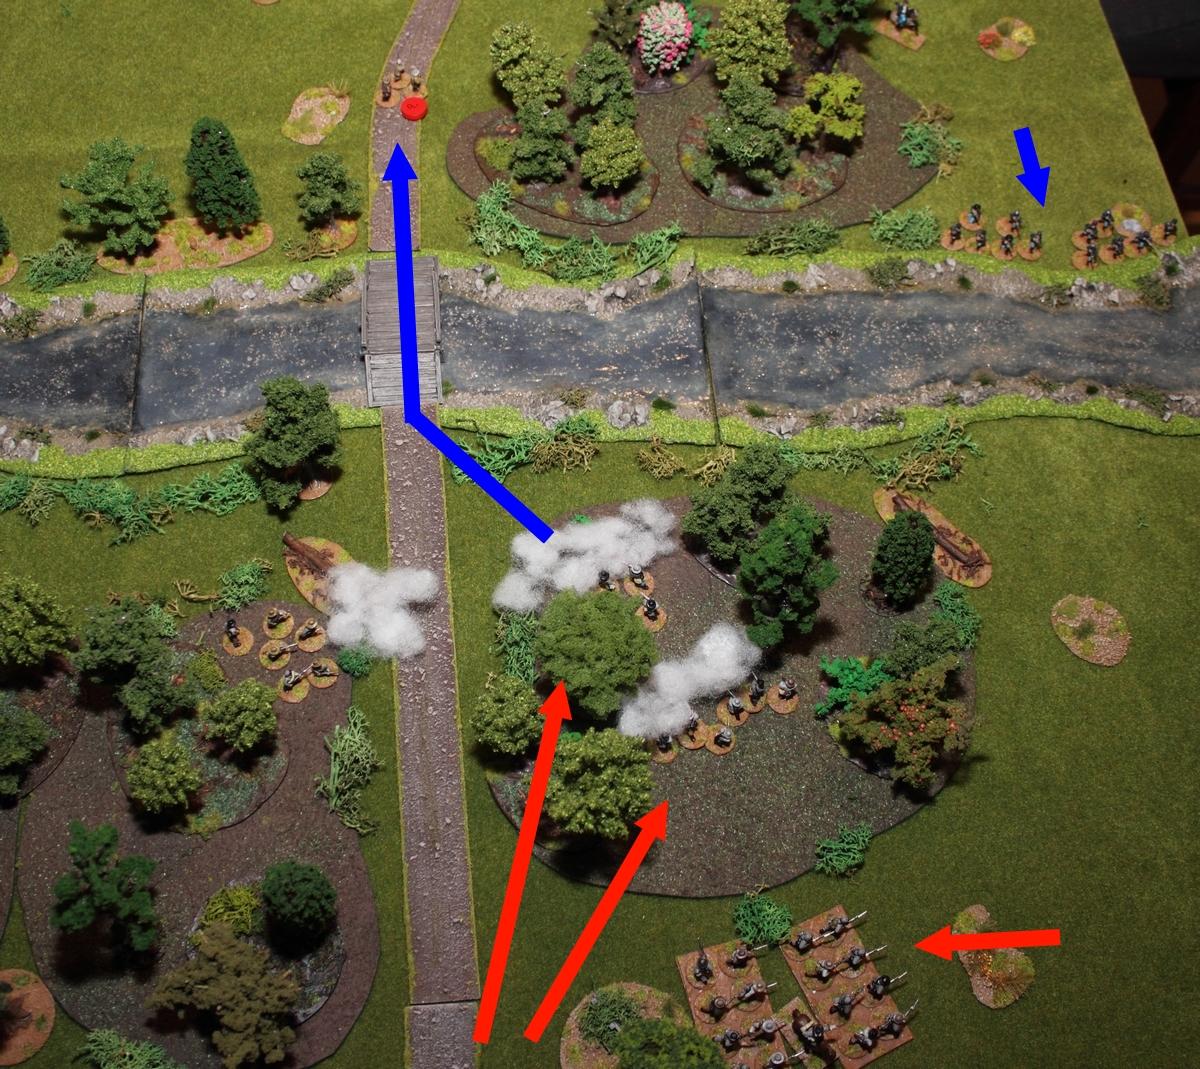
My infantry (lower right) moves back a bit to get out of the enemy fire zone. First I want to deal with the enemy skirmishers at the bridge. My own skirmishers, with the help of 2 groups of cavalry, whom I deploy dismounted, throw the Butternut Guerrillas back across the bridge. They break and flee. Very glad that this went so well
Problem is that the rest of the excellent Union cavalry (yeah, usually a weird adjective for Union cavalry, but it's 1863 and by then they'd learned a whole lot) would show up pretty soon. This forces me to decide: Either I seek confrontation with the chaps on my right flank and do a whole lot of damage to them (risking that I get whooped in the process and cavalry in my back) or I dig in, wait and see and then try to delay the whole enemy force with as little casualties as possible until the Confederate army detachment cathes up to them and I win (risking having to face the whole enemy force at once).
I decide to do the former and try to get everything I got at the bridge (1x slightly damaged skirmishers, 2x dismounted cavalry using a wide array of shooters, choppers, and things in between) across the river. My plan is to eventually fire at the enemy from the flank and behind.

In the beginning this doesn't go all that well, especially as I try to have my guys unload their guns as soon as they're on the bridge already. My cavalry just isn't good at shootin' them things that's all far 'way like and my skirmishers prefer to just run forward into cover.
The Yankee cavalry crosses the river. This of course puts pressure on me and hinders my line infantry to ever deploy in cover at the river bank. On the other hand thus they make it easier for my skirmishers and cavalry to get into the back of the enemy formation. But mainly it sucks for my infantry.
Still, I have to get some casualties and shock on the enemy cavalry groups quickly, so I have my infantry get out into the open and form up into line formation. As they do so the Yankees start unloading their carbines. And they just. Won't. Stop. There's nothing worse than having one's concerns about enemy firepower confirmed.
The two foremost of my infantry groups receive a few salvos at short distance. Once they can take this (even though one of the groups has to fall back a bit), but two or three times would see my formation erode quickly. Major James de Brown does his best to keep the troops together and into a firing line.
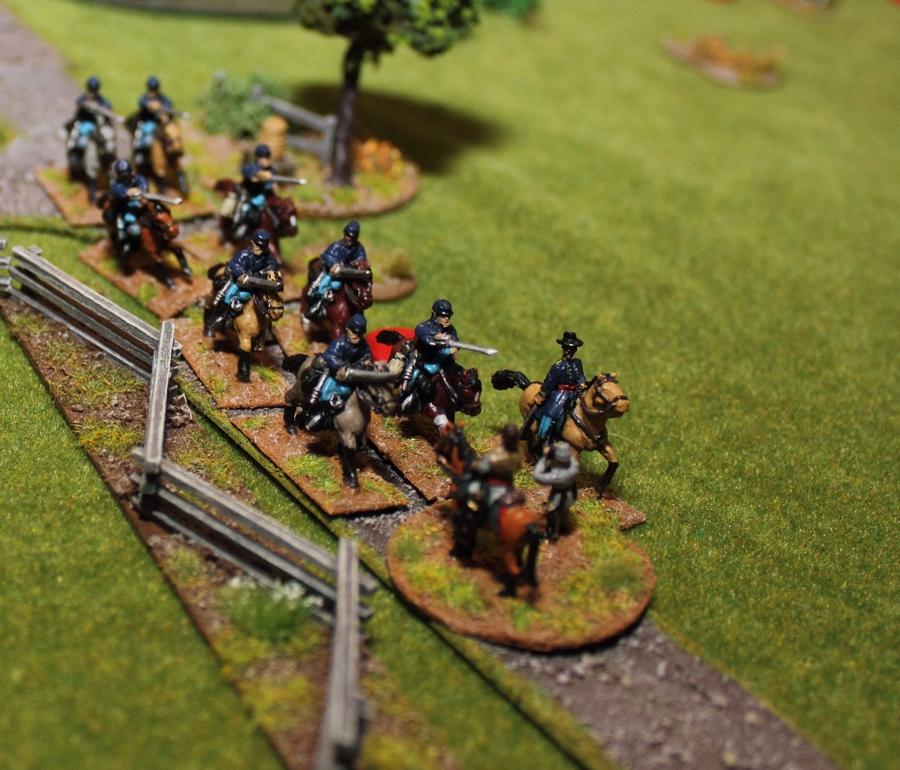
Meanwhile my cavalry and skirmishers advance pretty well, as Union reinforcements (2 more groups of cavalry and the Woodruff gun, limbered up) arrive.
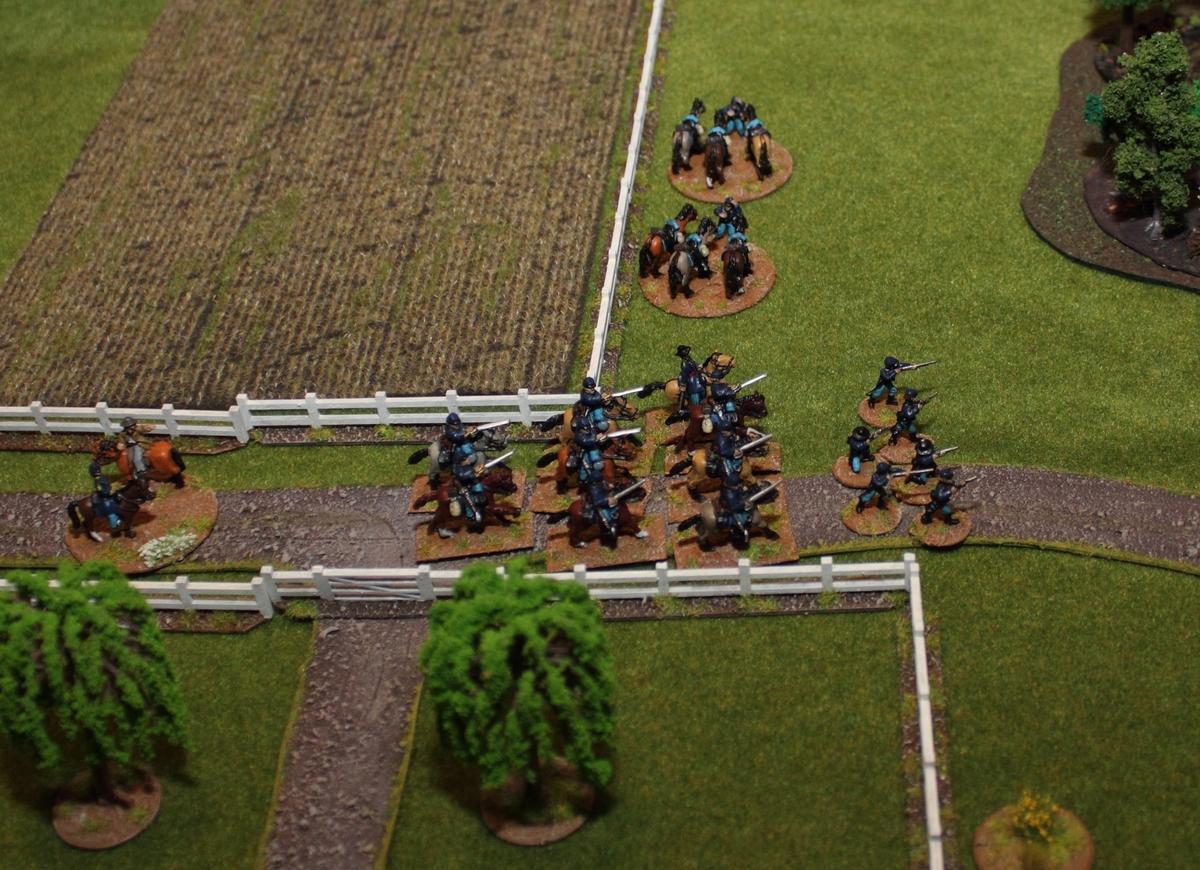
The first group of cavalry deploy dismounted, the second group stay in their saddles. While forming up for battle there's a mishap - one of the STOLEN horses isn't quite used to frontline service yet or just tired, there's a collision, and the leader of the formation, Col.Edward Prince, is tossed off his horse. his group wouldn't do anything for another phase. Same with the gun team, who follow them. Phew.
For me this is another point at which I have to make a decision - do I stick to my plan or should I have my skirmishers and cavalry turn tail and get back across the river? For now my skirmishers are covering the advance of my cavalry, but they'd have a really hard time to withstand the Union cavalry for any amount of time. And sacrificing troops like that is potentially very, very costly in Sharp Practice in terms of Force Morale. In larger battles you can afford that and sometimes it may be required, but in what Sharp Practice depicts the men on the ground notce if 100m further down the road a full group of comrades is sent to their death.
Speaking of which - I just let the cavalry advance toward the enemy. The skirmishers retreat back across the bridge back to their initial starting point. And then my cavalry managed to do something remarkable - they know that firing their array of weapons doesn't help much, so instead they rush down the river bank as fast as they can to get directly into the back of the enemy. On their way they happen across the leader of the enemy formation who had stayed back at this side of the river!
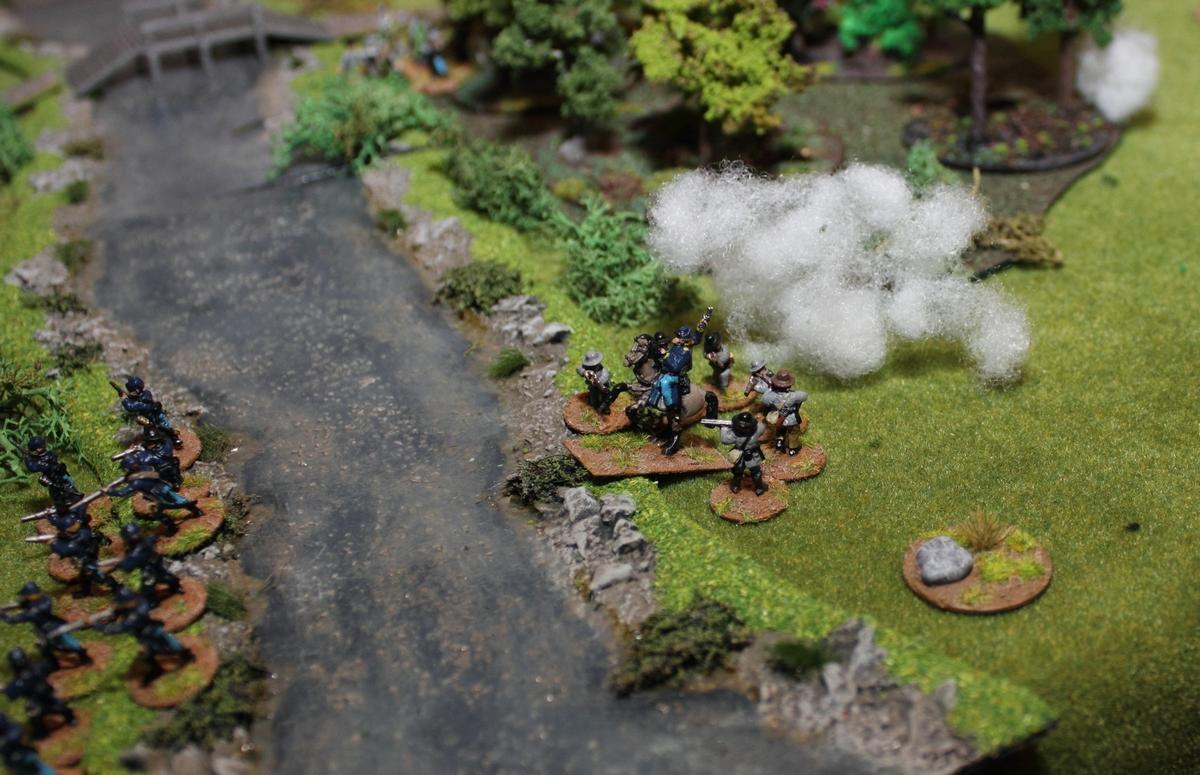
Lt.Styles is quickly overwhelmed and taken prisoner. A blow to my opponent's plans, but now it's his time to act. The dismounted cavalry group advances to my right to remove my cavalry from the back of their pals. To my great relief their carbine salvos are less effective than the first few.
Col.Prince, back on his horse and dusted off leads his group towards the bridge at full speed, just moments after my skirmishers had retreated the same way.
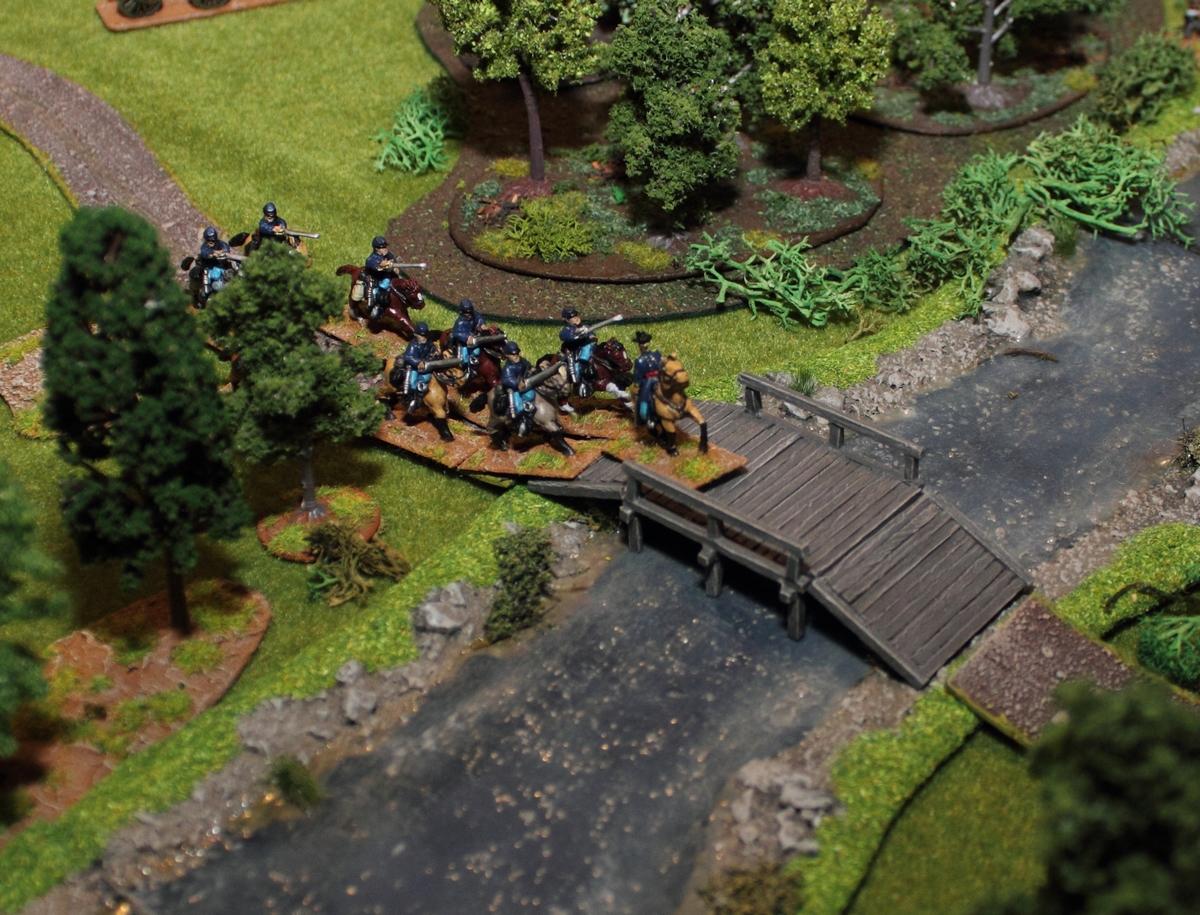
In the meantime my infantry had managed to form into a remarkably neat line, presented and fired textbook salvo into the enemy cavalry at the river bank.
The enemy cavalry is in a bad position now, with the infantry line to the front and the cavalry to their back. My cavalry is so close to the enemy now that they can even use their revolvers and actually give some more effecive fire into the backs of the enemy cavalry, several of whom get taken prisoner. Behind them the Union aid proceeds sluggishly as Col.Smith is overworked trying to get the dismounted cavalry and the gun crew to the frontline at once.
In a very cavalry-like move, and ignoring my skirmishers' fire, the mounted group rushes down the road and takes my deployment point.
The further plan of course is to turn around and be a pain in the backside of my infantry, but it's too late. Things at the river are decided at this point (at least at my river bank) and my infantry turns around to meet the cavalry. But at this point Union Force Morale is down to 1 while mine's sitting at 7.
An overview of the last phases of the game:
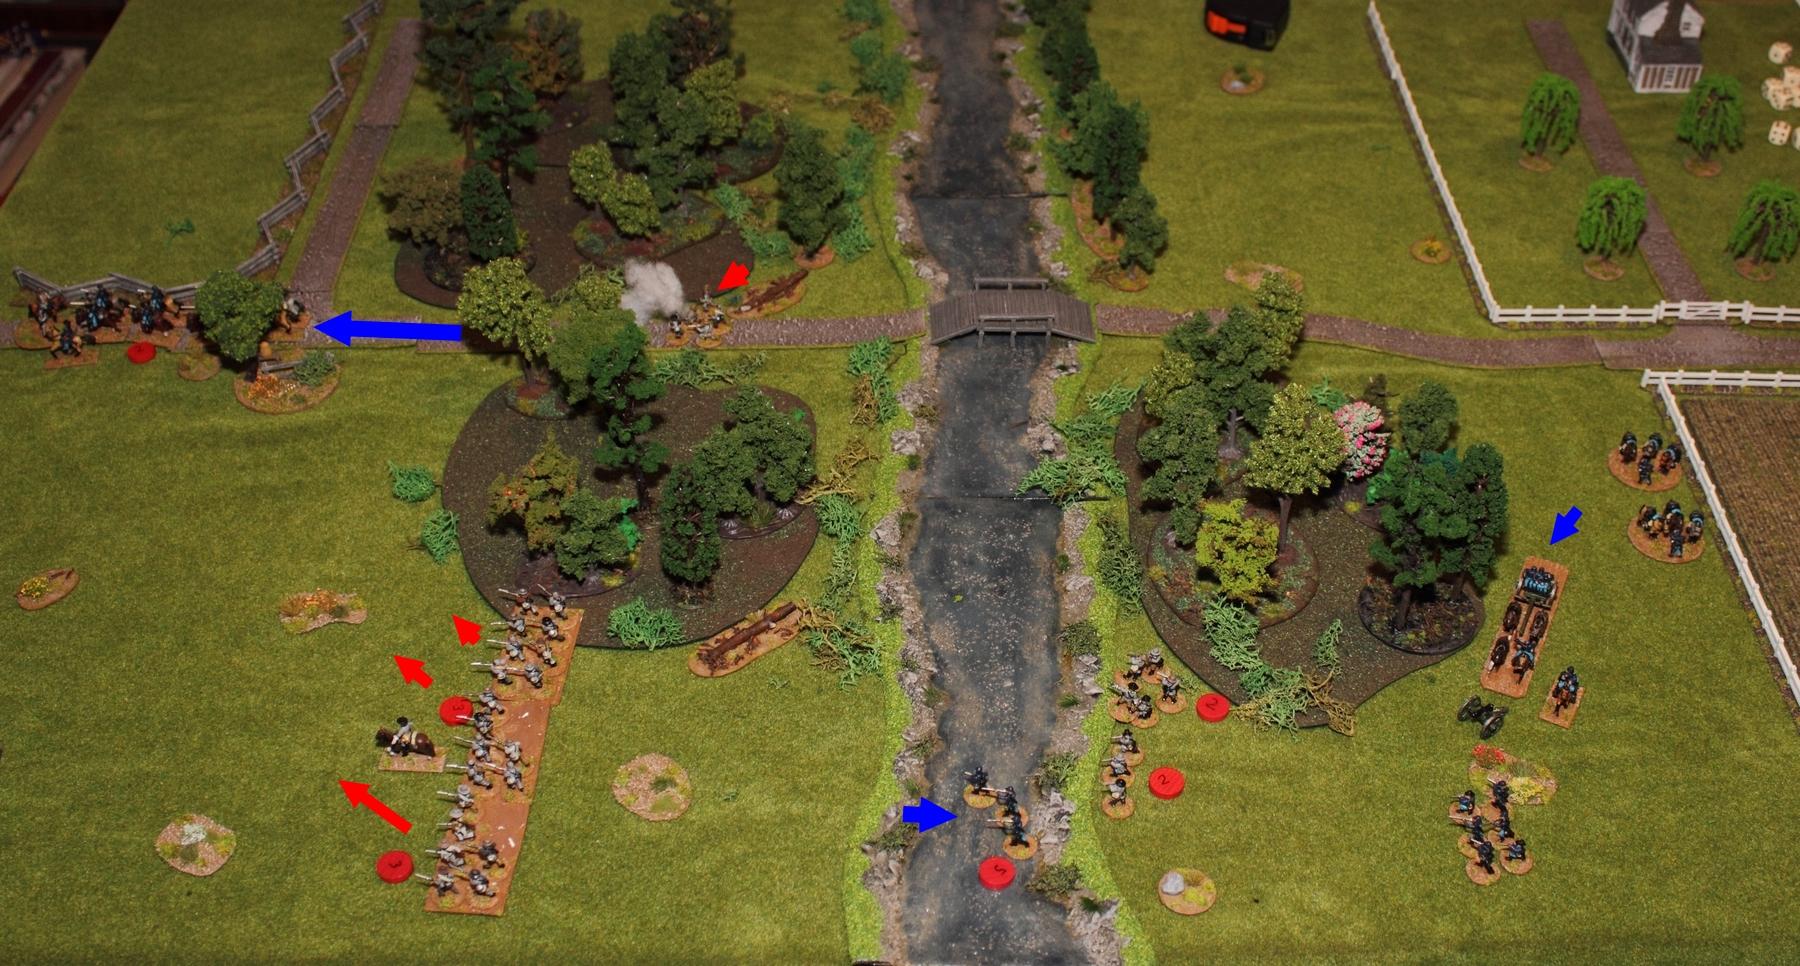
In the left you can see Yankee cavalry taking my Deployment Point. Skirmishers and infantry are turning to fire at them. My cavalry, also already slightly battered, but the main part of "casualties" left battle to guard prisoners. In the right you can see the Woodruff Gun which just got limbered off. The group of dismounted cavalry unfortunately didn't have a chance to have much of an impact on the game.
A Win for the
Confederaceh.
DebriefingThat went well. With a good dose of luck. Cpt.Shandy's plan was sound, but it took the second batch of troops too long to arrive. My decision to send the light troops over the bridge asap was a gamble rather than a gambit That one could have had quite different results just as well if a.) Union cavalry groups 3&4 (plus gun) had mobilized quicker, b.) my line infantry' formation and firing hadn't been so good, c.) my cavalry'd been not as quick on their feet, d.) the Union officer'd gotten away. And that's just the possible problems I can think of off the top of my head. In the end Union troops at my right flank was pretty much paralysed, with poor old Cpt.Smith trying to organize various types and bodies of troops.
That's the thing - losing leaders/officers in Sharp Practice makes things much harder, because on their own troops get all 'sticky' and pretty unwilling to do anything but (sensibly) staying put, keeping their heads down and fire occasionally in the enemy's general direction.
As always a very fun game. Thanks to the ever enthusiasig and patient Cpt.Shandy.

And of course thank you for reading! Hope you enjoyed the battle report.
Speaking of whom - here's his report of the whole affair:
https://wargamingraft.wordpress.com/


 Welcome, Guest. Please
  April 19, 2024, 08:28:32 PM


