Thanks for the kind comments. These were a lot fun to build and I used the following steps:
Making the bases
1) Draw out the sections on the material you will use for the bases. I used a 2ft x 4ft sheet of hardboard that has a blackboard on one side. I've found the blackboard version of hardboard resists warping and the blackboard side also resists grabbing any material on your table top. These are roughly $10.00 US for a 2x4 sheet

2) Cut the sections out with a jig saw and then bevel the sides with a dremel the mounts a sanding disk. This is the most tedious step of the project so I suggest you do a large number of these at once. It also creates a great deal of harmful dust so have a way to deal with the dust (I clamp the hose of my shop vac to my workbench). You should also wear a respirator as the fibers are not all the friendly to one's lungs.
3) Add some height variation to the bases by glueing some EPS foam and sanding it smooth. This is an optional step but I thing it adds some visual appeal and allows for some customization. Again wear the respirator when sanding EPS.
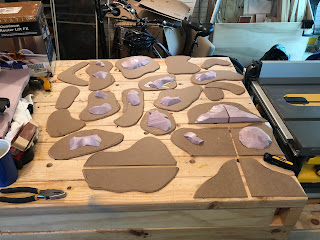
4) The last step in making the bases is to texture them - I like to use a mixture of flexible tile grout and white glue - roughly 3/4 tile grout, 1/4 white glue. I get a pre-mixed version of tile grout thats already colored (earth tone). Put a thin layer of the grout/glue mix on and let the bases dry for 24 hours. The result will be a rock hard covering that has a very nice texture. Once the tile grout has dried, I then painted each section a light brown.

Plants
5) I sourced most of my plants from a trip to Michaels, which is a chain of art supply stores in the states. Going to a Michaels can be a bit bewildering but there is a huge selection of plastic plants. Take your time looking at the plants and remember your looking for things you can take apart and use for plants. I sourced some model railroad scale palm trees from Amazon that look good and are are cheap - $8.00 US for 15. Lastly, I found some scale bamboo on Amazon for $12.00 for 100 stalks. Lastly, I used some left over Noch deciduous trees also just for variation. Remember that Amazon Prime is your friend when making terrain!
6) Cut up your plants into the sizes you want to use - I ended up with 6 different types plus the plan and deciders trees. I put them all in separate piles and then attached them with a hot glue gun. This part was a lot of fun and I had an unpainted figure on hand to use to make sure I kept the spacing wide enough for figures to move through.

One thing I do recommend is that you make up a test piece before working on the whole lot.
7) once all the plants are attached. I used some ground foam to cover the bases. These were glued in place by covering the base with matte medium, taking care to real cover the exposed hot glue and then putting on the ground cover. I the sprayed a little "wet water" - water with a drop of dish soap and then hit it with a mixture of matt medium and water. Set aside to dry and it will be well fixed.
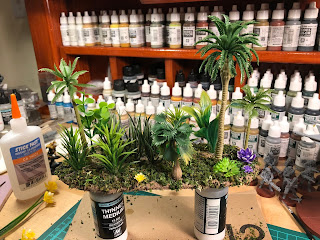
Jungle floors have a lot of materials scattered about (leaves, branches etc) - you can either do this in steps or cheat like I did and used a pre-mixed material. Scenic Express has a line of "forrest floor" materials and I had a bag of their Adirondack blend:
http://www.sceneryexpress.com/GREEN-ADIRONDACK-BLEND-32oz/productinfo/EX897B/.
I'm pretty sure this is just what they sweep off the factory floor and blend together but it worked for me.

the last step is optional, but I decided to add some color variation other than greens to the sections and was able to use some of the flowering tufts I've picked up along the way.

In full disclosure, I "stole" almost all of these steps from a series of jungle terrain videos on the "Terrain Tutor" you tube channel. If you really want to make this type of terrain take some time to watch the videos. Here's a link:


 Welcome, Guest. Please
  April 27, 2024, 05:36:43 PM
