*
Welcome, Guest. Please login or register.
April 16, 2024, 03:04:32 PM

Login with username, password and session length

Donate

We Appreciate Your Support

Members
Stats
  • Total Posts: 1689290
  • Total Topics: 118270
  • Online Today: 605
  • Online Ever: 2235
  • (October 29, 2023, 12:32:45 AM)
Users Online

Recent

Author Topic: More styrofoam adventures, and balsa too!  (Read 1995 times)

Offline PhilB

  • Scientist
  • Posts: 431
    • A Dragontooth Grognard
More styrofoam adventures, and balsa too!
« on: January 19, 2019, 11:16:29 AM »
Since my earlier post on Thenamelessdead's styrofoam thread, I've done a few more bits with carved styrofoam, the high-density kind. If you want details, it's gotta be high-density foam, and I've had some success with a couple recent projects.

Over on the fantasy boards I posted a thread on scratchbuilding a small viking ship, and it's the foam core that really made the ship model possible. Using the plastic rowboat from the Warhammer Laketown kit as a model, I traced the bow and the stern waterline outline of the hull onto polystyrene, then drew in connecting curves to  reach the desired size.


After carving off bits here and there to try to make symmetrical sides, and dropping the center section of the deck a bit, I was ready for some balsa sheets to finish out the project. In the end, no foam is visible (except for a wee bit under the fore and aft decks) but it was the key to succeeding this boat project.

Where I find foam to really excell is when carved to a specific visible function, like the two chimneys in my latest half-timbered house kitbash project.


Here you can see one carved chimney after a base coat of black craft paint and PVA glue (for sturdiness) and a second one just after the initial carving phase. It's really quick to make acceptable-looking brickwork. Not as random and organic-looking as the guys who use individual foam bricks and mortar them with plaster, but faster and cleaner for small projects like this.


Here you can see the second fireplace test fit into the house interior. I needed to see just where it would sit so as to paint the proper space on the wall black, since the chimney is kind of a partial trompe-l'oeil, being only half-depth and having no back.


Here you can see both the ground floor and upper floor chimneys painted and glued in place, ready for some logs, chimney tools and the like, as in my previous project (see 3rd pic).

Carving foam is really quick and easy, but I'd be very interested in any tips or pointers from you folks about better ways to work with it. One problem I had is with glue. Fitting the carved and painted chimneys into the house interiors worked fine with ordinary PVA, but getting curved balsa to adhere to the foam core of a boat model was a real chore, and the PVA was scarcely up to the job. I'm worried that some glues will be too aggressive for foam, but I need to find something with more adhesive power for difficult projects like that one.
« Last Edit: February 03, 2019, 06:28:48 PM by PhilB »

Offline Borderguy190

  • Bookworm
  • Posts: 79
Re: More styrofoam adventures (chimneys, viking ship)
« Reply #1 on: January 29, 2019, 12:40:58 AM »
As for a different glue, could you coat the under foam with PVA, let it dry, then use a rubber cement type glue? The PVA coating would protect the foam from the solvents in the cement. If you coated the back of the balsa wood, once the two were dry, sticking it together should be a breeze. Should be. Other wise i would use wood glue PVA , tacky glue, or mod podge (more PVA, less water in all) and lots of rubber bands to hold the balsa in place.

Offline Vagabond

  • Mastermind
  • Posts: 1624
    • Vagabond's Wargaming Blog
Re: More styrofoam adventures (chimneys, viking ship)
« Reply #2 on: January 29, 2019, 07:25:46 PM »
These are looking very good.

Re the glue, UHU - POR is an expanded polystyrene glue and will do styrofoam, it's in a tube similar the normal contact adhesives like evostic that are not suitable for polystyrene.

I've used PVA with cocktail sticks holding two sections together - it worked but is no where near as good as this stuff.

Offline PhilB

  • Scientist
  • Posts: 431
    • A Dragontooth Grognard
Re: More styrofoam adventures, and balsa too!
« Reply #3 on: February 03, 2019, 07:02:58 PM »
Thanks so much for the glue suggestions. My second boatbuilding project is on hold, and this last week I've been finishing my third half-timbered house, the second kitbashed from a Tabletop Basement kit. It's almost finished, but I couldn't wait any longer to share photos.

These Tabletop Basement resin kits are a pain to prepare, since the casting quality on the backs leaves a lot to be desired. But once prepared, they do a nice job, even if their layout is very standard. My kitbashing efforts included shortening the ground floor lateral walls to create an overhang on the front (as many half-timbered houses have), to make the door openable and, of course, to do a fully detailed interior. I'm particularly happy with the way the furniture turned out. But first, some pics of the whole building.


Here is the front facade, you can't really see the overhang from this angle, but IMHO it really improved the look of the house. The door is slightly ajar (held in place by pins set in the the floor and door jamb). The roof still needs some work, maybe some moss and lichen.


Here's the back, with a lot of climbing ivy, a balsa doorway to the basement on an angled base I textured from dense foam, with help from a stone-patterned roller from GreenStuff World. Can't see much of it, but these texture rollers do a wonderful job on foam. There's also a chopping stump and a scratchbuilt shed protecting a woodpile (short bits of branches quartered with a chisel, of all things). And when you lift off the roof...


I added a plank floor (balsa) for the attic, including a removable hatch. I don't think the beds are really appropriate for this dark attic, but I just had to show them off.


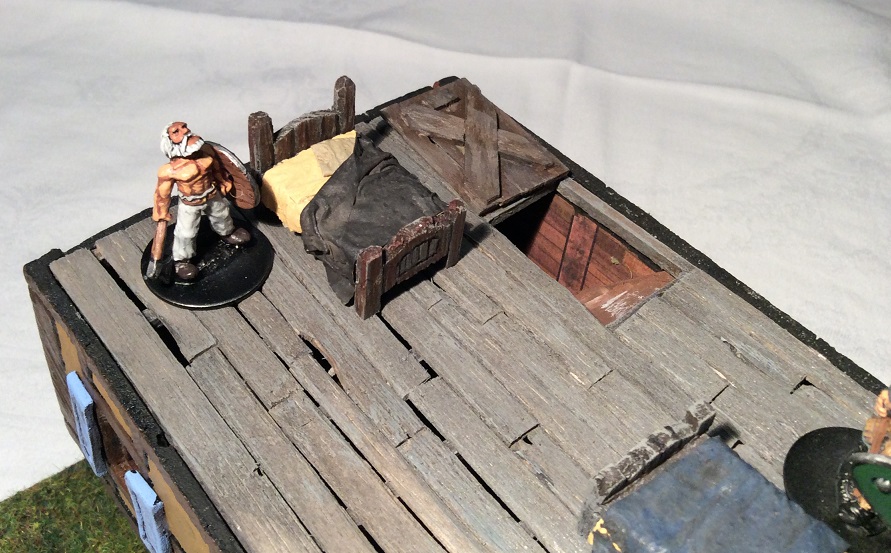
The bed is carved balsa (carved to shape after roughing up with a wire brush) and the sheets, covers and pillows are from a kleenex, cut to shape, then drenched in a mixture of craft paint and PVA. Took a whole day to dry!


Removing the plank attic floor, you can see the upper floor with another bed (made a batch of three!), as well as a balsa table, benches and chairs. Not so happy with the clairs, but they'll do. From the other side:


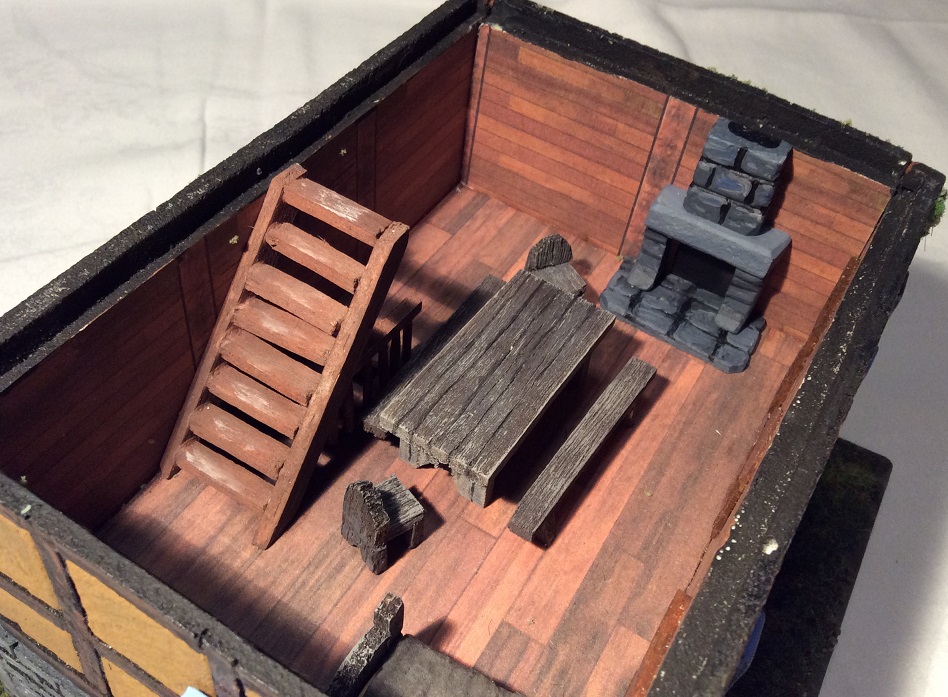
You can see the foam fireplace from previous pics. Still haven't tarted up the fireplace with logs and a fire, unlike the ground floor...


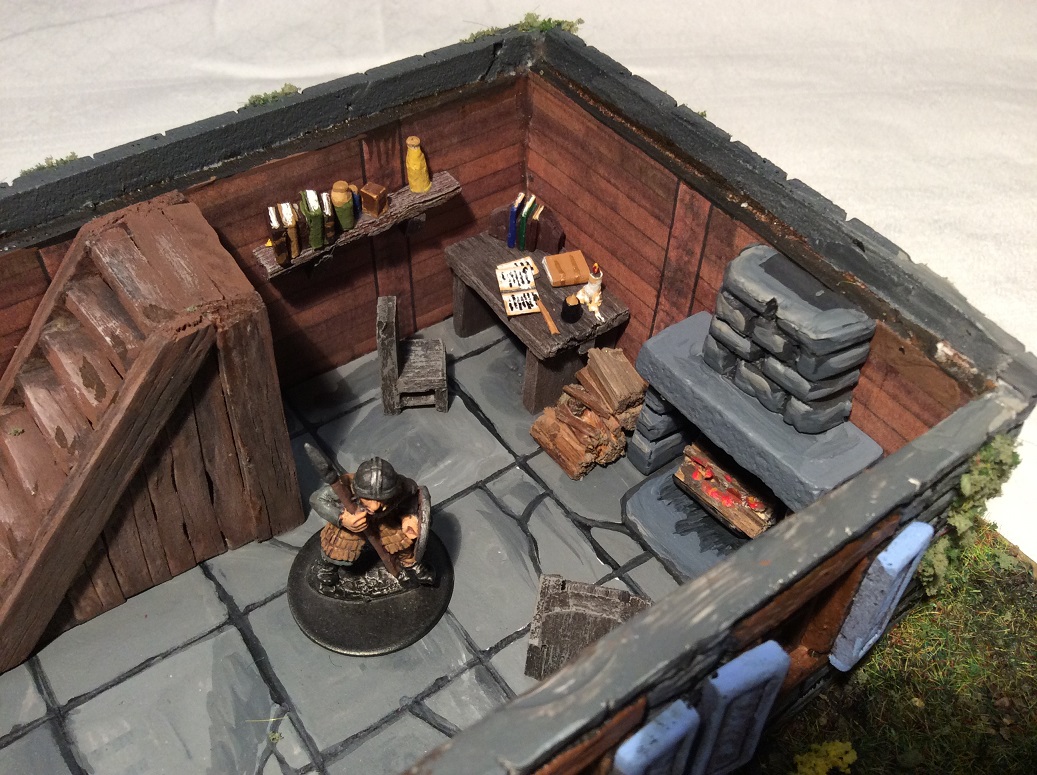
This is the part I'm really proud of. The foam-carved fireplace has a burning pile of logs, a stack of wood (from tree branches) and a wizard's desk, complete with candle (the melted wax is from a blob of gel superglue) an inkwell (sculpted from a barbecue skewer) a couple open books (the writing is from a fine-tipped pen) and a pen (sculpted from a toothpick) and some more books held by balsa bookends (books cut from medium cardstock - bank calendars). Above the desk you can see a shelf with more books and some potion bottles, as well as a mysterious gold-bound box. From the other side...


You can see the bookcase (built from balsa) filled with books that took me ages to prepare and paint. Before cutting the individual books from a strip of cardstock, I sanded one edge roundish, for the binding, cut them to size, glued together groups of 4-6 books, and then painted them. Left a few books solo, so as to leave them flat or leaning against the piles. And the sharp-eyed will see a skull from the GW box of skulls I picked up. So handy, when you need a skull!

This is my fourth building in the village project I started last spring. There's one kitbashed GW/Citadel Laketown house, one scratchbuilt half-timbered house and now two kitbashed Tabletown Basement houses, all with playable interiors. Once my Pathfinder players get off this (not entirely) deserted island, I should be ready for some village intrigue games. The preparation time is huge, but I'm having fun, and I get to show off my work here.
« Last Edit: February 03, 2019, 07:08:41 PM by PhilB »

Offline Malamute

  • Prince of Darkness
  • Supporting Adventurer
  • Elder God
  • *
  • Posts: 19320
    • Boot Hill Miniatures
Re: More styrofoam adventures, and balsa too!
« Reply #4 on: February 04, 2019, 08:31:50 AM »
Lovely stuff. ;D
"These creatures do not die like the bee after the first sting, but go on age after age, feeding on the blood of the living"  - Abraham Van Helsing

Offline Borderguy190

  • Bookworm
  • Posts: 79
Re: More styrofoam adventures, and balsa too!
« Reply #5 on: February 05, 2019, 11:17:58 PM »
So much detail! Everything looks lovely. Great stuff!