*
Welcome, Guest. Please login or register.
April 25, 2024, 12:44:53 PM

Login with username, password and session length

Donate

We Appreciate Your Support

Recent

Author Topic: Urban Zombie board Thread: resurrection 2023!  (Read 173290 times)

Offline Commander Vyper

  • Galactic Brain
  • Posts: 8130
  • Remember Reach.
Urban Zombie board Thread: resurrection 2023!
« on: August 06, 2009, 06:28:30 PM »
And so the madness begins:

Ok so this isn’t my first venture into scenery building by any stretch of the imagination but it is my first go at building a self contained gaming ‘area’ rather than taking over the dining room table with hundreds of bits of individual pieces of scenery.

So why do this again?

Well I took a mate of mine to Salute this year, (he collects Timpo injection moulded toy soldiers and has always been a little interested in war gaming).

Al had a great time loved the ‘nightmare on frothstreet’ participation game and as a result when we got back home we spent most of the evening playing with a load of makeshift scenery from his toy sets and the few figures I brought with me.

Following on from that, I thought…

‘it would be fun to surprise him next time I come up with a full gaming table and figures wouldn't it?’

So that was my mission:

•   To create a modern urban gaming table.
•   To paint ALL my zombies in time for this game,
            (the total unpainted at this point stood at around 80!!).

So with 5 weeks to go I set to it.

Note: The zombie paintathon will be covered in a separate thread.

More to follow in a mo....


The Commander
« Last Edit: January 18, 2023, 10:32:13 PM by Commander Vyper »
Now water can flow....or water can crash...be water my friend.
Sifu Bruce Lee.


Offline Commander Vyper

  • Galactic Brain
  • Posts: 8130
  • Remember Reach.
The gaming area:

I wanted a gaming playing area that was reasonable compact, I wasn’t after a sprawling metropolis: I wanted a small, claustrophobic urban hell perfect for turf wars, swat takedowns and or course the impending zombie holocaust. :D

Anyway the table had to be:

1. Easy to store/flat pack away.
2. Modular: (ie able to swop the buildings and layouts around for maximum variation).
3. Robust: (As it would be travelling 260 miles to the south east for gaming on a reasonably regular basis).[/li][/list]


So then over to Homebase, (UK DIY centre and their wood department)I went for 7mm MDF, two boards 4 foot by 2 foot.

Once home I painted them with a dark grey poster paint ready to accept the road and pavement  layout. I thought that if I painted them first, any little edges where the roads weren’t flush would show up as brown mdf.

Then I moved onto the road layout…..

Again I wanted something that looked reasonable polished, without needing huge amounts of additional detail that could get damaged or damage the other board when stacked.

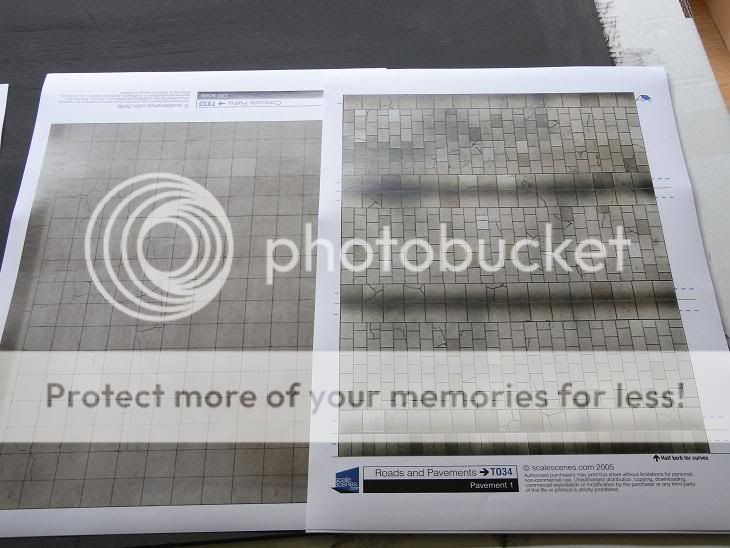
I looked at a number of options but eventually went with one of the downloadable pdf road and pavement sets from a railway scenics company called Scale scenes
http://www.scalescenes.com  and got the roads and pavements set (T034):


Concrete Ground (TX19)


Concrete Paths (TX33)


Tarmac (TX20)


Pavement (TX21)


Car park (TX22)


These were then downloaded and saved to disk for my visit to staples printers.

As they were created  in HO scale, I needed to scale them up so after a bit of playing around and some advice from a friend of mine I settled on between 135% & 144% enlargement, (I say that because I forgot the 135% when I went back a second time and ended up with straight  A4 to A3 upscale DOH!! All look ok together though).


So with the roads and pavements sourced my gaming area was starting to take shape:

Armed with printed sheets and gaming boards, I started to plan/sketch out the layout…but realised that without a decision on the buildings or the width of the pavements I was going to have some trouble in pulling it all together.

Pavements:

For the pavements I first looked at the new plasti-foam boards board that Jed over at Antenociti's Workshop http://www.barrule.com/workshop has started to carry, but didn’t go for it, (though don’t worry, loads of little bits and bobs from Jed found they’re way into the project!)

I decided that the pavements needed to be quite sturdy (as in keeping with the modular nature of the board, a number of them would need to be able to be swopped in and out) and I also needed to make some large open areas which again needed to be rigid and not warp.

So back to the DIY centre and over to the MDF again. I picked up two sheets of 3 mm 4 foot by 2 foot MDF, and got them to cut them down to strips for the pavements, and a number of  7”x7” & 14” x7” sections (you gotta love the first two cuts are free rule!!!) for building bases/open areas.

Being 3mm the MDF could be easily cut using a scalpel and metal ruler/set square to ensure good straight right angels.

The printed sections were then measured and cut with a scalpel. They were measured against the MDF the edges were prefolded before being glued and wrapped around the MDF strips. This gave a good clean curb edge.


Further curb stones were cut out and edging strips were added where necessary.

Repeat this process about 30 times and you have all the pavement sections you need. The trick is to be ultra sharp with your folding and clean with your adhesive. I used pritt-stick (giant stick) for the pavement and road sections, nice even application, no lumps and bumps.
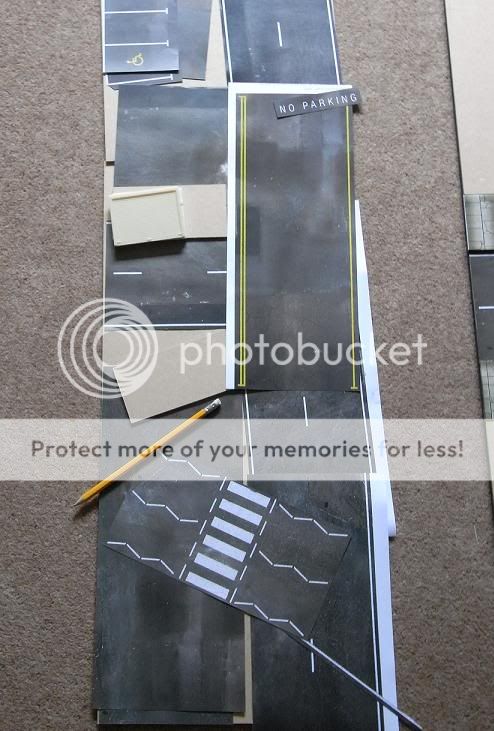
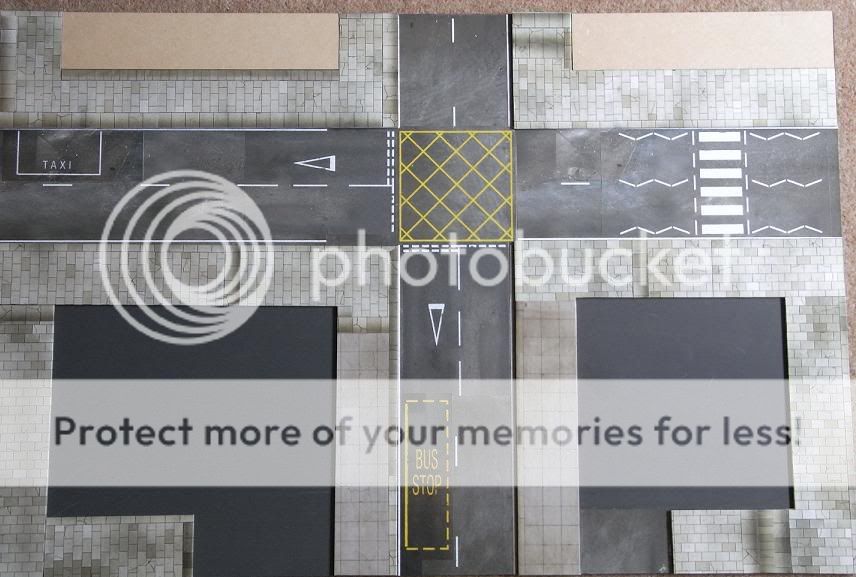
Roads:

The road and tarmac sections were easy to cut and stick in place.

I was also able to add details such as bus stops, taxi ranks, give ways and stop sections quite easily:


More to follow.

The Commander

« Last Edit: August 07, 2009, 11:33:13 AM by Commander Vyper »

Offline rob_alderman

  • Scatterbrained Genius
  • Posts: 3718
  • Dribbling wreck...
Those look excellent. I will follow this closely.

Offline Rabbitz

  • Mad Scientist
  • Posts: 642
    • Unit57
Stunning.   A thread to follow me thinks
Integrity is non negotiable

My little blog

www.unit57inminiature.blogspot.com.au

Offline Bako

  • Scatterbrained Genius
  • Posts: 2990
  • Loopy as a clock-work orange.
    • Hitting Dirtside
Looking interesting.

But while I've got the chance to remember this. What on Earth do those zig-zag white lines symbolize for you crazy British chaps? We never did figure that out when on a Euro-trip, but never did ask anyone... Remember a whole lane full of em'.
Everything is better with lizardmen.

Offline kidterminal

  • Mastermind
  • Posts: 1827
  • A rising star in the hierarchy of Hell.
    • Fends in Waistcoats
My friend and I having tried to plan out a cityscape without success. But you've shown us the way. I can't wait to see how it turns out.

Offline Captain Eaglehorn

  • Assistant
  • Posts: 44
    • My Blog
if you want some inspiration check out my gangsta thread [click my signature writing]
it has a urban board and anotrher one coming soon

Visit us in the future wars board! at leadadventureforum.com/index.php?topic=12091.0

Offline dodge

  • Scatterbrained Genius
  • Posts: 2266
Lovely gaming board

lots of quality in there.

Nice thumb ring  :D

Bako: those zig zags mean no waiting , stopping , parking or something like that. usually found befoe crossings, schools where parked cars would be a major problem

Offline digimortal

  • Librarian
  • Posts: 140
There is some good looking stuff on that scalescenes site as well as the free stuff.   Good find!

Offline Commander Vyper

  • Galactic Brain
  • Posts: 8130
  • Remember Reach.
Lovely gaming board

lots of quality in there.

Nice thumb ring  :D

Bako: those zig zags mean no waiting , stopping , parking or something like that. usually found befoe crossings, schools where parked cars would be a major problem


Cheers :D

white zig zags: no overtaking.
yellow box junction: no stopping.

if you want some inspiration check out my gangsta thread [click my signature writing]
it has a urban board and anotrher one coming soon

Yeah I've seen it thanks, but I know where I'm heading cheers ;)

More to follow later today.

Online Malamute

  • Prince of Darkness
  • Supporting Adventurer
  • Elder God
  • *
  • Posts: 19331
    • Boot Hill Miniatures
Great thread, looking forward to seeing how it comes together. :)
"These creatures do not die like the bee after the first sting, but go on age after age, feeding on the blood of the living"  - Abraham Van Helsing

Offline gamer Mac

  • Galactic Brain
  • Posts: 8213
Very good looking board, loads of ideas. Keep up the good work.
We will be watching 8)

Online Michi

  • Galactic Brain
  • Posts: 4166
  • Hoist the colours!
    • Tableterror
Great stuff, will mark this in the back of my head for further use...

Offline Commander Vyper

  • Galactic Brain
  • Posts: 8130
  • Remember Reach.
Quick update:

Keep off the grass:

I had a roll of scenic grass that had been laying around for ages, so I decided to make a few little park areas, again using the cut MDF strips I made sure that the grass was correctly positioned and glued to the strips. In order to make a tight fit, I lightly sanded the flock around the edges of the grass section so that it plugged into the surrounding pavement cleanly.


So with the first board completed in respect to the pavement and road system I then started to plan the second, though at the same time decided to start putting together the buildings, (my thought process was that if I completely ran out of time at least I've have one playable surface to work with.

Buildings:

So back to net trawling and research…. started to consider my options:

Scratch built:
      
Limited on time to take the detail to the level I wanted. I’d made a number of foam board buildings in the past and always liked how it worked as a material.

Resin fronts/buildings:   

very nice, some good ones out there but very expensive and no options  on really tall building. 
Printed card:looks very nice but not too durable.

At the same time as I was pulling my thoughts together, another LAFFer posted up his printed buildings which had a foamboard core.

So the decision was made: foamboard constructions clad in printed building sheets.

I looked at the scale scenes buildings and to be honest they were too complex for my gaming requirements (never totally happy with the rescaling for the buildings, you were always compromising in some one)  so I put those to one side and started looking at the other options.

I’d been looking at world works for quite some time now and on the recommendation of others went for the urban mayhem sets:

Mayhem downtown:


Mayhem Industrial:


Bits of Mayhem:


Mayhem Armoury:


These really are great packages and as they are designed for 28mm gaming I had no need to upscale or play around with them. Just click and print, (well again thanks to Staples high quality printing was needed...at a cost of course!!).

So with a massive stack (well almost a 'reem') of printed buildings, I then had to decide how this was going to play out.

I know I wanted a petrol station, (the flyover intro to Dead Rising kind of set that one in my mind). I wanted some tall buildings/apartments/wharehouses to snipe from and to land the chopper on, oh and some narrow alleyways. I also wanted some open areas.... just enough space for you to get complacent, hang around for too long and get cornered!

Subway: Eat fresh!

In the Mayhem packs there are some very nice little subway pieces, so again carefully cut the peices out, mounted on frosties cardboard, (they're Grrrrrrrreaatt for little bits of scenery) and scored the edges to give good clean folds:


Used as spawning points in the game.... you have to be completed mental to want to head down in the tube station at midnight (whoaoaoaoaooaoooooooo!).


More to follow...

The Commander


Online anevilgiraffe

  • Scatterbrained Genius
  • Posts: 2229
    • http://anevilgiraffe.blogspot.com/
great stuff mate...


just occured to me though, should you have giveways at a box junction?


Related Topics

  Subject / Started by Replies Last post
73 Replies
20412 Views
Last post November 08, 2010, 11:02:41 PM
by Hawkeye
3 Replies
2110 Views
Last post March 11, 2014, 01:20:27 PM
by Chris Abbey
2 Replies
1271 Views
Last post August 09, 2017, 03:26:16 PM
by CLT40K
67 Replies
16232 Views
Last post April 17, 2023, 10:59:22 AM
by Daeothar
0 Replies
476 Views
Last post January 16, 2023, 02:00:54 PM
by Wilgut Spleens