Thanks gents

Well, still waiting on a restock of figures from the casters
So heres a quick game report featuring Bloody Miniatures (plus one or two Bicorne figures, and a troop of horse - mainly TAG figures
) played using The Pikemans Lament (TPL).
The pastoral scene
1645, the village of Hambledon-cum-Knightley, occupied by Parliamentarian picquets, but about to be liberated (they hope) by the dashing Lady Lucinda Knightley and her men

For Parliament:
- Thomas Sheffields dismounted harquebusiers, who are holding a prayer meeting in the orchard (a veteran commanded shot unit in TPL terms)
- Nathaniel Crowes Forlorn Hope, sojourning outside the alehouse (a TPL forlorn hope - albeit with a reduced shooting range of 12, since theyre sword and pistol armed only)
For the King:
- Lady Lucinda Knightleys troop of horse, entering the north end of the lane near the Manor (aggressive elite gallopers)
- Knightleys Foot, also entering nearby ( an aggressive forlorn hope)
- Sir Christopher Quartons greencoats (also an aggressive forlorn hope) entering the south end of the lane by the pool.
The Royalists have a more men, but all hand-to-hand specialists no firearms.
They need to get up close and personal to drive the perfidious Roundheads from the village.
The Parliamentarians merely need to try to keep the Royalists at arms length and shoot them to pieces. Easy right?

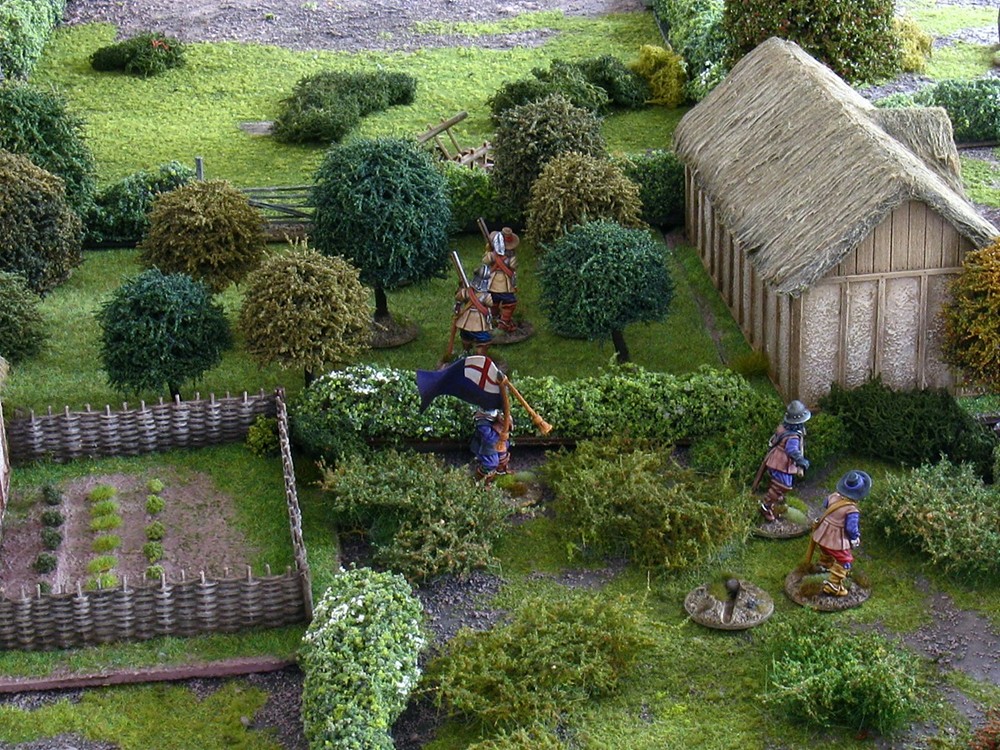
Crowes company loiter at the alehouse. In the background, Sheffields dismounted harquebusiers can be seen at their devotions in the orchard...

Quartons forlorn hope enters at the south end of the lane

Knightleys purple-coated horse and foot approach the Manor from the north and west

Thomas Sheffields harquebusiers move up to line the western hedge to the orchard, as they espy Knightleys forlorn hope approaching the pond

Having spotted Quartons greencoats hopping over the hedge from the lane, and skirting round the pool behind the church, Crowes Pistoleers depart the alehouse and move to the end of Church Close, ready to mount an ambuscade.

Aggressive gallopers should test to make a wild charge against an enemy within attack range, but the hedge means that they couldnt reach the harquebusiers (theyd have to move up to the hedge and stop, so arent in attack range as such. At least that's my reading of the rules... )
Lady Lucinda instead leads her cavaliers south down the lane, leaving her company of foot (temporarily taking cover behind a nearby cottage) to deal with the Roundhead harquebusiers

But the harquebusiers, being commanded shot, are now able to make a skirmish action (a half move and fire). Also - as commanded shot - they suffer no movement penalty for crossing rough ground (its a bramble patch)
Nor, as veterans, do they suffer the usual -1 for skirmish shooting
So all-in-all, pretty versatile. They give fire with their carbines

and successfully take down one of Lady Lucindas cavaliers.
With sky-high morale however, the troop of horse sail through the resultant morale check.

Quartons forlorn hope are also under fire - from Crowes pistoleers, who have crossed into the field in front of the barn.
As an aggressive forlorn hope, the greencoats already high stamina is further raised by the shelter of the fence, meaning they only take one casualty, despite some crack shooting (8 hits on 12 D6!) from the pistoleers. The greencoats easily pass their morale check.

As Lady Lucinda leads her cavaliers south down the lane, her foot rush towards the hedge, intending to assault the harquebusiers lurking in the bramble patch should the Royalists gain the initiative on the following turn, that is

Unfortunately for them, Parliament wins the initiative, and Sheffields harquebusiers make another successful skirmish move backwards this time, shooting and killing one of Knightleys forlorn hope. Once again though, Royalist morale holds firm.

Crowes pistoleers clamber over the hedge into Church Close
Quartons forlorn hope having sneaked around the back of the church

Now its the Royalists turn, and Knightleys forlorn hope jump into the bramble patch a risky move since they are now moving at half speed (only 3) in the rough, and cannot reach the harquebusiers. They must hope they win the initiative again on the next move! Who dares wins, Rodney!

Quartons forlorn hope charge into Crowes pistoleers, just as Lady Lucinda and her cavaliers come cantering into Church Close from the lane

In the bloody melee that ensues, the two parties lose two men each, but morale holds up all round. On a drawn combat, Quartons greencoats are obliged to retire half a move however, having failed to win their attack. Theyll be in trouble now, as at half strength theyll only be rolling half the amount of dice in their attacks.

Next turn. Parliament win the initiative, and Sheffields harquebusiers successfully activate and shoot, killing another of Knightleys forlorn hope their morale still holds however.

Crowes pistoleers give fire, and kill another of Quartons greencoats. They're down to just two. Still their morale does not crack!

Lady Lucinda now urges her gallopers at a lick down Church Close, bearing down on Crowes Pistoleers

In the bramble patch, her forlorn hope charge into Sheffields harquebusiers, who fail their activation role to evade
the dice Gods have deserted them in their hour of need!

This has a predictably dire result, because whilst very tricky to pin down, commanded shot are ultra-fragile. Despite the equalising effect of fighting in rough terrain, the dice continue to go against Parliament. They immediately lose four casualties against just one for Knightleys aggressive forlorn hope. The remaining harquebusiers fail their morale test, and promptly break in rout.

Ironically, despite having trounced and routed the harquebusiers, the Royalist forlorn hope also fail their morale test (having taken a casualty) and start to waver
Parliament wins the initiative on the next turn, and Crowes pistoleers rashly (and fatefully) decide to stand their ground and shoot, managing to take down another of Lady Lucindas cavaliers. Still not enough to dent their sky-high elite aggressive morale though.

Initiative passes back to the Royalists, Lady Lucinda has to immediately test for a wild charge, and duly smashes into Crowes pistoleers. In the ensuing one-sided encounter, the pistoleers lose two men, although managing to kill another horseman. They lose the combat however, their morale promptly cracks, and they too break and run.

Knightleys forlorn hope immediately pass their wavering morale test and set off through the orchard after the fleeing harquesbusiers (actually, having passed their test, theyre supposed to stand still, rally, and do nothing. But once a unit routs in TPL, theres no coming back - they just keep running until theyre off the table, so its somewhat academic as to whether the Royalists pursue or not. But it makes for a better picture 😊)

Similarly, since the remnants of Crowes pistoleers are now routing and effectively off. So theres little point in Lady Lucindas troop following up to deliver the coup de grace (as aggressive gallopers are technically obliged to). Nor in the residue of Quartons greencoats getting stuck in - much as theyd like to
And thats game over.
The Parliamentarians should really have hung back behind cover a lot more and used their firepower. (But that would have made for a rather longer game of cat and mouse
)

The casualty clearing station. This is why I like The Pikemans Lament fast, flavoursome and downright brutal.

The buildings, I should point out, are all by Oshiro Model Terrain, except the church, which was made by Steve 'Silent Invader' Marshall.
The wonderfully bucolic hedgerows are by Debris of War - highly recommended


 Welcome, Guest. Please
  April 19, 2024, 12:10:01 PM


