Hey every one,
I have been learning alot from this site, and I would say over 70% of what I am using for my guide over at Heroscapers.com I learned from you guys here these forums. Thank you!
I wanted to share one of the sections I am currently working on in my guide, its still a WIP as I keep learning new things and keep changing the guide, but I wanted to get some feed back from the pros ( you guys!!)
Any critizim is welcome, and any suggestions would be great!
Here is the first part of my guide, Materials used for converting a MB ship. I play a game called Heroscape, and I mention it a few times.
Materials[spoiler]
For each section of the ship you wish to change you will need materials to do so. Most obvious is after you chop off the pegs is replacing the deck.
Decking materials -
This is the biggest change you will do to your ship to convert it from a toy into a cool looking 28mm Wargaming / Heroscape terrain ship.
First the easy but more expensive options;
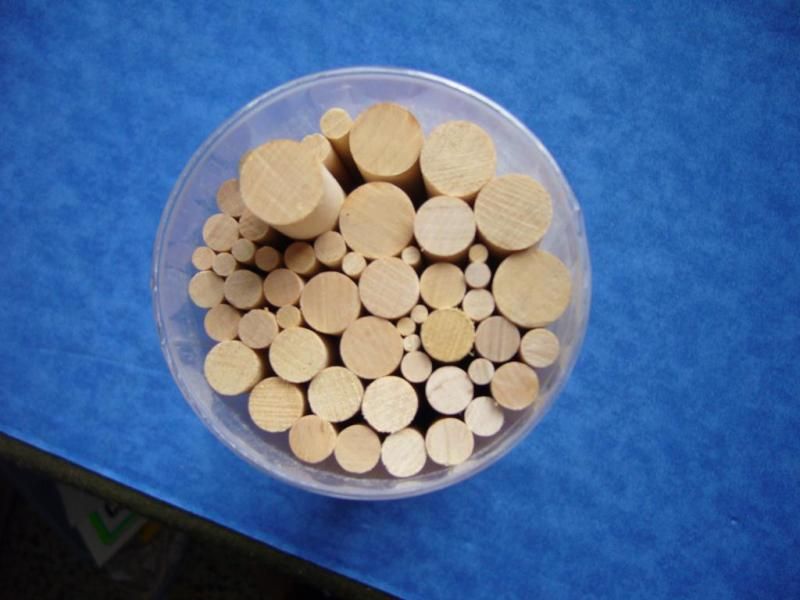
Plasticard Planking -
Works great but super expensive around $6-$8 per sheet, and you need anywhere from 1-4 sheets per ship. Choose the one with the planks about 1/4th an inch wide. I have not had a chance to see it up close but by the pictures alone it is not very impressive.

Wills plastic sheeting -
specifically SSMP201 'Planking' about $7 per pack of 4 sheets. I have only found it on UK sellers and it took close to a month to arrive. I thought the sheets would be the size of normal paper sheets like the plasticard but they are actualy quiet small, like the size of an envelope. Looks great and has really defined texture. This is what most people online I have seen use, its quick, looks great and really expensive as you need around 3-4 sheets per ship.

Also not as expensive you can use;
V grooved sheets
The plastic is slightly cheaper, and can be given some grain and texture by scrapping it a bit with a piece of sandpaper. ( choose the size that is 1/4th inch wide).
Sinewgrab over at
http://leadadventureforum.com was really helpfull and recommended
" .040 thick styrene plasticard available from one of my local hobby shops'
http://www.evergreenscalemodels.com/Sheets.htm#V-Groove Siding"
He used the sheets with .25" spacing off the .040 list on this webpage.

Or you can use real wood:
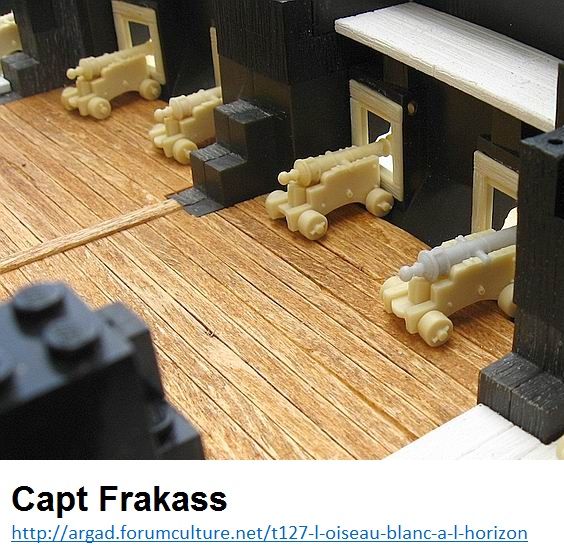
Another option is to buy sheets of thin and fragile balsa wood and cut it into really thin strips to make your planking. It is a little more work ( although less than the popsickle sticks / coffee stirers). But the wood finish looks amazing. In this picture brown ink was used to give it the finished effect.
This example is from a really cool guy over at
http://argad.forumculture.net, his user handle is Capt Frakass and he is teaching me how to imitate a few of his techniques. Also veryhelpfull and friendly guy. This is his Balsawood and brown Ink WIP.
Balsa Wood
It is very soft, whitish in colour, porous and just a very fragile wood. It also does not hold nails very well.

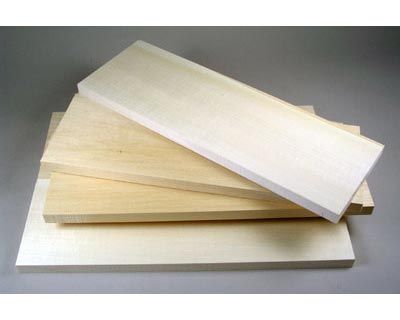
Basswood
An excellent all-around wood, readily available in hobby shops. White and very fine-grained. Easy to work with and bends freely, but too soft to turn.
You can either buy or make a small device to help you cut precise strips of carboard or balsa.
Here is the video on how to make your own DIY device;
Or you can buy one for $12 plus shipping
http://www.micromark.com/WOOD-STRIP-CUTTER,6625.html It also has a 30 second tutorial and I am thinking of buying one to test it out.
But what I recommend for you to use initialy is
Popsickle sticks!! or rather coffee stirrers.
7.5" or 5.5" Coffee stirrers.

Free at your local Starbucks but a whole box of them of about 10k will cost you $15 ( if your fiance wont let you keep raiding the local Starbucks that is...)
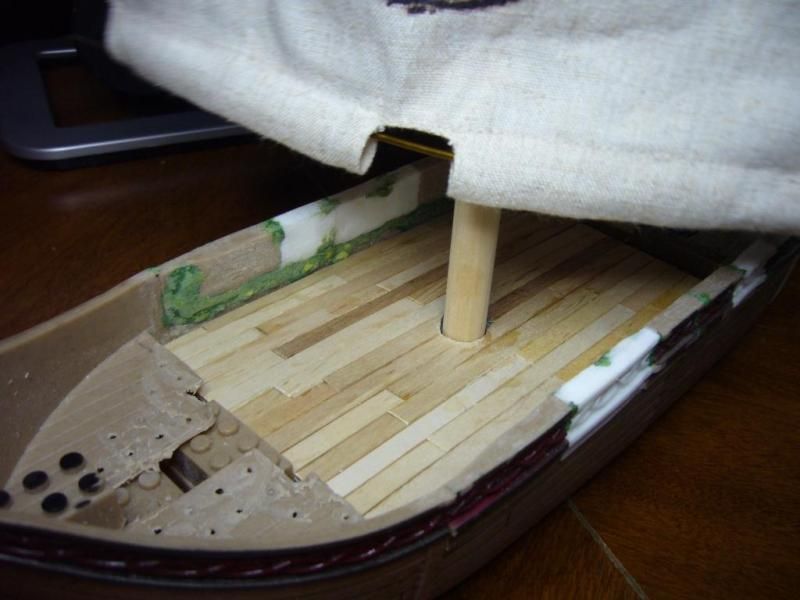
Popsickle sticks can be used for alot of other parts of the ship, like support under the deck and trimmings and decorations but the thinner coffee stirrers give a better scale for the planks under the 28mm figures. I also have a bunch of much wider Tongue depressors, also very cheap ( especialy when your a paramedic) that I use mostly to create supports under the deck with.
The trick when using these are not to get glue smeared on the top as it wont hold the paint as well and shows up very easily. I have not tried yet to paint with wood varnish but I will soon to see how it looks.
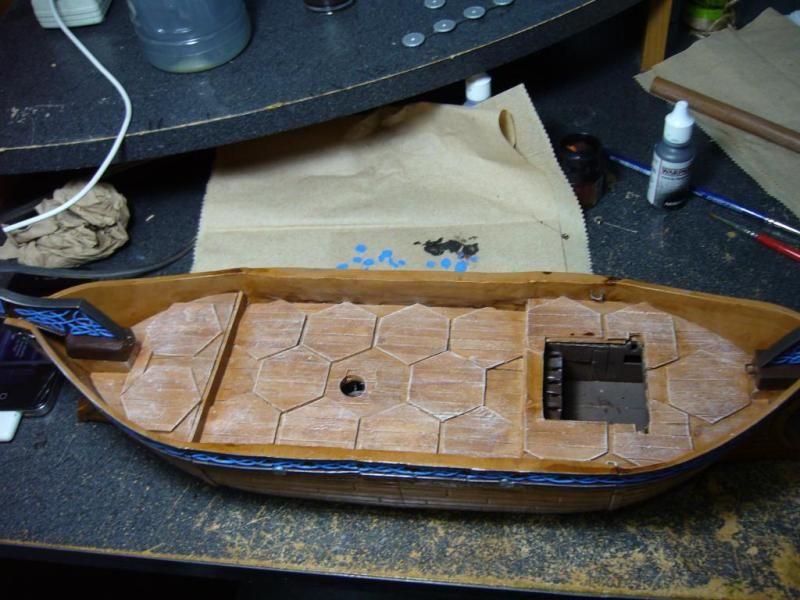
Here is an unpainted deck
This is coffee stirrers laid out in 2 layers, first was a solid deck and second was an attemp to make the hexes stand out. ( These hexes are used in the Heroscape game) This has been painted with light brown basecoat, brown ink wash and very light brown drybrush.
I am not very pleased with the result and might end up repainting a darker tone.
Also note;
Foam board is also used to fill out the space underneath the deck and heavy plasticard ( or substitutes) are used to give the deck firmness.
Plasticard - For building walls, decks, patching holes, building fore / stern castles
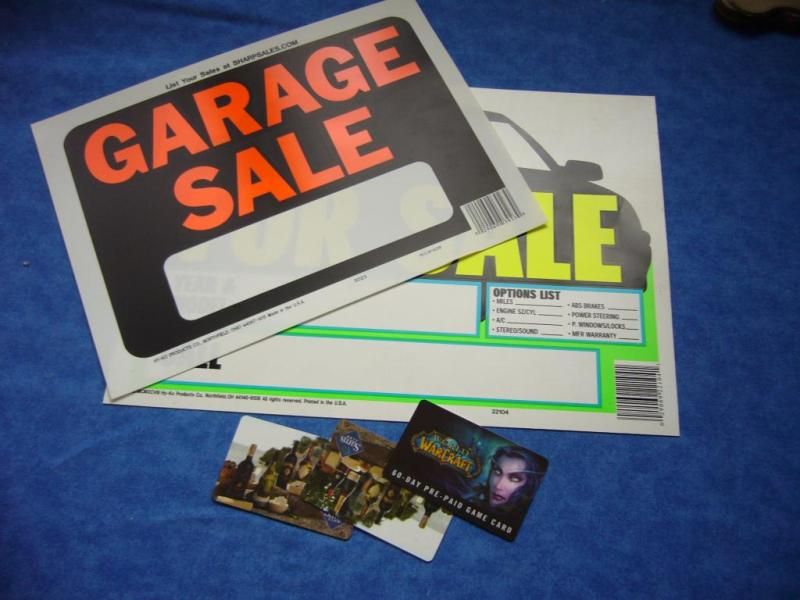
Plasticard are expensive sheets of plastic that come in different thickness. You will use a bunch of this stuff depending on how much customization you plan on doing on your ship. From building new rooms, installing walls, building a fore castle, patching holes in the deck to installing a first solid layer for your deck and then gluing on your planking or decking material to get a nice even look. You will need a couple of peices per ship but Plasticard is really expensive and you can find a lot of alternatives for a fraction of the price.
Plasticard can run you around $5 -$9 for just 3 sheets, and that will be used up pretty quick. You can go to any hardware store and buy a few signs for $1-$3 each. I suggest a few thin signs like the indoor EXIT signs and at least a couple larger really thick outdoor signs like HOUSE FOR SALE. Make sure you grab a few thick ones as you will use these sturdy sheets for your deck. Also, gift cards, and any plastic cards are usefull for odds and ends.
 Rigging and Decorations
 - Optional
Rigging isn't really necessary but looks good on certain ships.It probably isn't the best idea for a ship used in wargaming as it might get in the way. But a few ropes here and there can really bring a ship to life and add amazing detail with minimal work ( but a ton of knots!)
It's not easy to find a perfect thickness in string / cord to look the right size on your ship but you can play around with some cheap alternatives untill you find one you are happy with.
I found this string in walmart, it was priced at $2.50 but underneath the sticker said it was originaly only $1.
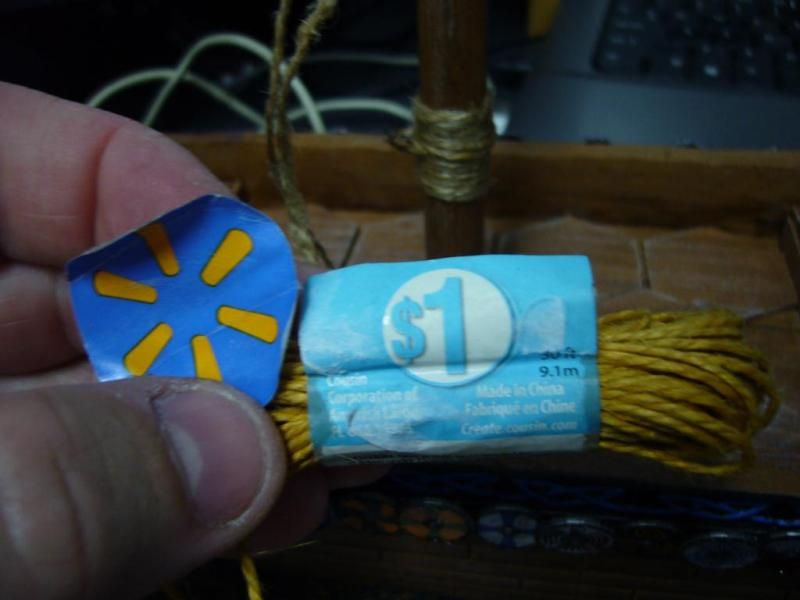
Also make sure you check Crotchet cotton threads as these come in a lot of different thickness and colors.
I found this good advice over at modelshipworld.com when some one asked about what thread or string to use on a ship.

Just remember, before you use any string or thread, tie a section to something heavy and let it hang overnight to stretch it out. If not, once you install your "rigging" on your ship it might start to sag over time forcing you to take it apart and tighten it up again.
I thought twine might work, the colors looked great but it was just too thick. Here is a comparison between twine and that cheap walmart cotton thread use for Crochet.

To get rid of the threads sticking out from the string at first I was using a lighter to burn them off , really bringing my viking ship close to becoming a funeral ship before it was done, but then I read on Modelshipworld.com that normal people just rub some beeswax lightly over the line to smooth out the threads. ( Im guessing its the stuff people use to wax their surfboards, skate boards or make dreadlocks? I honestly dont know, just guessing here)
Here is the twine I used ( and later replaced) before and after burning, should have used the bee'swax I use for my dreadlocks instead.
 Mast , Bowsprites and yards
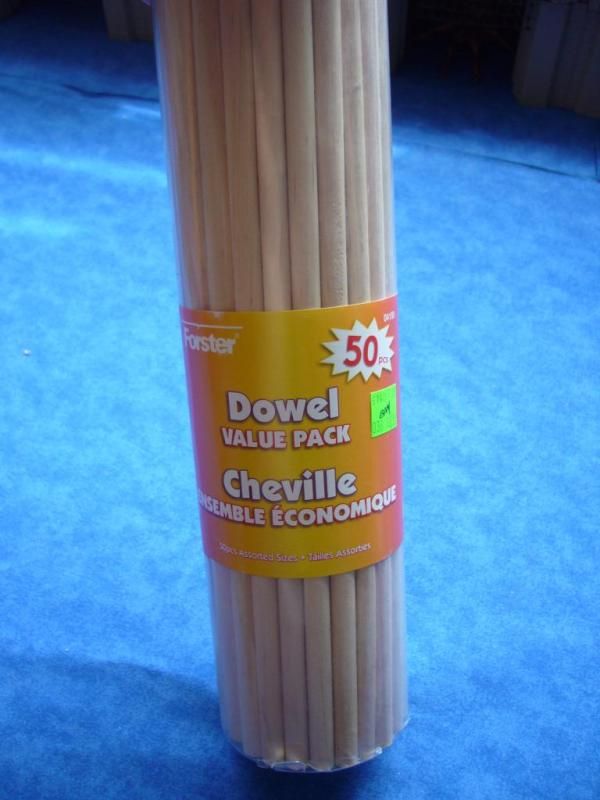
 If your lucky and you buy a ship that has all its parts then you might not have to worry about replacing the mast or other parts on your ship. If you wish to change the layout of the mast or wish to add more to it, dowels are the way to go. You can buy a bag of assorted sizes for around $4 at walmart or you can buy a larger set for around $9 in a hobby store.
When using dowels to replace mast and yards I wanted to give them texture so I just slid the blade of my hacksaw across them several times, at first I was timid with it then I found out the deeper you carved the lines in the better. ( Also the better the chances of causing some nice bodily harm, since when is a hobby supposed to be so dangerous???)
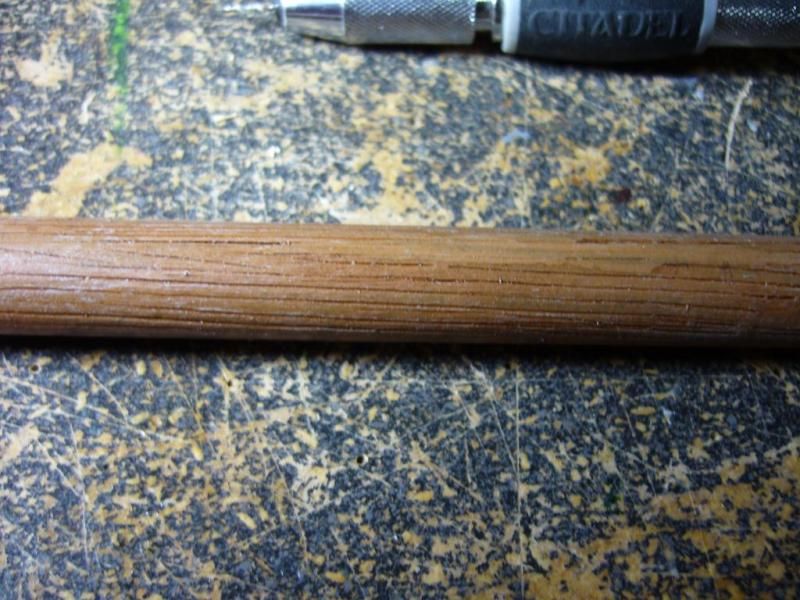
I had to sand the dowel rod with some very light sandpaper to get rid of the slivers of wood from gauging the dowel, but after priming , base coat and a wash, I liked the effect, it was very easy to do.
SailsCheap Linnen cloth in various brown shades are perfect for making replacement sails or making a whole new set. Most of these toy ships already come with sails but if you purchase them used, they might come with an incomplete set, or you might want to change the sail layout. In the case of the Black Pearl from Megabloks, you might just not like the plain limp sails that come with the ship and wish to give it a more traditional brown canvas look. Its actualy not that hard to make a set of sails if you have one as an example.
A few yards of cloth for making sails might cost you a full $3, and thats enough to make a few ships worth. You can also find the really thin nearly transparent cloth that comes with the "ghost " ships like Dread eye's phantom and Flying Dutchman pretty easy. Just take one with you so you can compare them while your at the store ( Walmart, or any store that sells cloth). You will find it at the far back near the curtain section.
Miscellaneous Sand paper is usefull for smoothing out your deck if you make it from balsawood strips or from coffee stirrers. Also it is key for sanding down the dowels that you might use for mast and yards if you give them some texture like I suggested above. I know I have read that some people use a really thick sandpaper to give texture to some of the wood but I have not tried it, I have used sandpaper to smooth out my peices but It was the only one I found in my garage but worked great.
 Accessories
 Granny Grating ( The stuff used for stiching, looks like a plastic mesh) Used to create the bars and hatch covers in the middle of the ship.
Ships wheel - Will update soon with links and cost
Doors and windows - Will update soon with links and cost
Cannons - Lots and lots of cannons!! - Will update soon with links and cost
[/spoiler]
Modding / Converting [spoiler]
Decking Some people layed out the deck one "board" at a time directly on the ship, I first made a template, then glued on the planking material on this template, trimmed as needed then glued on the ship when I was done painting both deck and ship. I might consider making a second deck, and have them removable, one for a normal 28mm wargame and one that is marked with hexes for Heroscape.
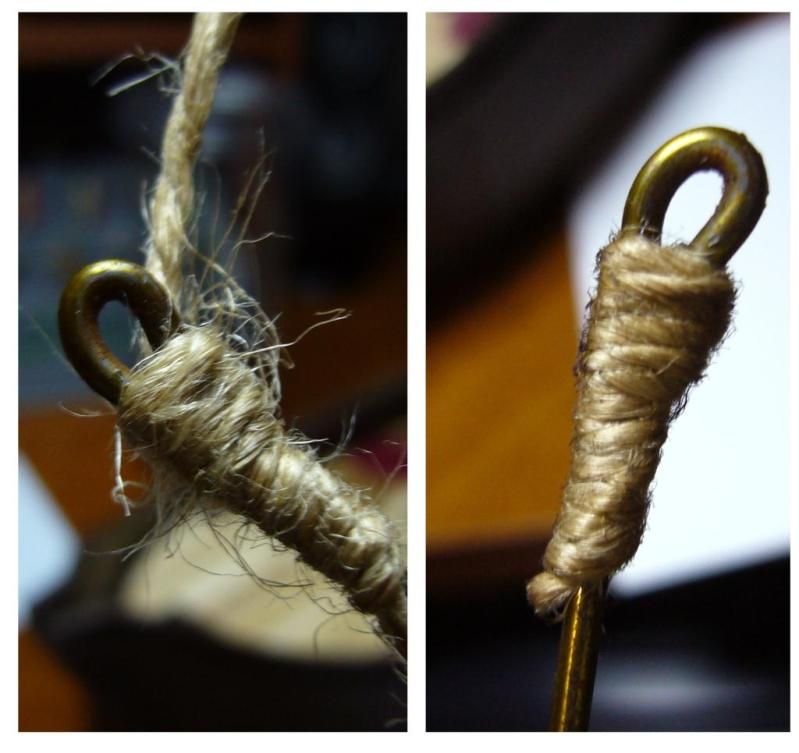
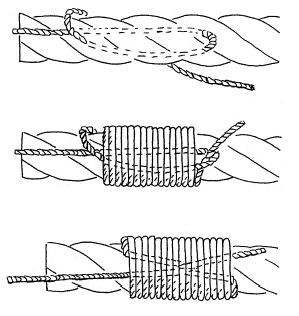
Knots When tying your "ropes" to your mast or hards, this is a really easy knot to do and looks good once you figure it out, its actualy used for tying the ends of ropes to keep them from fraying but looks great on a mast.
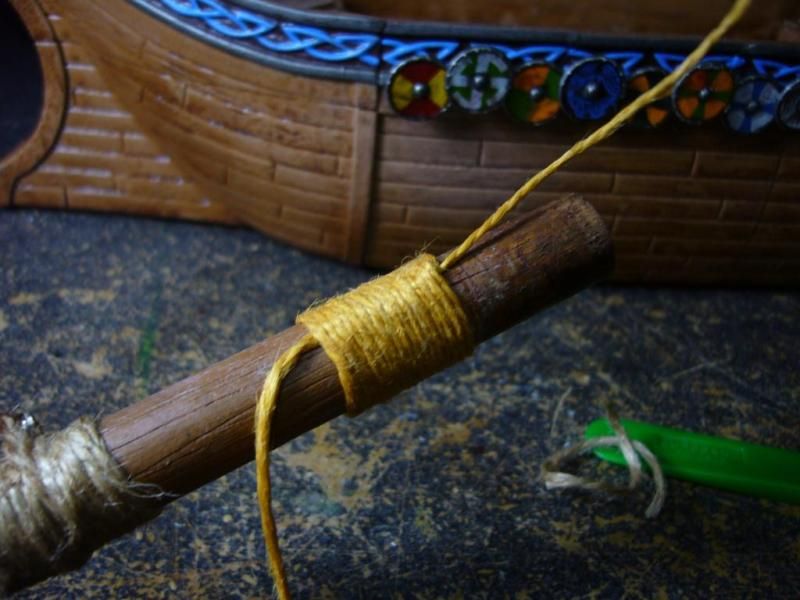
And here is how its done.
[/spoiler]
Let me know what you think and any advice is always welcome!


 Welcome, Guest. Please
  April 29, 2024, 08:56:32 AM


