Evening all,
Finally had some time to stop experimenting and finish a 15!
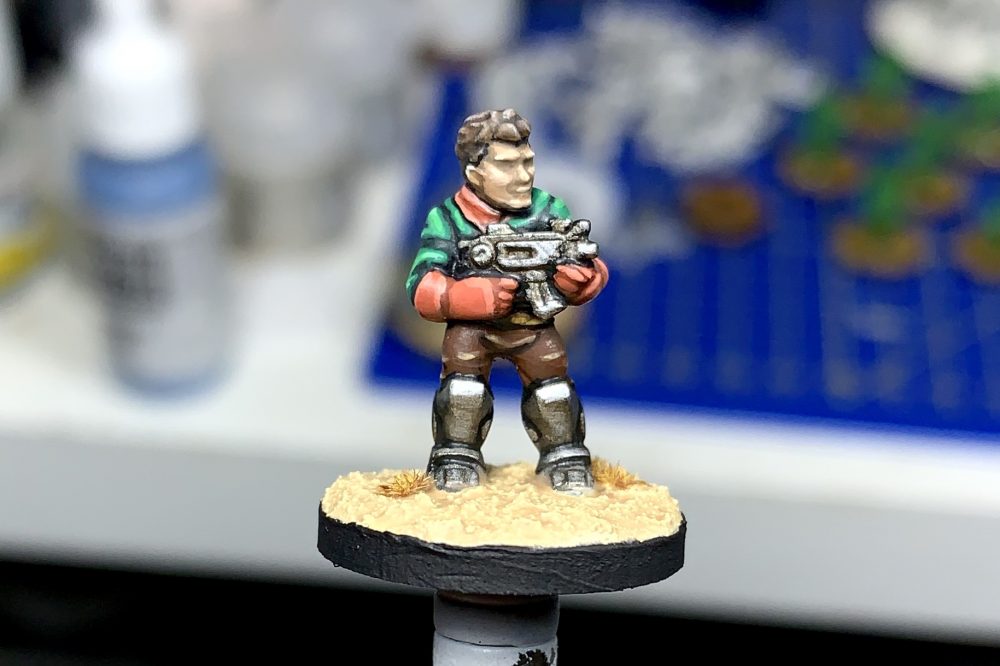

He does represent a bit of an experiment though - making Heroforge minis work for 15mm.
Here's the recipe, and my thinking:
1 - Proportion: As standard, Heroforge minis don't look right scaled to 15mm, They're too thin and delicate (in fact, my feeling is that they're a bit to delicate even at 28mm). 15mm miniatures have big heads too - they're not just small 28s.
So, thinking about the many ways I can rescale a mini I figured the best appriach would be to keep the mini as short as possible (less reduction when scaling, which stops limbs getting too thin) and increase the head size. I scale the minis to the smallest height ('3 foot tall') and give them size 5 heads.

Then I bulk them up, increasing the weight and musculature on them - they'll look too muscly on screen.
2. Posing - Again, this is an exercise in thinking through the medium how to make sure these minis look like the rest of my collection. For posing I try and replicate one piece, cast miniatures - I've been using the Rogue Trader adventurer range as inspiration. This means that in the zoomed in view of the Heroforge interface I create little contact points and overlaps, knowing they won't be viewable when printed and painted.
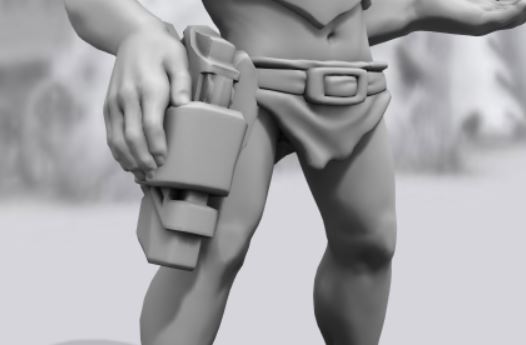
Here's an example - by ever so slightly embedding the hand into the holster, I've made the 'structure' of the mini significantly stronger, and removed the need for some supports. And when shrunk, you won't be able to tell.
I do the same with two handed, 'armed' poses (as above) and slightly embed into the chest.
Finally I buy the download without a base, import into Tinkercad at 68% (that makes an upright human roughly 16.5mm to the eyes, perfect to scale with GZG). In Tinkercad I add a small, 0.5mm bases (to help with affixing to my MDF basing, and make an digital 'conversions' I might want to do (I often alter guns - Heroforge doesn't have a great selection).
Once printed (I print at 0.03 on a Photon) I make sure to clean up any marks from supports and any weird print details (you'll see a missed a little spot on the back of his left calf - can't see that in the flesh).
Things to be aware of:
This process is intended for resin printers, no idea how it would work for FDM.
Chins! - It can be difficult to add supports to chins that do't get stuck to the chest of the model during printing and wreck detail. On balance I prefer not to add supports to chins, and just to resculpt them if they don't print. It easier than reparing detail on the chest.
Poses - I find the two handed rifles poses to be crap, so I tend to pick a single handed pose then adjust it until it looks good. Shoulderpads are your friend here - they'll hide weird, twisted shoulders. Again, where possible make your pose a 'tight' as you can to improve strength - printer resin is actually very tough, but every little helps!
Converting with paint - at this scale, you can easily tweak some of the fantasy looking clothing to sci-fi just with paint. Don't be afraid to play with combinations.
Converting digitally - you can use the time in Tinkercad to add any other bits you might want (I've added backpacks I found on Thingiverse, for example).
I'll admit this isn't cheap, but it is fun!


 Welcome, Guest. Please
  April 19, 2024, 12:28:36 PM


