The last two days I've done some applied basic research on which surface cover to use for my modular gaming table. As you can read in previous posts I aim to get the visual effect of arid mountainous terrain of scree, gravel, rocks and little vegetation.
To test the adhesiveness, fill, durability and look of various alternatives I took a 20*30cm piece of pink foam and covered it with the following materials:
Materials used: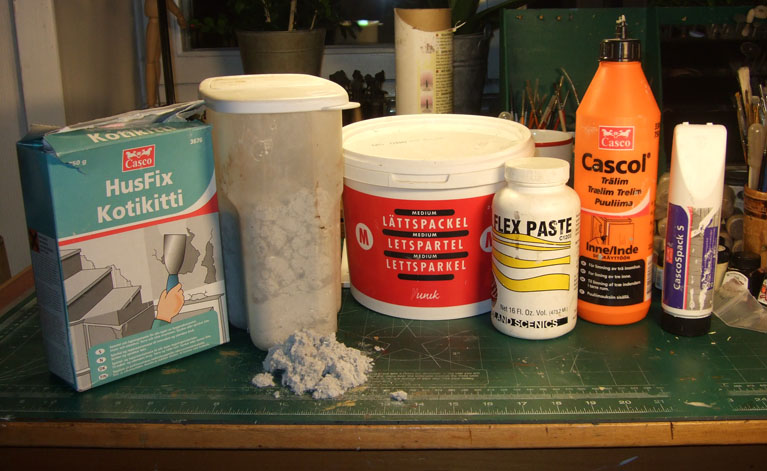
From left to right:
- 'Husfix', a houshold light concrete used for filling holes in wood and masonry but also as grout for floor tiles. I use it extensively in hobby projects. You mix it 4-1 with water.
- 'Celluclay', probably familiar to some of you, esp. in America. It is a shredded paper/wallpaper glue compound which you mix with water, ergo
papier maché. It is very popular among diorama and model train enthusiasts and also sculpters aged 5-10 making a Christmas present t grandma.

Celluclay, why use mud when you can use paper?
- Yunik Light spackle, medium course, this is a local brand of wall spackle. I think the generic term sand spackle is sometimes used. I had some semi-dried up remains from a DIY project. It comes ready in a bucket. Convenient, that.
- Flexi Paste from Woodland Scenics. Also familiar, I suppose, to the model train nerds among you. It is sold in a pot.
- Casco trälim, the Swedish equivalent of the good ol' Elmers Glue, white glue, carpenter glue...
- Cascospac, a quick spackle used for, well spackling something quickly. Probably got a fair bit of acrylic in it. Sold in tubes.
Some of you may reflect on that I am not trying plaster-of-paris, hydrocal and the like. Well, I hate dealing with that stuff and won't use it, no sir! I also rejected acrylic textured artist paste, the kind with ground pummice, since it is rather expensive. Textured paint went the same way as it has no fill.
Again: the qualities I was primarily looking for are adhesiveness, filling properties, durability and sex appeal...well, maybe not, but it should at least look good.
The result (sorry for the over large image but there are a couple of details I want to point out) :
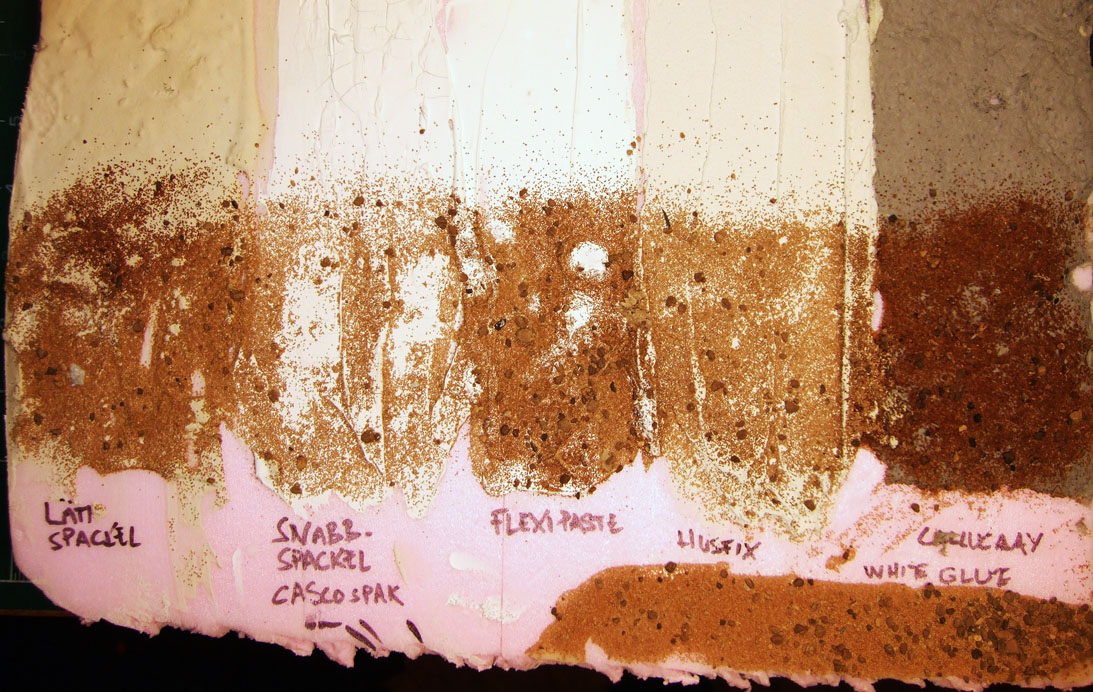
The vertical bands are from left to right:
light wall spackle, rapid spackle, flexi paste, 'Husfix' light concrete, Celluclay and below a strip of white glue (I added the plain glue strip to the experiment as an afterthought). I smeared them on fairly thick, something like 3-5mm.
As you can see I tested adhesiveness not only for how the material stuck to the pink foam but also how well grit stuck to it without using glue. The pink foam was not prepped in any way.
The verdict
Medium Coarse Wall SpackleWhen I stirred the contents of the buckets it was so dry I had to add some water. And of course I add to much and it turned into the consistency of semi-runny gruel. I nevertheless smeared a stripe of it onto the foam and it did not run all over the place. I was rather happy with the result. It dried hard but not brittle. It sticks well to the pink foam and the grit sunk in just as well into the spackle and stays there. Since it was wetter than it should be it developed a rather smooth surface. It didn't shrink noticeably even though I had added water. Encouraged as I am by the result I may try this again with a steaming fresh pot of course textured wall spackle. It is fairly cheap to, costing something like 15 Euros for the pot in the picture which I think should last for the two square meters I am about to use it for
Rapid spackleThis was rubbish. Boo! As you may be able to see it shrunk and cracked event though this particular stripe was not smeared on as thick as the others. As you can see the grit has brushed off all to easily. It also feels rather brittle when you poke at it. So this is a reject. All things have their uses, however. That cracking effect can be used to mimic dried mud plains or river beds if applied the right way. Not so sure about durability though.
Flex PasteRather nice. Stuck nicely to the foam and the grit sits there like nobody's business. It dries quick, without shrinkage and develops a rather smooth surface, which is so-so; I wouldn't mind a bit of texture. A rather nice feature, as indicated by its names, is that it has slightly flexible character, which probably means it wont tear and crack as easily. It certainly feels like it. Doing some product research right now I just confirmed a hunch: like many Woodland Scenic products it is expensive. Something like $20 for 16 ounce jar. That and the lack of texture pretty much rules this one out.
HusfixI am rather partial to this material but I'll try to quench my enthusiasm here. It dried to a hard, rigid surface over night and stuck nicely to the foam. The grit was slightly pushed into the rather dense paste and stayed there acceptably well. I would probably depend on a layer of paint or watered down white glue to keep it in place completely. Husfix mixes nicely in a plastic bowl but I would recommend anyone to use a face mask while doing so. It is dusty and irritates when inhaled. I would not recommend it for recreational snorting. I very muck like its sandy texture especially in combination with grit. The had surface seems very durable but probably would crack if someone leaned a sharp elbow on it. This is definitely an option even though it is slightly more expensive (12 euros for the box in the picture, 22 Euro for a large box) than wall spackle and gives similar results.
CelluclayWell, I botched this one a bit. 48 hrs later and it is still not dry. I may have used to much water. I mixed the stuff to the consistency of oatmeal as per some instructions; some sources say it should be mixed to the cosistency of clay (is the name Cellu
clay any guidance here?) As per recommendation from a guide by the veteran diorama maker Shepard Paine I added a large dollop of white glue to the mix as wetter Cellyclay shrinks and may curl up at the edges when it dries. To early to say. Anyway, the glue did its magic on the grit which sits firm embedded in the mush. The texture is lovely and looks much like packed dirt. I know from earlier experience that the surface generally dries tough and has a slight bounce to it. This fact and that it can be pigmented with dry artist pigments makes me hope that it would make for a very durable gaming surface ready for wear and tear. One drawback may be that it takes long to dry. I will experiment some more with the mix. I may also use the drying chamber in the laundry room to speed up the process. Another drawback is that Celluclay is not readily available in Sweden (I am still living of my stash from the US). It is however cheap and lasts long: a 5 lbs bale costs something like $20 so I might just order it from abroad.
Finally:
White GlueI tested this because I've had less than good experience with using white glue when sticking bits of pink foam together. It seems like WG doesn't like non-breathing materials or environments.
In short: it sticks very well on top of pink foam, it fastens the grit with a superior, flexible bond, it has no texture nor fill, the grit won't 'sink in'. Enough said.
ConclusionWell, it seems like I am going forward with wall spackle or Celluclay. If i can find a source and if further experiments turn out well I am inclined to think it will be the latter.
That's it for now. I would appreciate your comments.


 Welcome, Guest. Please
  April 28, 2024, 07:24:44 PM


