I decided to make an artillery redoubt / earthwork for my expanding ECW collection.
Of course, an earthwork is an earthwork, and this one would do for any period from 1500 - 1900.
The same modelling techniques would apply equally well to ancient hillforts or C20th trenches (the trench that my son and I made is in my LAF gallery)
For once, I took pics as I went along, so I can accurately document the process for posterity!
Here goes...
Step 1. Sketch the ground plan of the edifice you want to build on an offcut of MDF.

If the 'footprint' of your proposed model fits - great! You can go ahead and use this offcut as the baseboard for your piece of scenery.
If not - well, at least you know how big a baseboard you will need to cut out to mount the finished item. Also what size pieces of polystyrene you will need to make the bulk of the piece.
In terms of polystyrene, use the ‘high density’ pink stuff or blue stuff - there's not much difference. Don't use lightweight white polystyrene - it's way too fragile, and the wrong consistency for modelling / shaping.
Step 2. I worked out that for my earthwork (a double breastwork with a roadway running through the middle) I would need two high density polystyrene blocks - one block to form each main bastion sitting astride the road.

The first part of the process is to use a craft saw (or bread knife) to carve the polystyrene blocks into the approximate shapes you want.

You can buy a hot-wire cutter which makes this job very clean and easy. Sadly I don't have one.

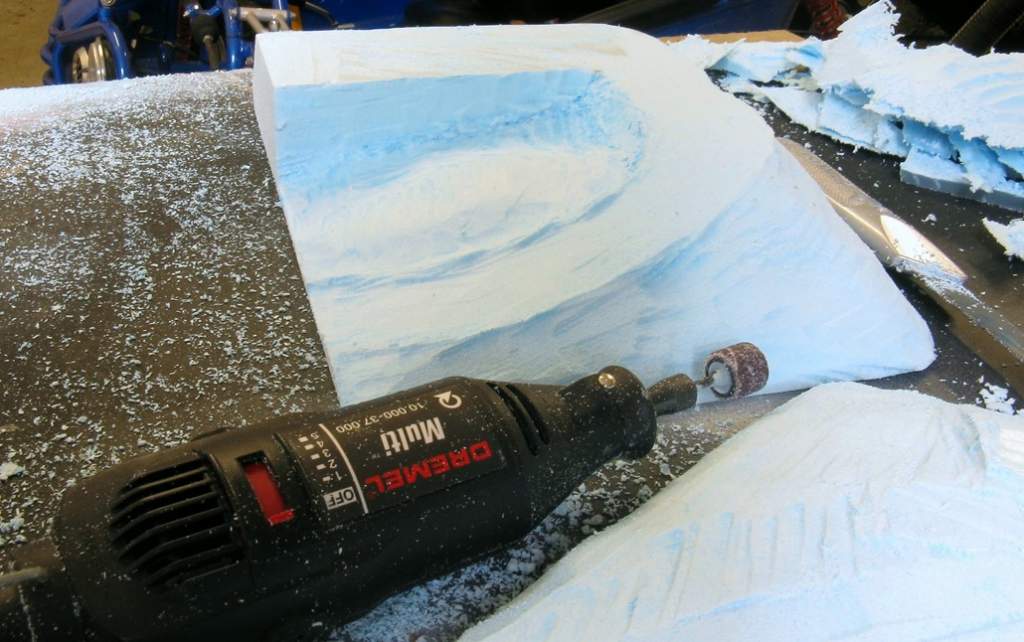
Step 3. Now comes the messy bit.
You ideally need a minidrill (Dremel or similar) for this.
Sand down all the rough contours you have carved to create the desired gradients and soften the corners, edges and so on.
You really don't want to inhale the polystyrene dust, so wear a mask. Hat and goggles help too.
If you don't own a minidrill, I'm sure you could do this with old-fashioned sandpaper and a lot of patience… (But ask for a minidrill for Christmas because they are invaluable for all kind of modelling projects - not least for cleaning up figures before painting, drilling out hands for weapons, and so on. Anyway, I digress… )
So you should now have your main terrain portions shaped to more or less how you want them.
Don't worry too much about the finish at this stage, because the whole thing is going to be covered in two layers of texturing / groundwork.
The main thing is to make sure that the shape is how you want it, and that any surfaces or elevations which are going to take timbers (floors or walling) are fairly level.
Step 5. Next, add all the main woodwork - palisades, revetments and walkways.
It's better to do this before fixing your polystyrene sections down onto their baseboard, as you will need to handle and turn the polystyrene pieces a lot whilst doing the fiddly work of inserting innumerable matchsticks!
The only two materials used here are matchsticks (a big bag from the local craft shop for about 2.00 GBP) and wooden coffee stirrers (available by helping yourself to sneaky handfuls at all good high street coffee shops!

)
Crucially, before you stick anything anywhere, go through a few dry runs to work out how many lengths of palisade you will need, and where you are going to put them… Time spent planning and trying out various arrangements using loose matchsticks, is time well invested in making sure your end product looks great.
Step 6. You can see from the picture the basic method of construction of the palisades…

In short, you sharpen some matchsticks, pop a dab of expanded polystyrene glue (such as UHU Por) on the end, and poke the sharp end into the polystyrene.
Two at a time provide you with pairs of uprights. Then you slot the horizontal 'beams' (more matchsticks!) in place between the uprights, using a touch of PVA to fix each piece in place as you go along.
Don’t forget to check the height against the figures you are going to be using - you don't want your defences so high that the figures can't fire over them, or so low that only their shins are under cover. Gun positions will need a lower defensive work.
To add a bit of variety to your fortifications and strengthen your gun positions, add a few gabions – man-sized wicker baskets packed with earth.

I used metal ones by The Assault Group (
http://www.theassaultgroup.co.uk/store/product.php?productid=943&cat=82&page=3)
but there are plenty of terrain manufacturers that sell resin ones.
Just glue them into position using Araldite or similar 2-part epoxy adhesive.
This works fine for gluing metal, and will not dissolve your polystyrene either.
Step 7. The next step is to add revetments - the retaining timbers used to shore up earth walls, like in a trench or a mine. You can use matchsticks or coffee stirrer pieces for this, according to taste, and how big an area you need to 'dress'.
The best way of doing large areas is to cut a piece of paper to the exact size of the wall section you are going to reinforce, then glue all your matchsticks (or coffee stirrer planks) onto that piece of paper in the arrangement you want.
Then once dry, stick this whole collage onto the wall using polystyrene glue.
It's a lot easier than trying to stick matchsticks one by one against a vertical wall!
Revetments should be horizontal by the way, with the occasional vertical reinforcing timber holding the horizontal beams in place.

A little irregularity in your timbers is no bad thing - these are supposed to be soldier-built earthworks thrown together in the field, not modern precision carpentry!
Step 8. Now add flooring where required. This can be whole sections of platform, or just runs of duckboards laid over the mud…
Just cut up and glue lengths of coffee stirrers or matchsticks in places where you want them. You can see that I've used matchsticks to create some gun platforms, and some more haphazard surfacing up the sloping tracks to the ramparts.

Okay, that's part one done. The basic model is completed - albeit in two lumps.
Next part 2 - basing and titivation:
http://leadadventureforum.com/index.php?topic=7778.0


