Everything that gets talked about here are essentially old and tested methods used for military modeling but might come in handy for miniature related things too (chipped power armour, rusted weapons, battleworn shields, speed painting micro armour etc.) What really amazed me when I discovered pigments, turpentine and graphite was that really effective results could be achieved with very little effort and a fragment of the time the usual highlighting/glazing routine takes.
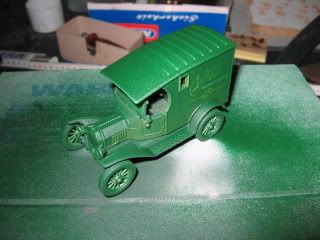
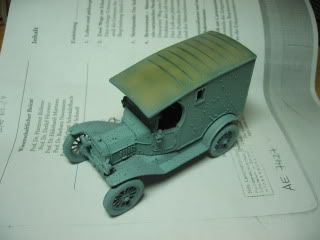
The Ford T is a Matchbox die-cast from their 1:56 yesteryear series that I bought second hand for a fiver. The details aren`t that great but it should suffice for the wargames table.
Stage 1 Preparation
I used masking tape to cover the front shield and used superglue to fix the wheels and front axis. A soapy wash to get rid of all the grease and dust later and it was priming time.
Here I used an old GW dark green can I had lying ariund to get a solid base coat to work from. Any dark colour should do.
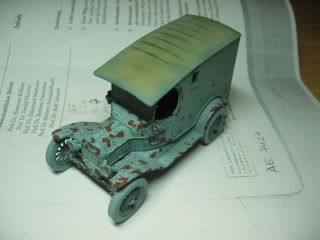
Stage 2
The colours applied here were quickly done with an airbrush and will only show as chips and rusts afterwards. I used VA Rust for the metal parts and VA Dark Earth for the wooden (I think) cabin. A light colour was used for the leather top as a quick basecoat for later.
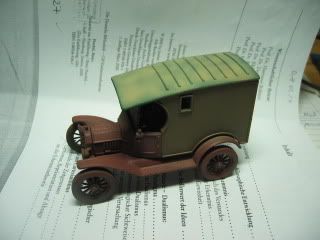
Stage 3 Chipping
This was done in two stages. At first I used Humbrol masking fluid which I applied with a bit of blister sponge. For smaller chips and micro damage I covered the lower parts with a coat of hairspray and sprinkled cooking salt on top of it before it dried up.
Then I applied a unified coat of the basic colour with the air brush and left it to dry overnight.
In order to reveal the chipping take a brush and try to remove as many salt crystals as possible. For the removal of the masking fluid soft rubbers or paint shaper jump to mind but the tool I found to be really up to the task is the multifunctional index finger used in a circular motion.
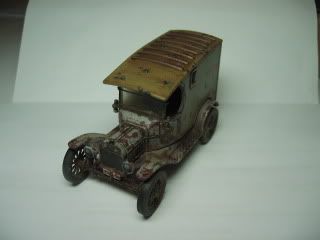
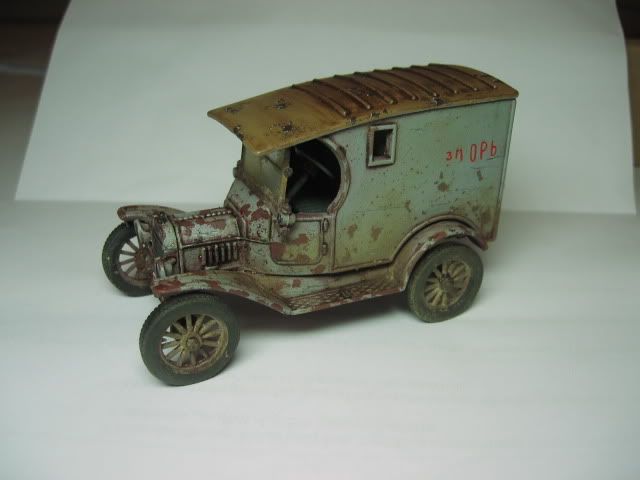
Stage 5 Oil Wash
Now it's time to add shadows and tint the basic colour. Mix a small spot of burnt umber oil paint with turpentine and cover the whole model with it. Due to the minimal surface tension the mix will run and sit in the recesses without any hazzle. Wait for an hour or two and take your trusty blister sponge again and polish the whole mini. Due to the slow drying time of the oil-turpentine mix blotchy patches and pools can be removed easily. Take care to not wipe the mix for the recesses tough. For a more interesting finish add soem green or black to the mix and aim for specific areas. Watermarks can be done by dotting unthinned oil paint onto the larger surfaces and wiped downwards with a brush that holds turpentine only.
Scratches were done with a soft pencil and underlined with white paint. Tamiya Smoke was used on some parts to give an oily finish. The transfer came from a tank kit. Some Tamiya Topcoat sealed the oil-turpentine mix.

Stage 6 Dusting
Orange pigments with turpentine were used to give the impression of really heavy rust. Beige pigments were used on the chasis and the leather top. Another application of topcoat sealed the pigments. All that was left to do was to paint the front lights and sponge on some acrylic paint on the leather top to tie it in. Done