*

Recent Topics

Author Topic: Misc Sci-fi Stuff (Shipping Containers - 30 Aug)  (Read 5719 times)

Offline Braz

  • Mad Scientist
  • Posts: 715
Misc Sci-fi Stuff (Shipping Containers - 30 Aug)
« on: 25 August 2015, 09:07:24 AM »
A small vtol flyer which I figure seats 6.
From cereal card, dowel, coathanger, a bit of insomnia and some foamcore.


Air intake has since been moved to the side. Before priming need to greenstuff some joints. add the landing gear, lights and thrusters, and retrofit some weight to the front - it's perfectly balanced so tends to tip backwards too easily.
« Last Edit: 26 October 2019, 07:21:55 PM by Braz »

Offline Commander Roj

  • Mad Scientist
  • Posts: 933
Re: Misc Sci-fi Stuff (Flyer - 25 Aug)
« Reply #1 on: 25 August 2015, 09:19:58 AM »
A small vtol flyer which I figure seats 6.
From cereal card, dowel, coathanger, a bit of insomnia and some foamcore.


Air intake has since been moved to the side. Before priming need to greenstuff some joints. add the landing gear, lights and thrusters, and retrofit some weight to the front - it's perfectly balanced so tends to tip backwards too easily.

How on earth did you get the cereal card to conform to those curves and stay there while the adhesive dried? Great work!

Offline Dewbakuk

  • Administrator
  • Galactic Brain
  • Posts: 5775
Re: Misc Sci-fi Stuff (Flyer - 25 Aug)
« Reply #2 on: 25 August 2015, 09:47:13 AM »
How on earth did you get the cereal card to conform to those curves and stay there while the adhesive dried? Great work!


That'll be the coat hanger he mentioned. Ingenious.
So many projects..... so little time.......

Offline blacksoilbill

  • Mastermind
  • Posts: 1666
Re: Misc Sci-fi Stuff (Flyer - 25 Aug)
« Reply #3 on: 25 August 2015, 11:06:59 AM »
Yep, that's impressive.

Offline Duke Donald

  • Mastermind
  • Posts: 1000
Re: Misc Sci-fi Stuff (Flyer - 25 Aug)
« Reply #4 on: 25 August 2015, 11:30:29 AM »
Great build, looking forward to seeing it finished.

Offline OSHIROmodels

  • Supporting Adventurer
  • Elder God
  • *
  • Posts: 28257
  • Custom terrain a speciality.
    • Oshiro modelterrain
Re: Misc Sci-fi Stuff (Flyer - 25 Aug)
« Reply #5 on: 25 August 2015, 11:41:17 AM »
That's a very good shape, not at all boxy like a lot of gaming flyers  8)

Looking forward to seeing it complete  :)

cheers

James

Offline Braz

  • Mad Scientist
  • Posts: 715
Re: Misc Sci-fi Stuff (Flyer - 25 Aug)
« Reply #6 on: 25 August 2015, 12:08:48 PM »

That'll be the coat hanger he mentioned. Ingenious.

Actually the coathanger is passed through the body and is used to strengthen the leg winglet pylons on the sides although I can see how it could be used for the curves. I have some WIP images on another device -  will post a mini tutorial later; have to run off to work now.

Thanks all.

Offline Suber

  • Supporting Adventurer
  • Scatterbrained Genius
  • *
  • Posts: 2313
Re: Misc Sci-fi Stuff (Flyer - 25 Aug)
« Reply #7 on: 25 August 2015, 01:03:34 PM »
Cool! I'm really interested in seeing more of this! :-*

Offline The_Beast

  • Supporting Adventurer
  • Galactic Brain
  • *
  • Posts: 5139
  • As my grandchildren see me...
Re: Misc Sci-fi Stuff (Flyer - 25 Aug)
« Reply #8 on: 25 August 2015, 01:25:42 PM »
Yes, that is competence worthy of my undying hatred. ;)

Well done!

Doug

Offline JoeRugby

  • Scientist
  • Posts: 206
Re: Misc Sci-fi Stuff (Flyer - 25 Aug)
« Reply #9 on: 25 August 2015, 03:39:50 PM »
Really cool flyer dude.

I look forward to your tutorial

Offline Braz

  • Mad Scientist
  • Posts: 715
Re: Misc Sci-fi Stuff (Flyer tutorial- 26 Aug)
« Reply #10 on: 27 August 2015, 03:12:13 AM »
I didn't take as many pics as I thought I did so less of a tutorial than I thought it would be.

The basic framework is made from illustration board which is quite rigid and makes a great substructure. Basically it is a bunch of cross sections of how I want the final shape to be. I added foamboard cutoffs cut to shape to provide a greater gluing surface; generally not much edge is needed for gluing but this helps.

Here you can see the dowel used to support the tail section.


***Important to note that cardboard has a direction of natural curvature so when cutting out pieces one should take that into consideration; that makes for smoother curves and the cardboard is less likely to crack. Also curving the cardboard in several small increments helps too instead of in one go.***

Below you can see the first panels being added. Generally I place a slightly larger piece of cardboard against the structure where it will finally be, trace it with a pen, and gradually trim it to fit. This sometimes needs a third hand or some low tack painters tape. This becomes my template piece which I use to cut out the panels.
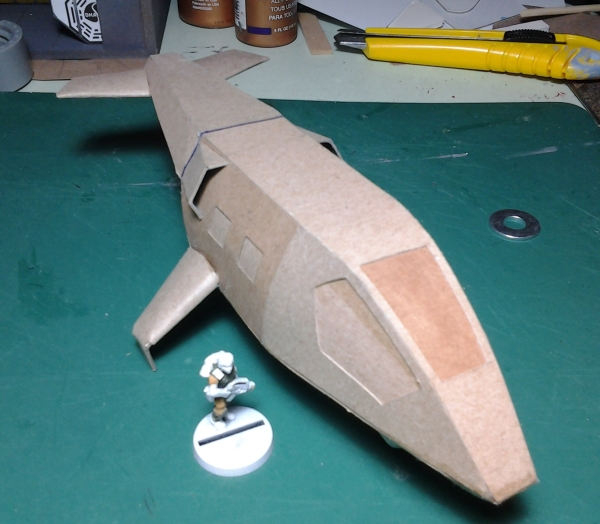
The door is just pen heavily drawn in to create the panel lines.

How on earth did you get the cereal card to conform to those curves and stay there while the adhesive dried? Great work!

I glue the pieces using Aleenes Tacky glue and just hold it in place with my fingers for a few minutes; it sets up fairly quickly.  I usually have some show or film playing in the background so just watch that. Sometimes I use elastics or clothes pins.  I also added some extra tabs to give a greater gluing area but just edge to edge is what I usually use. Also you can see on the left most panel I added a second layer of cardboard to give greater surface strength; I precurved the pieces before gluing them together.


I then add a second layer of cardboard, with cutout features to create the recessed areas, windows, etc. I use the templates I created earlier and cut out pieces that are slightly larger so it will fit over the larger area created by the first layer. A lot of gentle trimming and dry-fitting until it fits just right then glued in place. The second layer greatly increases the strength of the model.

A couple of washers are retrofitted as weight added to the front to keep it from tipping too easily.  I probably won't add much detail to the bottom as it is usually not seen. I added a layer of foamboard and cut the edges at an angle so could have a solid surface to glue the bottom trim on. No photos of the winglets being built. I drilled a hole through the structure to pass the coat hanger wire through and bent it carefully with some pliers. I then built up the wing surface from an initial illustration board shape and two layers of cardboard to create the wing shape.


Here is another view with the new intake vents.


Hopefully this gives some insight on how I got this far.
« Last Edit: 26 October 2019, 07:32:07 PM by Braz »

Offline darthgus

  • Assistant
  • Posts: 43
    • Hobbyists Blog
Re: Misc Sci-fi Stuff (Flyer tutorial - 26 Aug)
« Reply #11 on: 27 August 2015, 06:52:06 AM »
That is brilliant. Now I want to have a go at creating something similar.

Offline Vanvlak

  • Galactic Brain
  • Posts: 5310
Re: Misc Sci-fi Stuff (Flyer tutorial - 26 Aug)
« Reply #12 on: 27 August 2015, 08:00:59 AM »
Very nice - I need to get some of your brand of insomnia!  8) 8) 8) 8)

Offline Constable Bertrand

  • Scatterbrained Genius
  • Posts: 3679
    • Make and Paint Blog
Re: Misc Sci-fi Stuff (Flyer tutorial - 26 Aug)
« Reply #13 on: 27 August 2015, 09:55:52 AM »
Very Nice Braz!  8) Thanks for taking the time to share some WIP images, its greatly appreciated ^_^

I look forward to the post paint piccies! :D

Cheers
Matt

Offline The_Beast

  • Supporting Adventurer
  • Galactic Brain
  • *
  • Posts: 5139
  • As my grandchildren see me...
Re: Misc Sci-fi Stuff (Flyer - 25 Aug)
« Reply #14 on: 27 August 2015, 01:33:12 PM »
Yes, that is competence worthy of my undying hatred. ;)
...

On top of which,  you try to make it look SOOO easy. Not making it any better, you know.

You said:
***Important to note that cardboard has a direction of natural curvature so when cutting out pieces one should take that into consideration; that makes for smoother curves and the cardboard is less likely to crack. Also curving the cardboard in several small increments helps too instead of in one go.***

TOO true; a major point should be, for those of us with a less sensitive touch, curving around a curve, say a bottle, can help you avoid the dreaded 'crisp fold.'

Getting the curves balanced, now that's an art!

Doug


Related Topics

  Subject / Started by Replies Last post
4 Replies
2079 Views
Last post 27 December 2011, 10:24:30 AM
by 6milPhil
0 Replies
1454 Views
Last post 19 May 2013, 01:16:06 PM
by bandit86
8 Replies
4432 Views
Last post 27 January 2015, 02:53:35 AM
by Chainmailninja
54 Replies
11378 Views
Last post 10 May 2025, 10:40:18 PM
by Pattus Magnus
816 Replies
134692 Views
Last post 16 August 2025, 07:01:56 PM
by CapnJim