5. Freikorps A7V by John Hart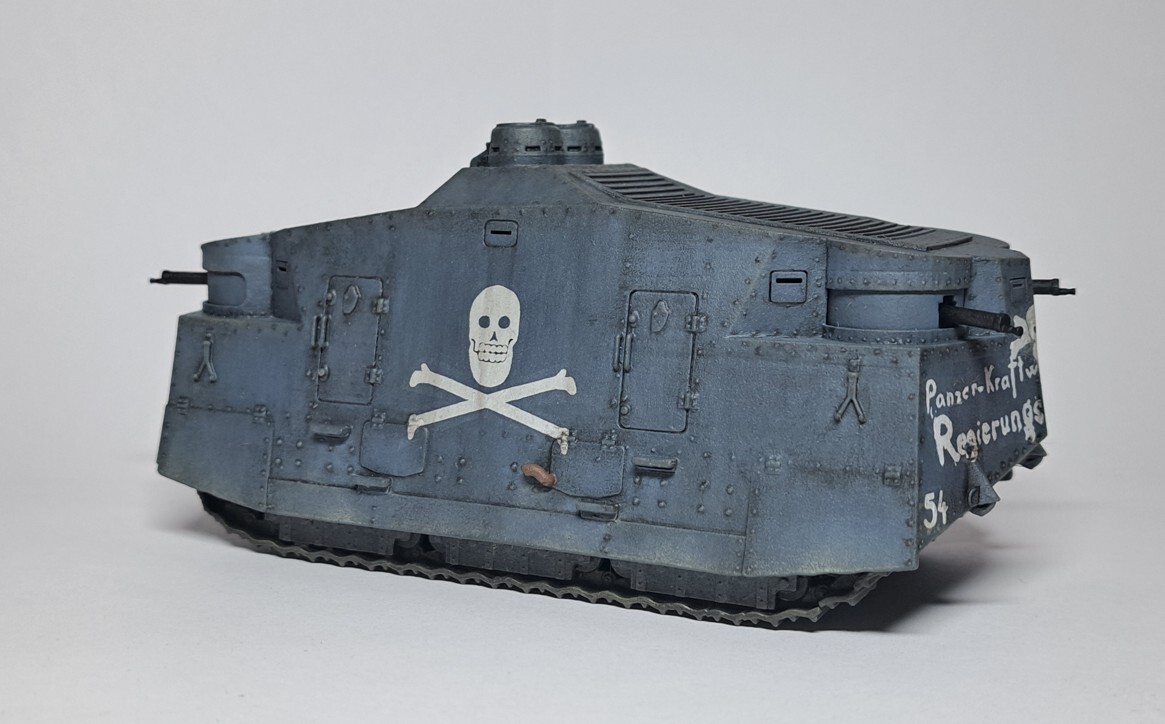 A brief history:I apologize in advance if I leave out some facts. But I have to make sure that the summary does not turn into a page-long essay. However, I can add more information about the two Freikorps A7V and the organization of Kokampf if desired. So just ask your question in the chat and I'll see if I can answer it.
 The Freikorps A7V is probably one of the least known German tanks. Originally mistaken as a quickly assembled copy of an A7V main battle tank (made of inferior steel on the chassis of a repurposed Überlandwagen), this vehicle later turned out to be another official A7V tank variant that had its beginnings during the war.
But let's start at the beginning:
When the guns came to rest at the front and the German soldiers marched back to their barracks from France, the majority of the German main battle tanks were left behind in the former deployment areas. In fact, there was probably only one A7V main battle tank that was spared this fate.
There were also two half-finished armored cars on a factory site near Berlin. These had been designed as communication vehicles. Equipped with a radio system with a retractable transmitter mast, Morse headlights (so-called flashers) and a cable plough that could lay a telephone cable at a depth of 30 cm while driving, these vehicles were intended to serve as mobile communication stations in the front line.
But this never happened. When the war was over, these two vehicles stood untouched on a factory site.
However, when the German Empire was threatened by unrest and uprisings in 1919, a combat unit was set up under which the majority of the remaining armored cars and tanks were united. This unit was known as Kokampf (Kommando der Kampfwagenabteilung(en) – Commando of the armored vehicle departments) and comprised various divisions in which the last remaining main battle tanks (of type A7V, Mark IV and Mark A Whippet) were combined.
The two A7V communication vehicles were also used for this purpose. The vehicles were converted, given a new roof construction, the cable plough was removed and the opening for this was closed with an armored plate on the rear of the vehicle.
The two A7V variants were equipped with four MG08s in the casemates as standard. The armament could be supplemented with additional MGs in the numerous hatches.
However, it can be assumed that only the four MGs in the casemates were carried as standard and the additional MGs were only used in the additional hatches for show effects. (If all these MGs had been used in combat, the two-man MG teams would have hindered each other inside the tank).
The most striking feature of the two tanks is probably the roof construction, which consisted of two separate cupolas (one for the commander, the other for the driver). It is clear that this was a provisional improvisation. On the one hand, these two cupolas made communication between the commander and the driver more difficult and, on the other, driving through uneven terrain would have been a dangerous undertaking for the two men, who would probably have suffered more than just bumps on their heads from the shaking and rocking.
However, as the vehicles were only used on the road (probably mainly in large cities), this improvisation was acceptable.
Not much is known about the deployment of the two vehicles. Photos show that both tanks were used in Berlin. The second vehicle, named “Hedi”, was also used in Leipzig. It is noticeable here that it later lacked the side track covers.
It is not known whether the tanks actually took part in fighting. However, it is certain that they patrolled the streets of Berlin and were symbolically parked in public places. They were also in great demand as photo motifs. There are several pictures of soldiers having themselves photographed in front of the fully equipped vehicles (almost every hatch was fitted with a machine gun).
It can be assumed that the vehicles were scrapped as part of the Treaty of Versailles in mid-1919. In addition, nothing is known about further use outside Berlin and Leipzig.
Personal note on the crew and armament:
It can be assumed that the tanks were equipped with four MG 08s as standard. Further weapons could be installed in the additional hatches if required, but this is rather unlikely due to the limited space inside.
Based on the crew breakdown of an A7V main battle tank of the First World War, a “Freikorps A7V” must have had at least 12 men: A driver, a commander, eight machine gunners (one loader and one gunner for each of four machine guns), a mechanic and a dispatcher.The kit (by John Hart)Scope:1 x main hull (resin 3D print)
2 x track drive section (resin 3D print)
1 x bottom plate (resin 3D print)
2 x rod for hull plate (brass)
(Track units, base plate and brass rods are already assembled, but can also be easily separated for painting)
4 x turret - two each with two different openings (resin 3D print)
4 x MG08 for the turrets (resin 3D print)
8 x MG08 for hull openings
4 x hatch (large) (resin 3D print)
4 x hatch (small) (resin 3D print)
No decals!
No instructions!
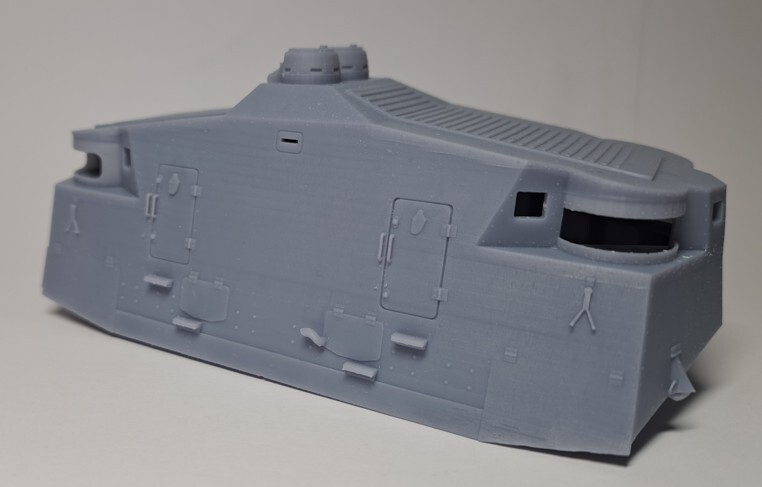
Fig 1) Hull version of “Hedi” during operation in Leipzig, without side skirts
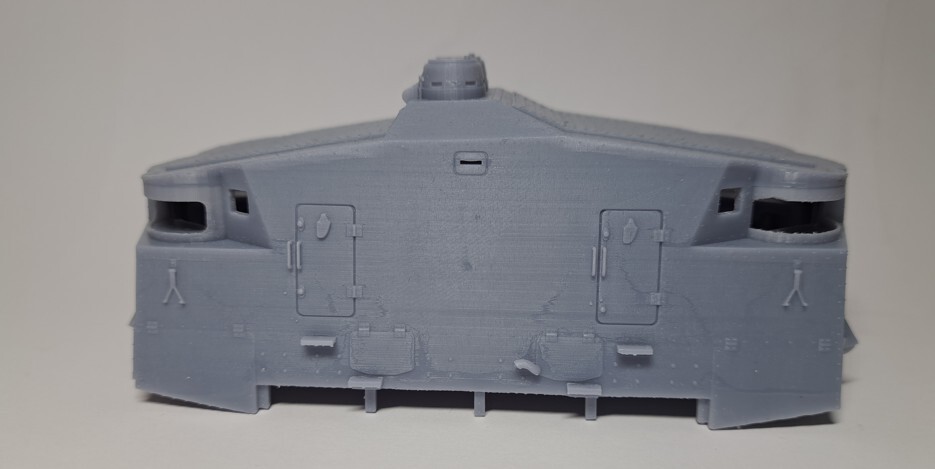
Fig. 2) Hull of “Car 54” or “Hedi” in Berlin
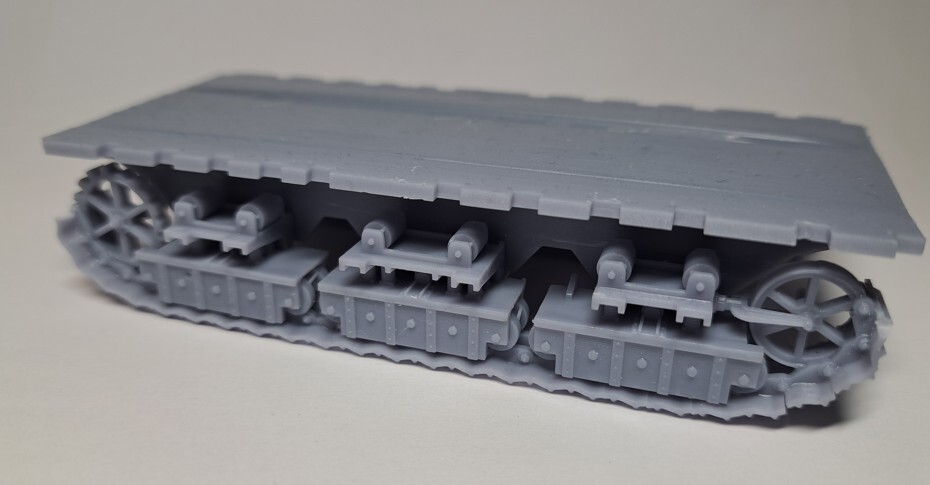
Fig. 3) Base plate with track sections
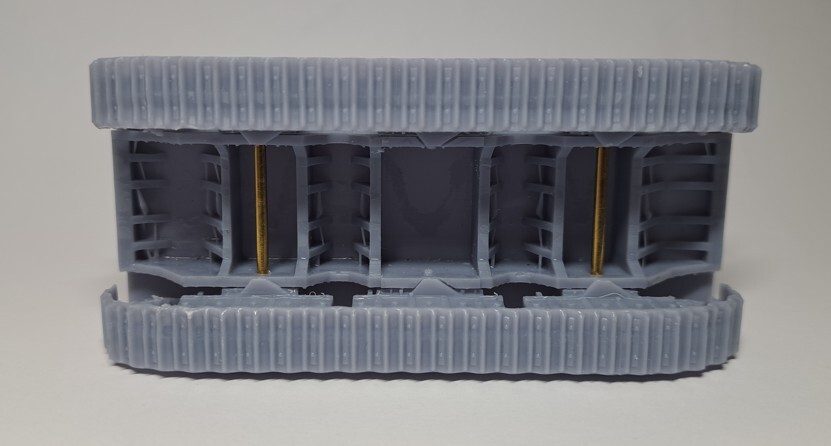
Fig. 4) Base plate from below with support brass rods
Dimensions (scale):There are no official construction plans for this A7V variant. However, it can be assumed that the dimensions are basically the same as those of the A7V main battle tank (especially since the same chassis was used). In this case, the basic dimensions (height, length, width) are completely correct. Interpretation is required for the roof construction. This is because there are only a few pictures of the tank, which also only show the vehicle from the side at different angles.
In fact, there are only three differences to the original (and these are more a matter of interpretation):
• The upper edge of the roof slopes backwards on the model. If you compare this with the basic shape of the A7V main battle tank, I would say that it should be absolutely horizontal to the ground.
• The side track covers should be perpendicular to the ground and not run at the same angle as the side armor plate.
• At the rear of the tank, an additional armor plate is missing, which covered the original opening for a cable drum. As I have an early model, it is possible that John Hart will add this. (see fig. 5)
However, the first two deviations are not clearly visible in the photos! Therefore, I can only describe my impression here, but not call them deviations from the original armor!!!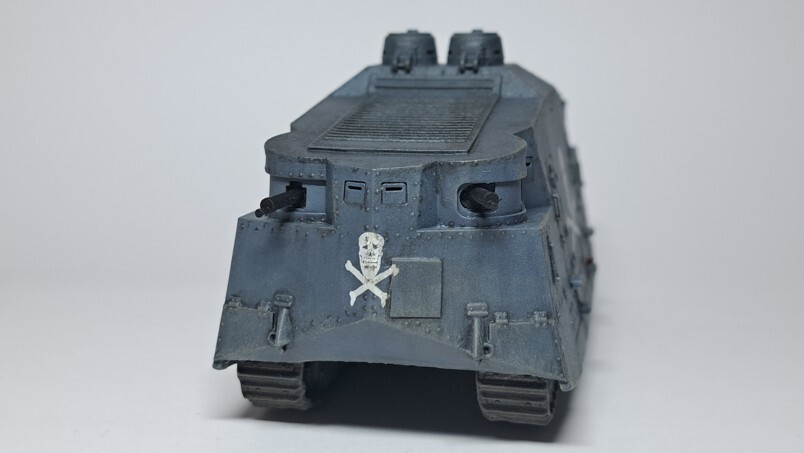
Fig. 5) I used some plastic sheet to show the missing armor plate on the right side.
Fig. 6) Carefully packed machine guns
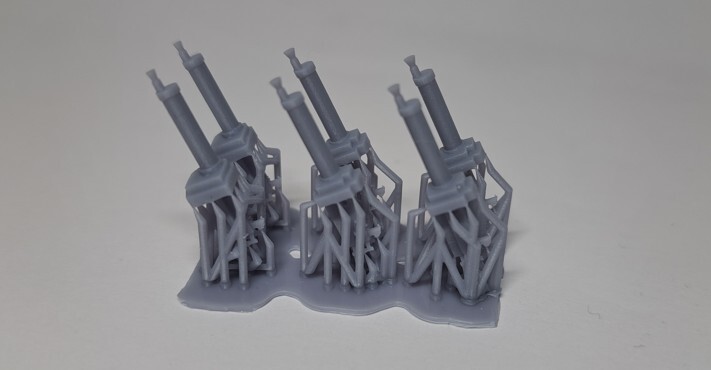
Fig. 7) Machine guns for the towers
Fig. 8 ) Towers for the casemates with different openings
Detailing:The vehicle is really incredibly detailed. You could almost say: “Every rivet is right here”.
You also have the option of opening almost all the hatches on the vehicle and equipping them with an MG08 (as you can see in many pictures of the vehicles).
The turrets can be glued into the casemates at different angles or you can do as I did and slightly reduce the height of the turrets, attach small stoppers to the inside of the roof and thus ensure that the turrets remain movable.
A little advice:
If you place the machine guns in hot water, you can bend them slightly to change the elevation so that the machine guns do not all have the same uniform elevation. Furthermore, John Hart offers two versions of the main battle tank. One is the basic version with side skirts and the other is the later version of Hedi, as seen in Leipzig, with missing side skirts.
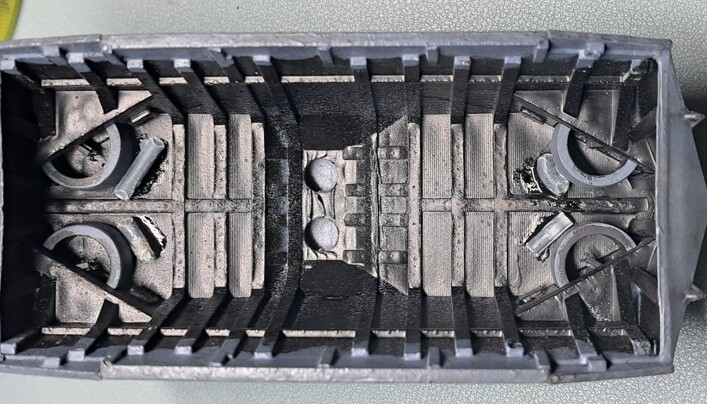
Fig. 9) My solution was to fix the towers in the casemates with a few spare plastic rods and allow them to rotate.
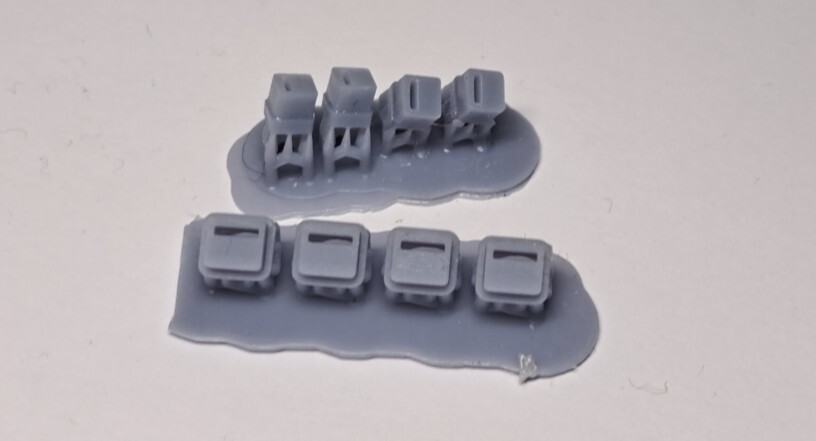
Fig. 10) Flaps for the viewing hatches
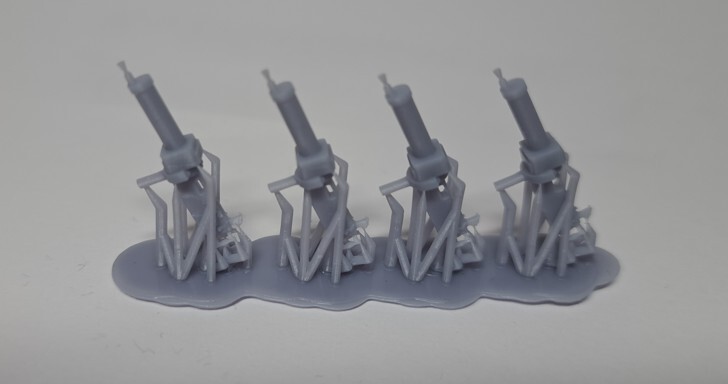
Fig. 11) Machine guns for the side hatches
Casting quality/print quality:The 3D print is really good. There were only minimal areas on my models that I had to touch up. These included a small missing corner on the edges of the very finely printed casemates, as well as a small hole in the rear part of the roof. I also had to remove a few printing sprues on the undercarriage area.
Unfortunately, the vehicle has large straight surfaces and you can see the lines of the printer in some places. In addition, I have a clear warp halfway up the armor on the right side of the hull. Also affected are the round casemates, which are not perfectly round but have edges and lines. While the printer lines can be partially smoothed with some sandpaper, sanding is not advisable in the casemate area, as otherwise the fine rivet structure will also be removed and the already thin material will be sanded even thinner.
The designer has assured me that he is still working on optimizing the print. So we can look forward to seeing whether this will be rectified in the near future. If the printing were perfect, this vehicle could also be highly recommended to every model maker.
Advice from me:
I sanded all the round inserts for the casemates to remove the slight edge structure. I also lightly sanded down the lines of the printer, at least on the large open areas of the side armor.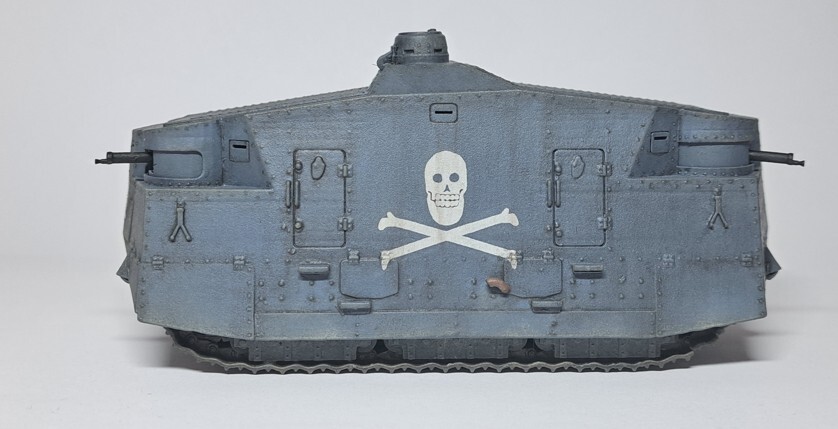
Fig. 12) In the side view you can easily see the lines of the printer. You can also see a “corner formation” and a print line on the round casemates. In the middle area, the surface was smoothed with sandpaper.
Accuracy of fit:The accuracy of fit is phenomenal. The designer has already firmly connected the base plate and the running gear with brass rods. This finished component can be easily inserted into the fuselage. For painting, all the components can be easily removed from each other and painted individually. All hatches and MGs also fit perfectly into the openings provided on the fuselage. It may only be necessary to sand the turrets a little so that they fit into the casemates. Unfortunately, the casemates/hull have slight warping inside in the area of the openings, which could interfere with fitting.
My tip:
Carefully sand off some of the top rim of the towers. This should usually allow them to fit into the casemates without any problems.Material (quality):The resin selected for the model is relatively robust and light. It also has the advantage of becoming pliable in hot water, which makes it possible to “repair” or customize one or two things (e.g. the elevation of the MGs).
Decals:No decals are included with this kit. You may be able to contact “Black Lion Decals”. They have a decal sheet for these Freikorps vehicles in 1/72 in their range. On request they also scale them up to 1/56. (This is also where I got my decals from. I also ordered the version for Hedi with the license plate which is needed of the version with the missing side skirts). The decals are not 100% correct. Nevertheless, they are quite good and the best choice at the moment. There is another Australian supplier on Ebay, but the decals are not scaled correctly and are also very thick, which means that they do not fit properly to the rivet structure.
At the moment I am planning to create decals myself, which may be added to the kits in the future.
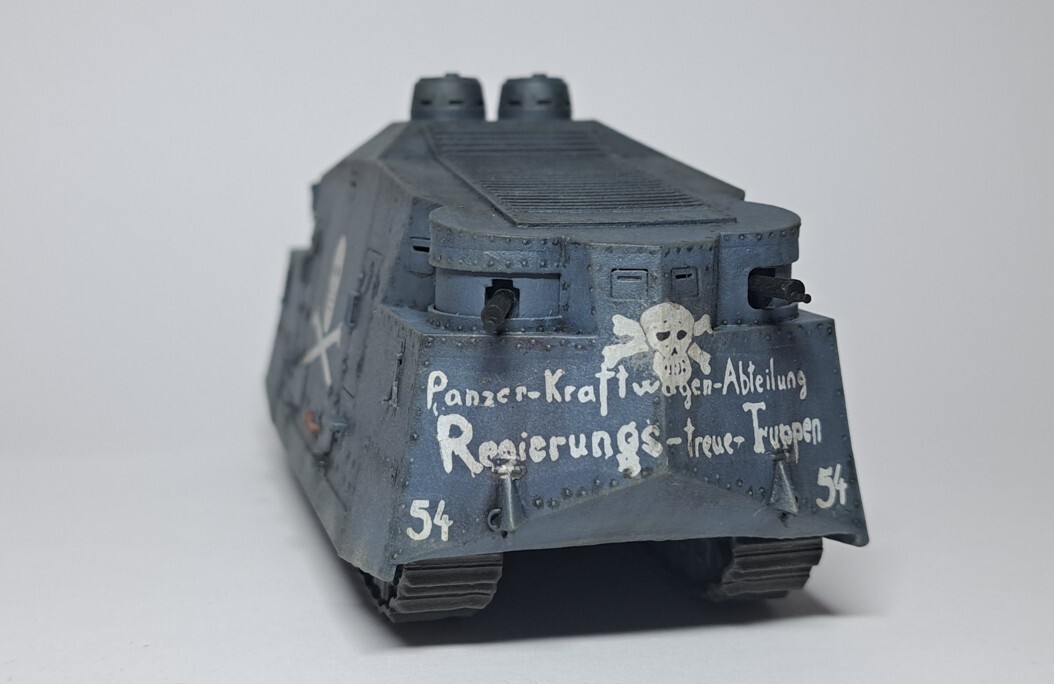
Fig. 13) Unfortunately, the lettering is not 100% centered. The decals would have to be corrected here.
Instructions:The kit has no instructions. It does not actually need them. Nevertheless, you should pay attention to which tower goes in which casemate! The towers with the semi-circular recess belong in the low casemates with the rounded corners. The towers with the square recesses, on the other hand, have their place in the casemates with the wider openings. (Just take a look at the pictures of my model).
With the hatches, you should make sure that all the viewing slits are at the top.
To be on the safe side, take a look at photos of the vehicles on the Internet beforehand. These may help you to determine the various details.
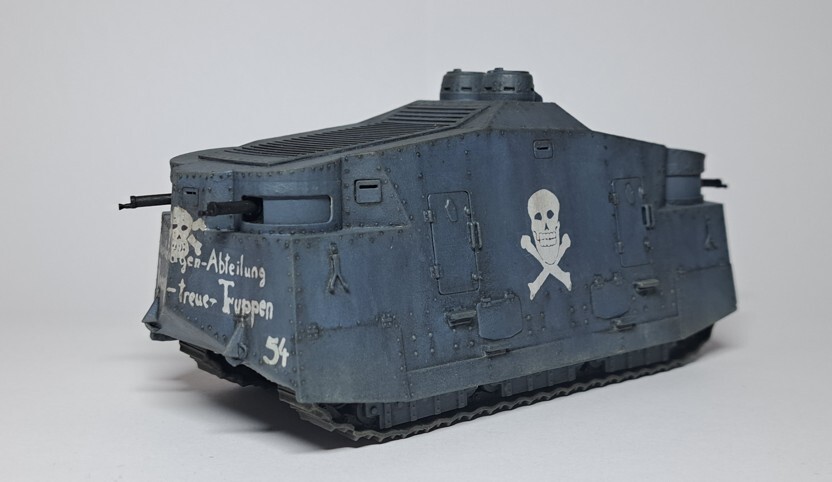
Fig. 14) View of the left side of the vehicle. Note the different design of the skulls on both sides.
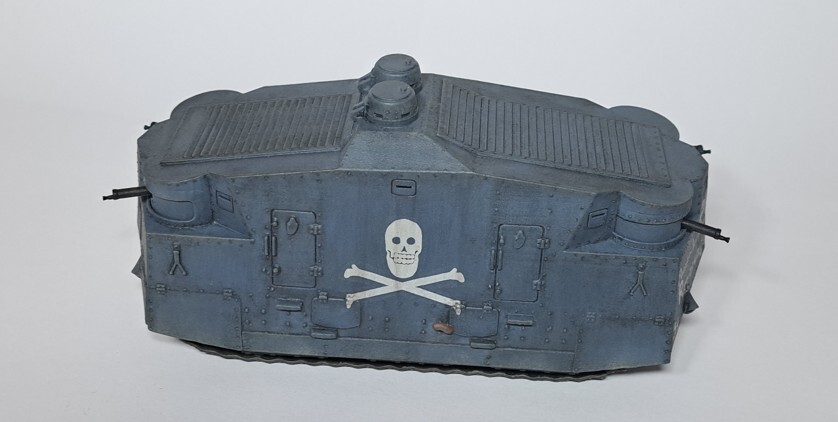
Fig.15) Roof view with the lamellar covers.
Price:The model currently costs about 25.00 GB pounds. This is an absolutely fair price for this 3D print. Unfortunately, the tank is only available from the manufacturer in Great Britain. Which is why the transportation and customs costs for European customers still need to be added to the price of the model.
Further advice:Two-component glue or better superglue is required for assembly.
To correct bent/warped resin parts, it is recommended to dip the affected parts in a bowl of hot water for a few seconds and then carefully bend them back into the correct shape. This can be repeated as required.
You should also have a craft knife for removing flash and some sandpaper for sanding off any unevenness.
ATTENTION: Please only sand outside or over an extraction device! Resin dust is highly harmful to health and is most likely carcinogenic!
Dimensions:High: 6,1 cm
Width: 5,5 cm
Length: 12,8 cm
Evaluation summary:Dimensions (scale): very good
Detailing: very good
Casting quality/print quality: good
Accuracy of fit: good plus
Material (quality): very good
Decals: - not available
Instructions: - not available -
Price: good
A few words about my model:Of course, I also finished painting and assembling a model for the report. Actually, I also wanted to paint the Hedi version without skirts, but at the moment I simply don't have the time to do this.
Since I was more interested in painting car 54, I decided to take on this vehicle. The actual color of the tank is debatable. In fact, nothing is known about it. Both vehicles look very dark in the photos, which is why I personally tend towards a dark shade of gray, olive or green. For my vehicle, I opted for a blue-grey shade.
To emphasize the fine rivet and edge structure, I worked it out with a dark ink tone and accentuated it with pastel chalk. I also gave the vehicle a strong weathering, as the photos show the tanks in a similarly worn condition. In addition, the weathering strips that have run off make the lines of the print less recognizable.
As already mentioned, the decals are from “Black Lion Decals”. These were very thin and delicate. As they also cover a very large area, you have to be extremely careful when applying them. Otherwise they tear very easily. I also used a decal softener so that they adhere better to structures such as sheet metal joints and rivets.
As there is not much to see of the tracks, I simply painted them with dark metal paint, darkened them with black ink and also gave them a wash with “track wash”. I also added a lot of dust to the undercarriage area with pastel chalk. I highlighted some details on the tracks with a pencil.
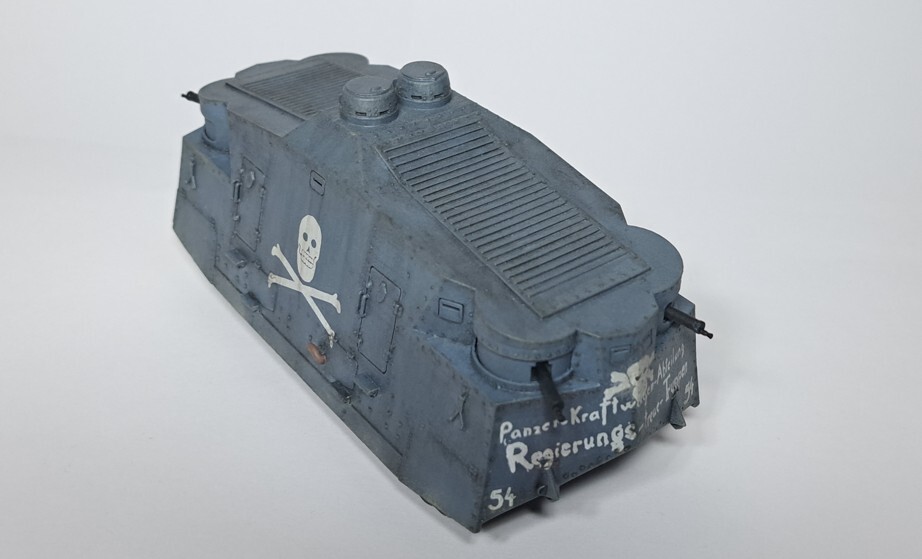
Fig. 16) Another view of the roof structure.

Fig. 17) Viewing angle from the left-hand side of the vehicle.
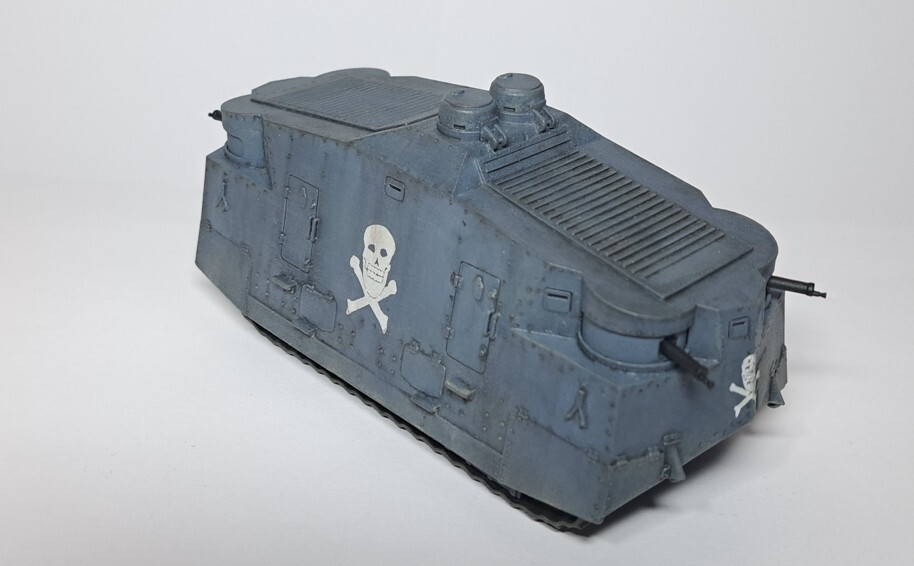
Fig. 18) The vehicle from the rear. Note the detailed reproduction of the hinges for opening the domes.
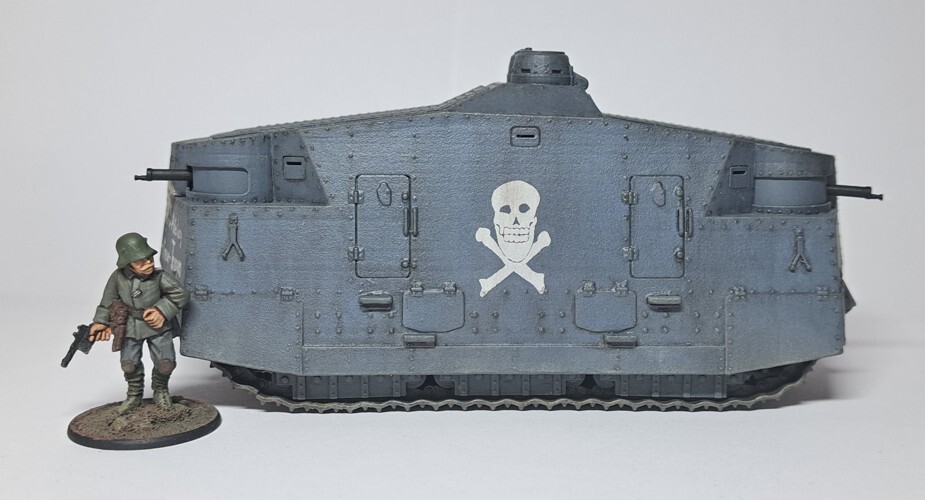
Fig. 19) The vehicle with a figure from “Great War Miniatures” for size comparison
Conclusion:
There is currently no 1/56 scale model of the Freikorps A7V on the market. It is therefore all the more pleasing that this designer has taken on the subject. The realization, detailing and design are outstanding and show how much effort he has put into the project.
If you look at the few existing models in other scales (1/72 and 1/35), John Hart's model is the best version.
It is also great that he has also thought of the Hedi version without skirts.
The quick and easy assembly also speaks for this model. The whole thing is rounded off by the options to display almost all hatches open or closed, to be able to equip them with an MG08 and also to be able to glue in the turrets with different orientations.
The only drawback is the partially visible lines of the 3D printer and possibly the slight deviations from the original mentioned above.
John Hart's model is really well suited for the gaming table. Nevertheless, you should always exercise caution here, as the filigree MGs could possibly break off at the muzzle if you handle the model too carelessly. However, this really requires a rough hand, as they are otherwise quite robust.
As a model for model making and for presentation purposes, the tank is only suitable to a limited extent due to the printing marks. Here remains the hope that John Hart can optimize the printing process in the future, because then he has really created one of the best Freikorps A7V models that can not be so easily topped.You can order the model directly at John Hart: johnrhart001@gmail.com


