*
Welcome, Guest. Please login or register.
April 16, 2024, 10:10:23 AM

Login with username, password and session length

Donate

We Appreciate Your Support

Members
Stats
  • Total Posts: 1689254
  • Total Topics: 118266
  • Online Today: 558
  • Online Ever: 2235
  • (October 29, 2023, 12:32:45 AM)
Users Online

Recent

Author Topic: Daeothar's Trash Bash 2012 Entry (Text & Pic Heavy)  (Read 4501 times)

Offline Daeothar

  • Supporting Adventurer
  • Galactic Brain
  • *
  • Posts: 5790
  • D1-Games: a DWAN Corporate initiative
    • 1999legacy.com
Daeothar's Trash Bash 2012 Entry (Text & Pic Heavy)
« on: March 13, 2012, 09:49:30 PM »
First off: a well deserved congrats to Diego and Andy for their respective 1st and 2nd placings. Ahead of me; you did at least something right... :D

All the entries were great though; there are definitaly some aspects there that have been firmly filed for future reference!

Ok; on to my entry then.


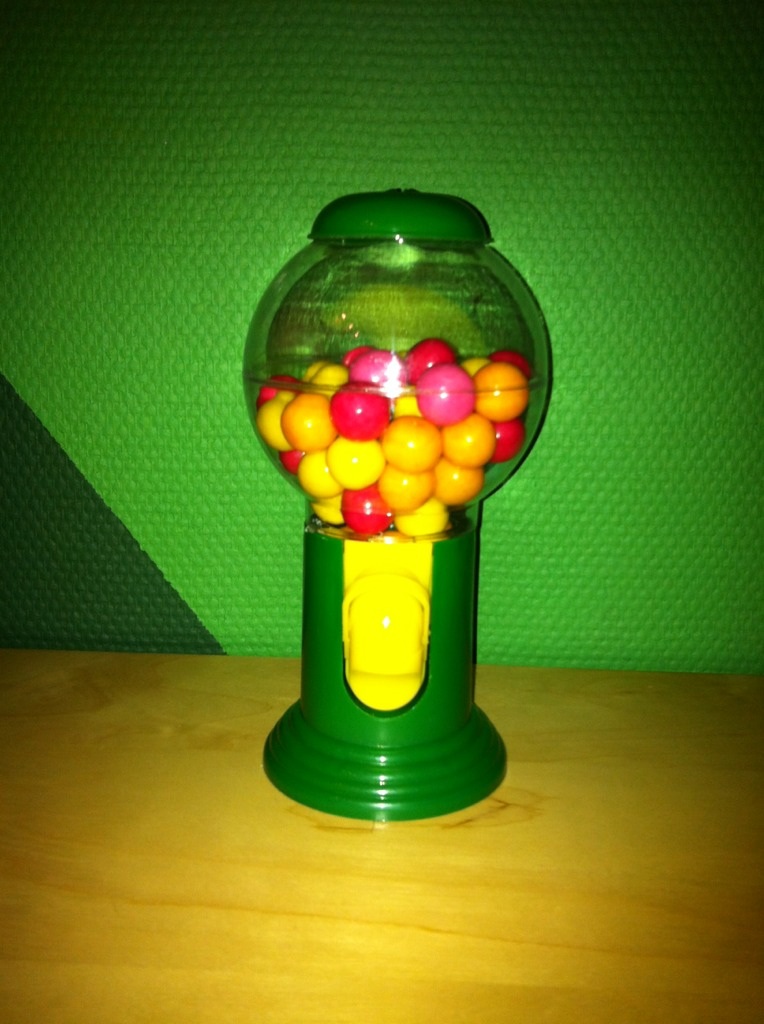
Remarkably, I started out with pretty much the same item that took Diego to his first place; a cheap, small gumball machine. Picked it up at Action for the wee price of € 1,00. At first, I was planning to turn it into a Soviet Lunar Lander, as seen in Apollo 18 (which I had only just seen at the time). But I did not cherish the prospect of finding, ordering, receiving, painting and basing the required astronauts, as well as building a whole lunar surface setup.

So, in the end I settled for something more practical, as I have already invested a lot of time and effort into several fantasy projects. And this way, this project can be fit in quite comfortably into my existing stuff, with the added bonus of increasing the incentive to finish some long forgotten WIPs... ::)

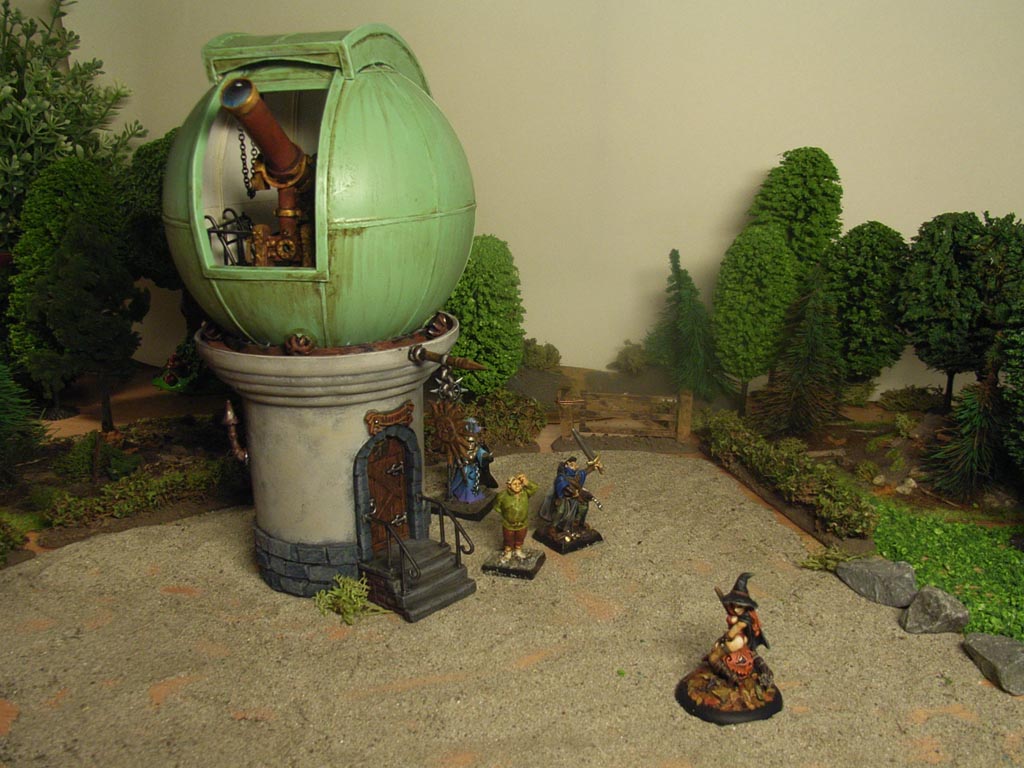
And thus I settled on an observatory. After all, the theme was 'Observation', so really; what else could it be...

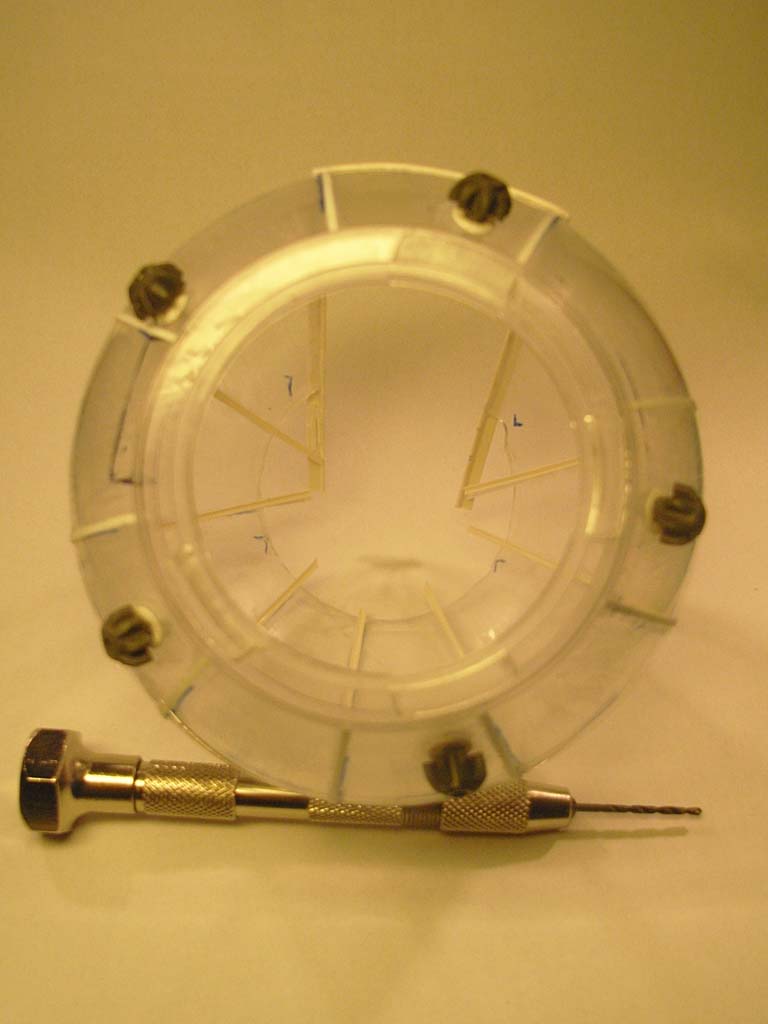
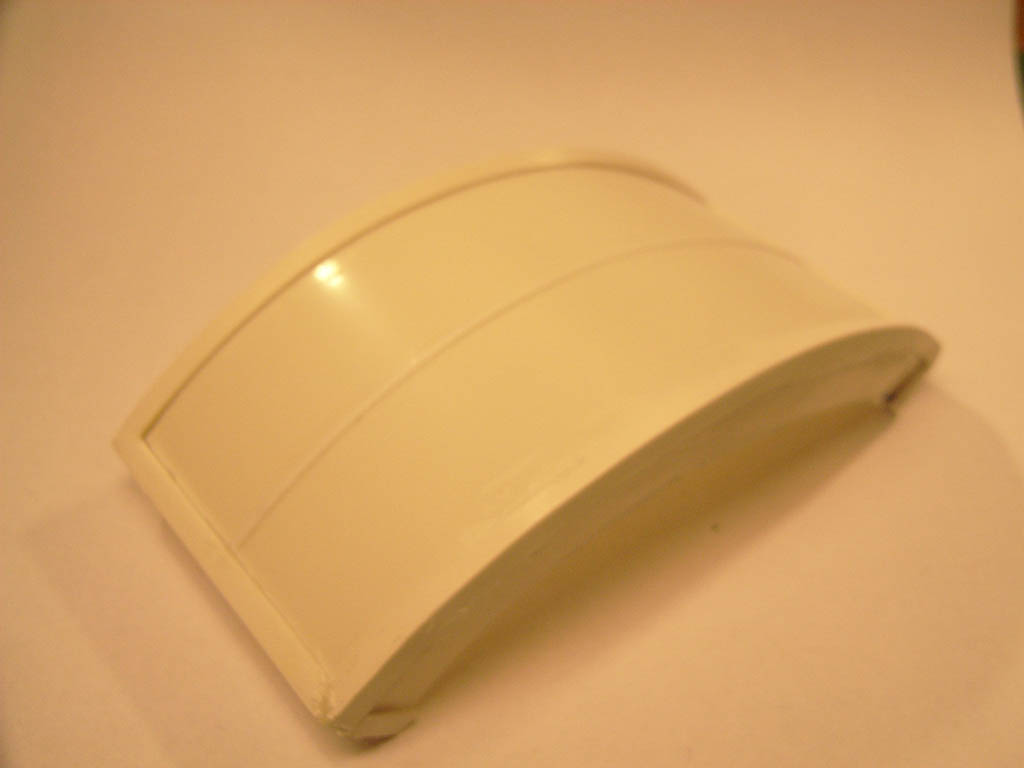
First, I disassembled the gumball machine. It turned out to be constructed out of two distinct types of plastic; a hard, brittle one for the transparent dome, and a slightly flexible, but very thick, type for the base and mechanism (and the screw-on top of the dome). The mechanism was flimsy and jammed at the very first try, so I put it aside, and did not use it in this project. The same went for the top lid. This is an identical one (I bought several; these could come in handy at some point ;) ):


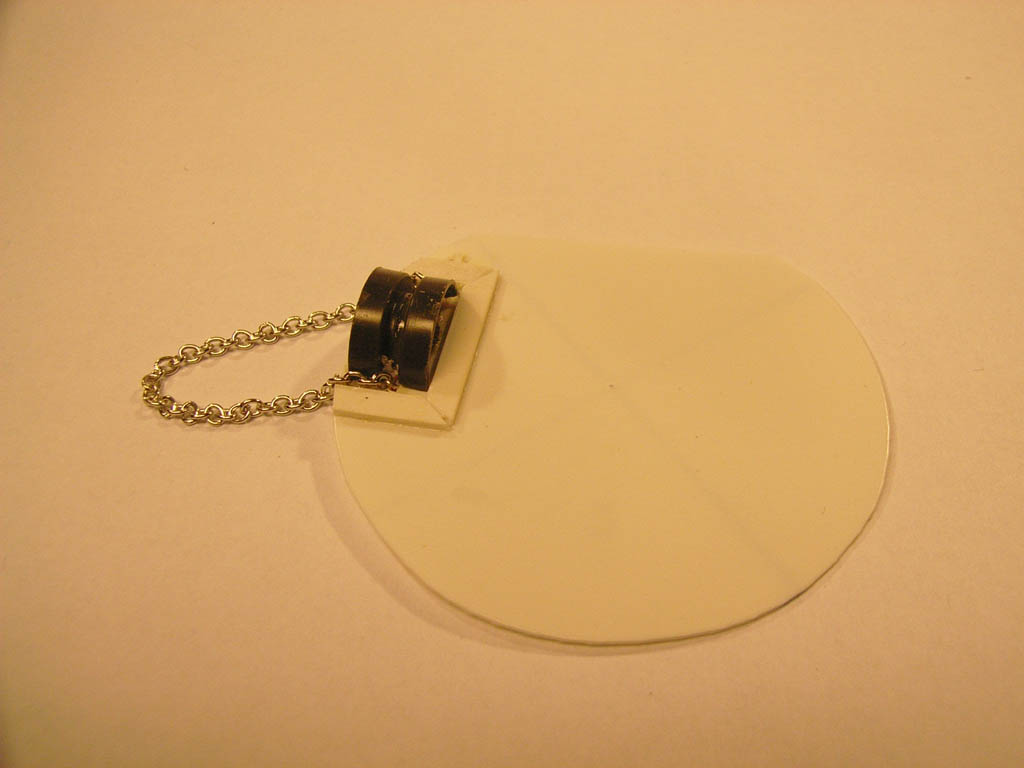
There was a bottom clicked into the base, which had a bit of a concave centre though, which I later used for the inner floor of the dome.

I then started to play around with the individual parts, and quickly saw that the space previously occupied by the 'gumball release mechanism' (which sounds remarkably Dr. Evilish actually lol ), was perfectly doorshaped, when the base was turned upside down!

So I closed off the inside of the alcove with some plasticard, and used rectangular plastic tubing cut in short pieces as the stones around the door opening. And lo and behold; the remaining space was a perfect fit for a spare door from a Citadel building kit (either the Watchtower, or the Chapel). But the alcove was way too tall, so some steps were required to reach the door.


The steps were made from some textured plasticard and a cut off from a Citadel Watchtower stair. I then cut the stepping stones from square plastic rod, and made the top stone out of a random piece of very thick plasticard. The handrails were made from small diameter square plastic rod, with the ends slowly bent around a tool handle, then cut to size. I drilled some holes for where the posts of the rails would attach to the stones, and used some plastic strip for the bases of the posts. The stones forming the base/foundation of the observatory were made by slicing some 4mm MDF cut offs into thin strips, that were then cut into individual stones. The rough surface of the cut MDF gives the stones their structure. They were glued to the base with PVA glue, but only after coarsing up the surface of the base. Equally, I used very rough sanding paper to add some structure to the surface above the stones.

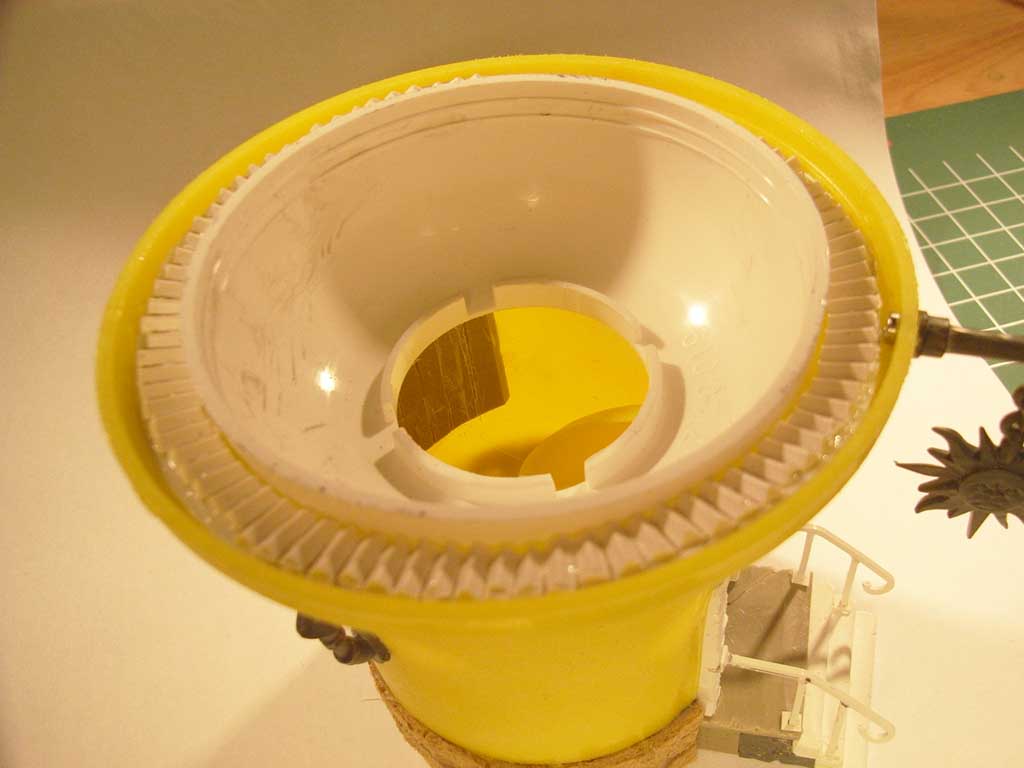
On to the dome mounting and its mechanism then. I found the dome to sit too low on the base, so I found a piece from an old lamp (part of its cover), to fit into the base. This solved the height problem, but left a rather large gap between the edge of the base, and the insert. After some deliberation, I decided that that would be the place where the dome's rotation mechanism would be located. So I fitted some spare plastic sprockets to the dome (5 in total), angled down into the gap. I then used two plasticard half circles to fit snugly between the edge and the insert, and cut off about two zillion pieces of triangular plastic rod, to serve as the teeth into which the sprockets would catch.


Great, but now the back of the building was looking rather plain. So I cut out a large chuck of the wall, and thinned the edges of the gap by cutting material away. I also cut out some cracks in the plaster, and fit a piece of brick textured plasticard behind the hole. Now some plaster had fallen away, revealing the masonly underneath. Cool. For good measure though, I also fit a space chimney/smokestack to the base. after all, it can get cold up in these observatories during the night...


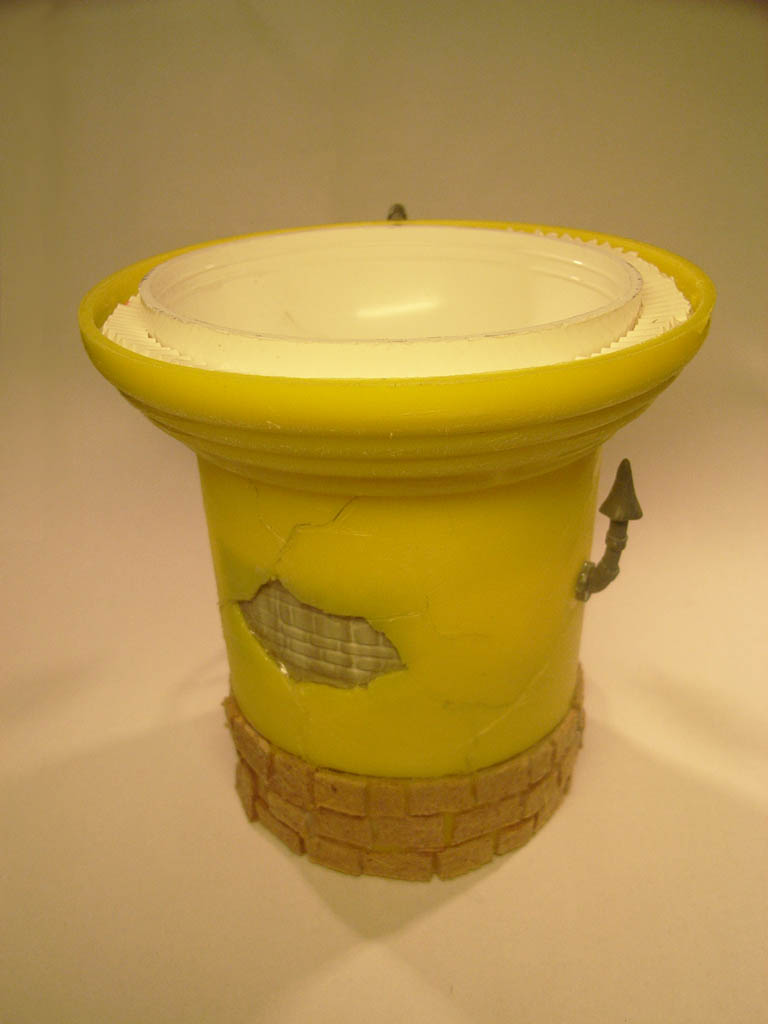
A nice sun sign would fit perfectly above the door, but I had to use a screw to hold it in place, as glueing it would have been too fragile, and thorough pinning was out of the question due to the placing of the sign (above the teeth of the mechanism). Oh; and a scroll above the door of course, where I would later paint the latin work 'Observatio'. You know; to drive the point home... ;)

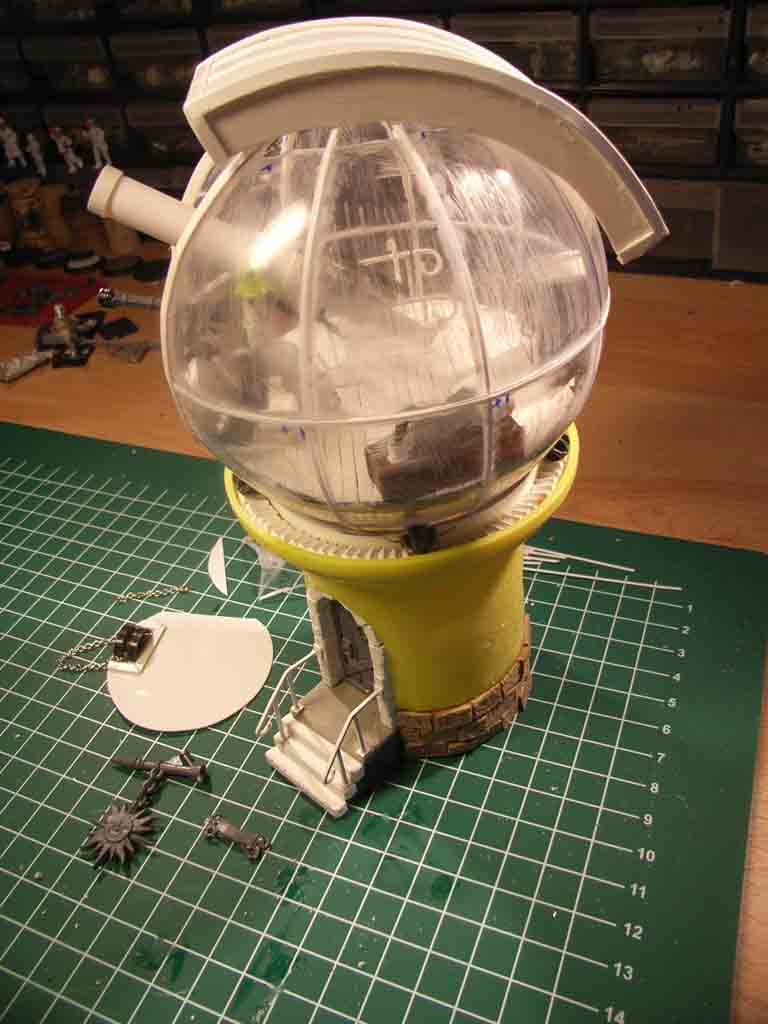
And with that, the base was pretty much done, so on to the observatory proper...

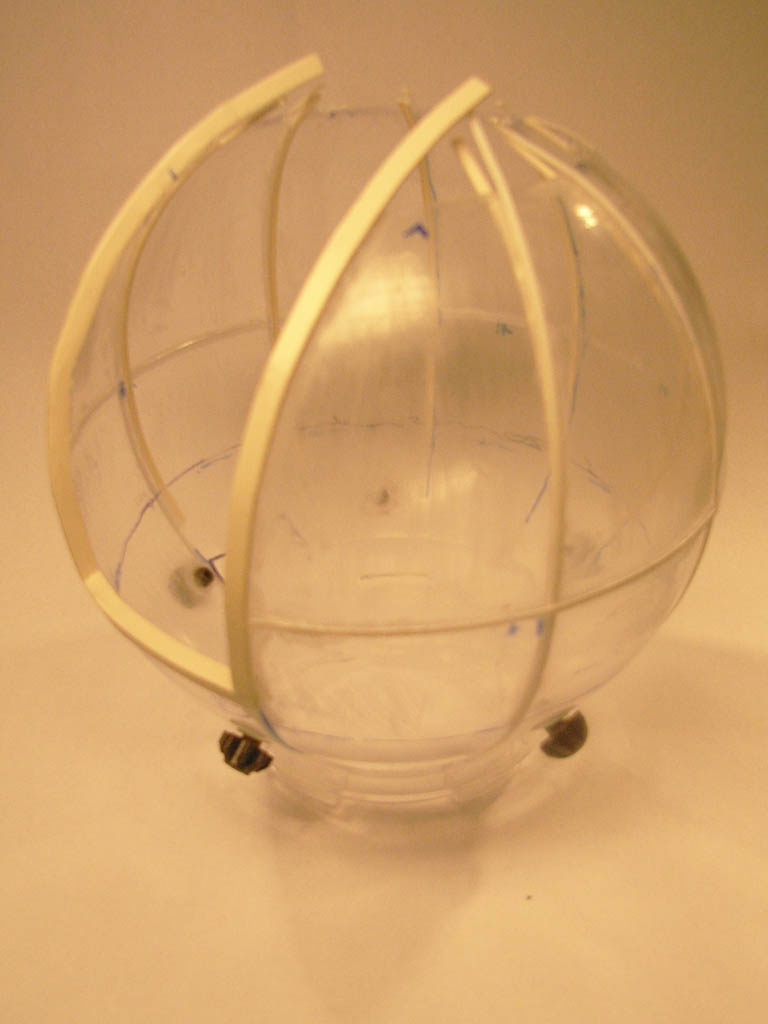
First, I sawed off the thread on top of the dome, where the cap fit onto it; I wanted a perfect sphere, and not one wearing a small cap. ::) Then, by first taping over the intended area and drawing the door opeing on the tape, I very carefully used a jeweler's saw to cut out the opening, as the clear plastic is extremely brittle. In the end I managed, with only one small corner cut off the plastic coming out of the opeing. I had inteded to use that as a basis for the door, but as the curvature was wrong for that, I only used part of it to close up the dome in the end.


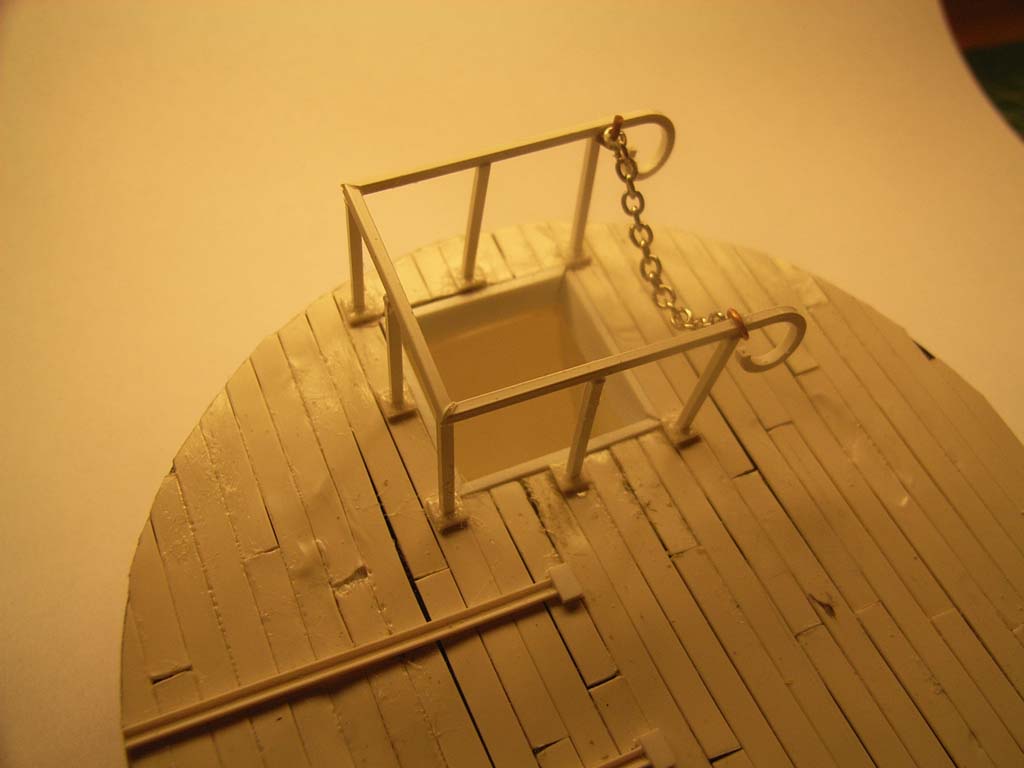
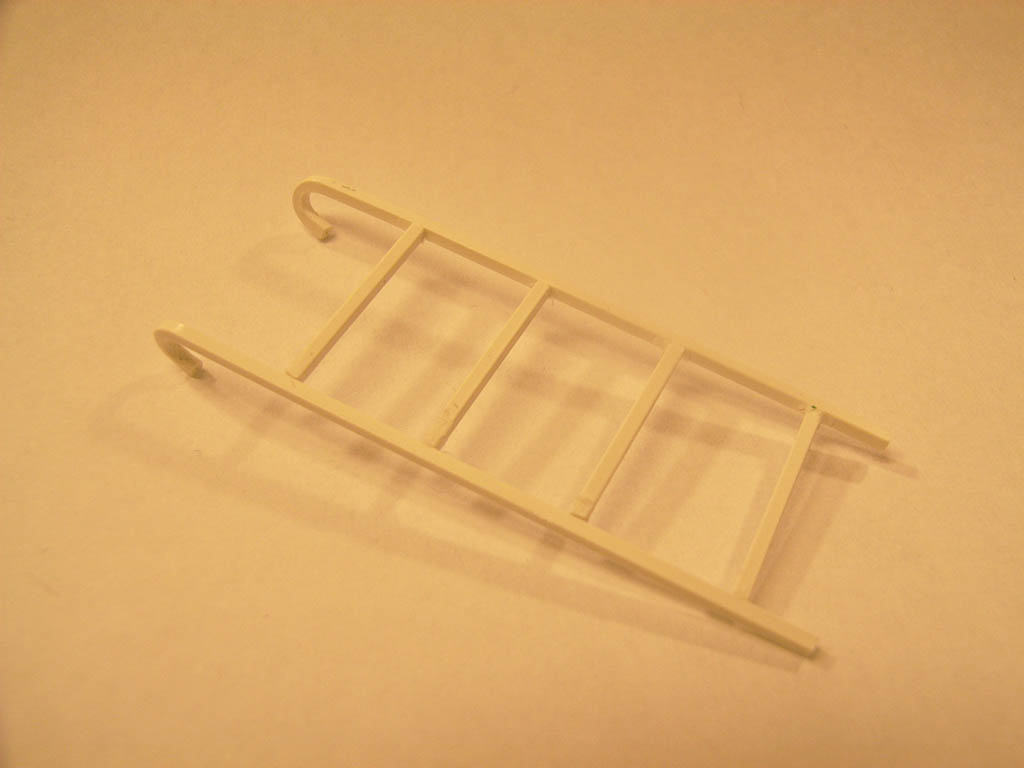
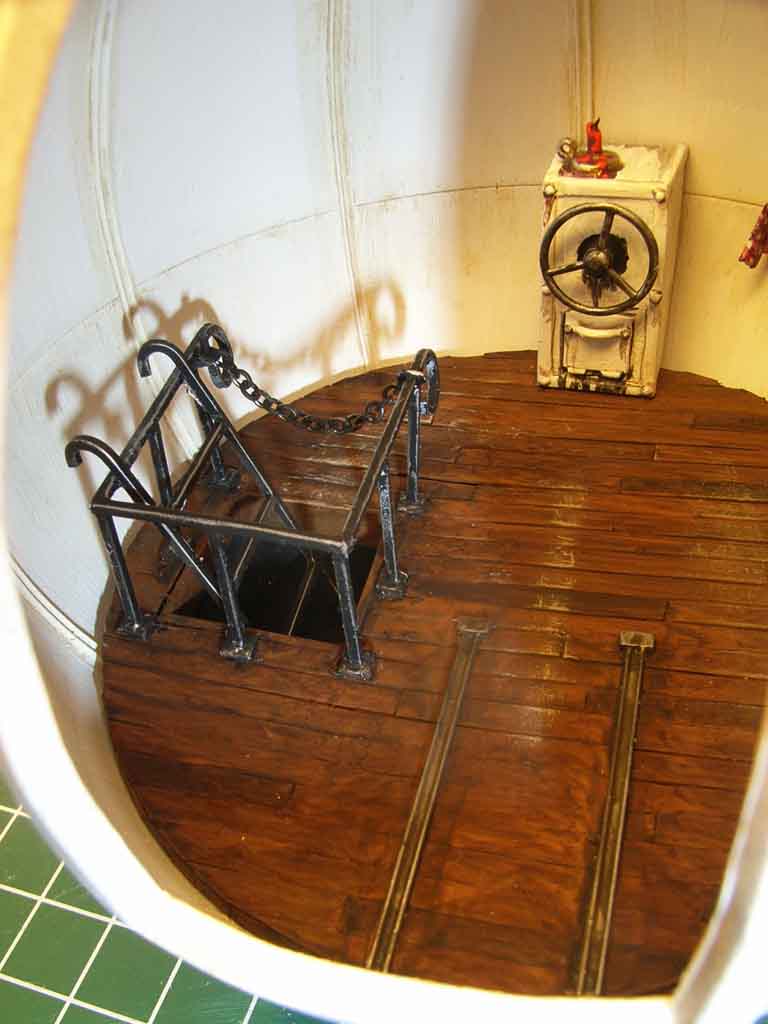
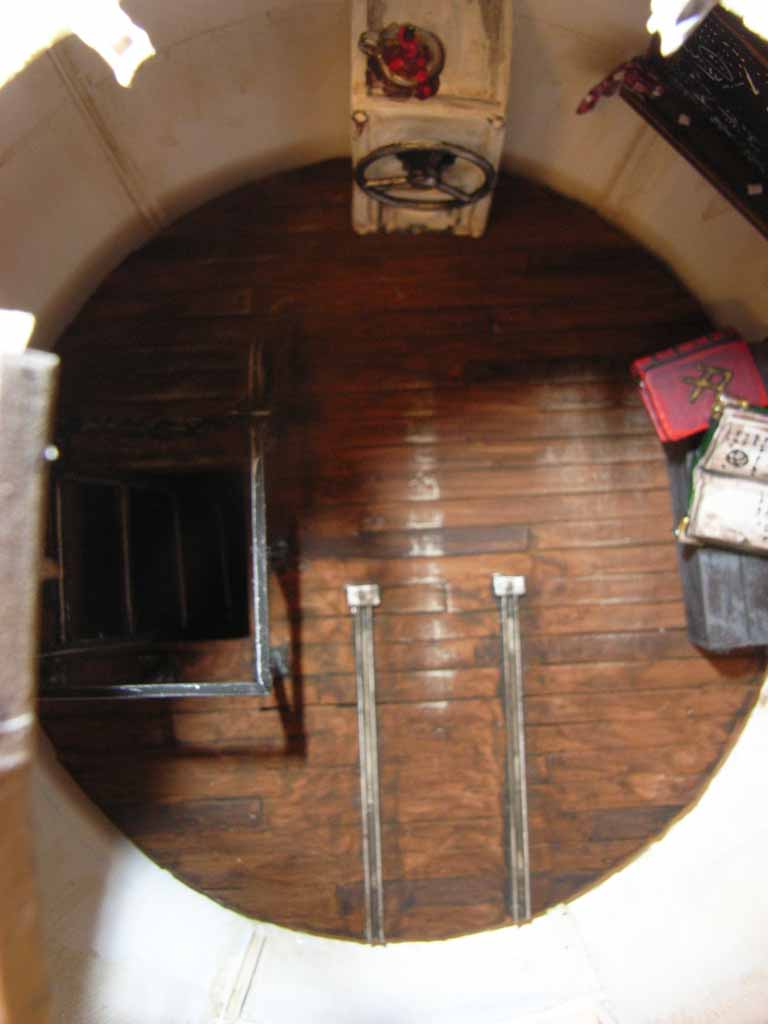
Then, I was able to fit the black original bottom of the gumball machine into the dome, and it turned out to be sized perfectly to serve as the basis for the floor. I cut out a square to serve as the stairwell, and decided to go with a ladder, as a standard spiral staircase, whilst cool, would not be a practical solution, with a rotating dome on top of it... Then 5 cm long strips of plastic strip were cut aplenty, and glued over the floorbase. The indentation was rather deep, so I did fill that with plastic cut offs, until the surface was more or less level. But the haphazardness of it created a more visually interesting effect, with the floorboards not being all level and exactly fitting.


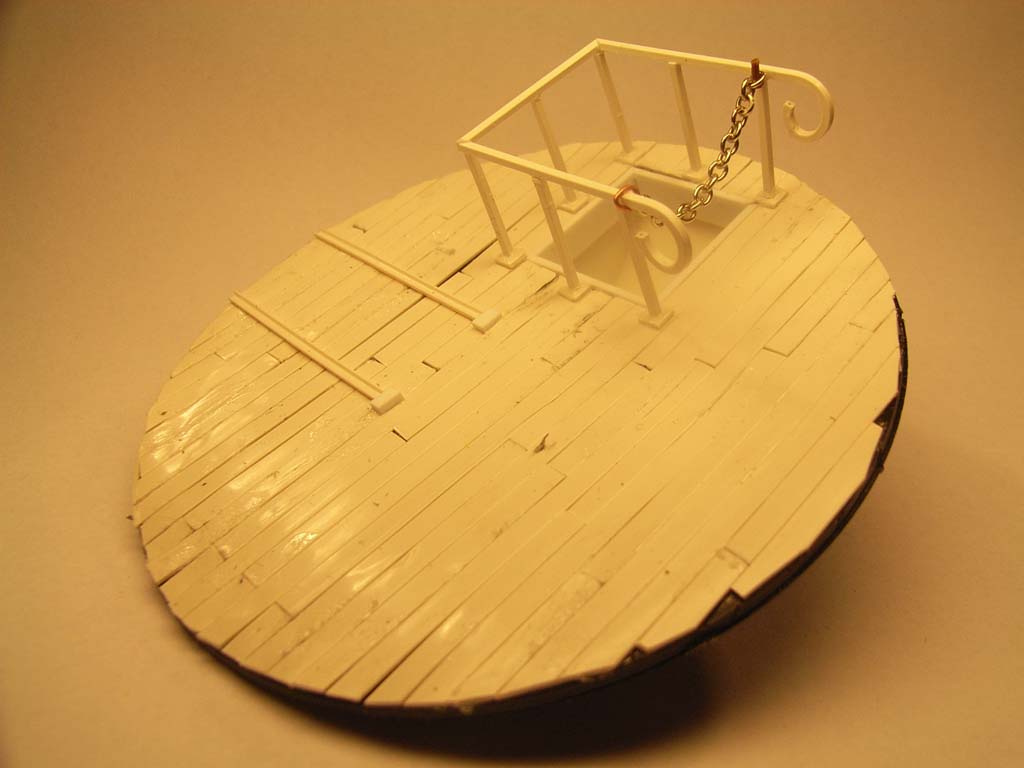
The hole was covered with more plastic boarding, and given a box underneath, to serve as the dark stairwell. I ended up cutting it back three times along the way to finally fit into the dome... The handrails here were done in the exact same way as the ones on the steps (and the ladder too), but with the addition of a bit of jewelry chain, as a bit of a safety precaution. You know; for during those long lonely nights peering into a telescope and the not fast enough returning of normal vision. That stairwell is deep...


Which firmly brings us to the interior of the dome. I wanted it to have several things; of course a huge telescope, a mechanism for rotating the dome, a mechanism for opening and closing the door, stuff on the walls and assorted reading and writing materials. I had to discard the idea of some Leonardo-esque drawings and medieval artwork on cosmology, as my printer had run out of ink, and I out of time to freehand them. I did download a veritable library of inspirational material, so I might add this at leasure at a later date after all.

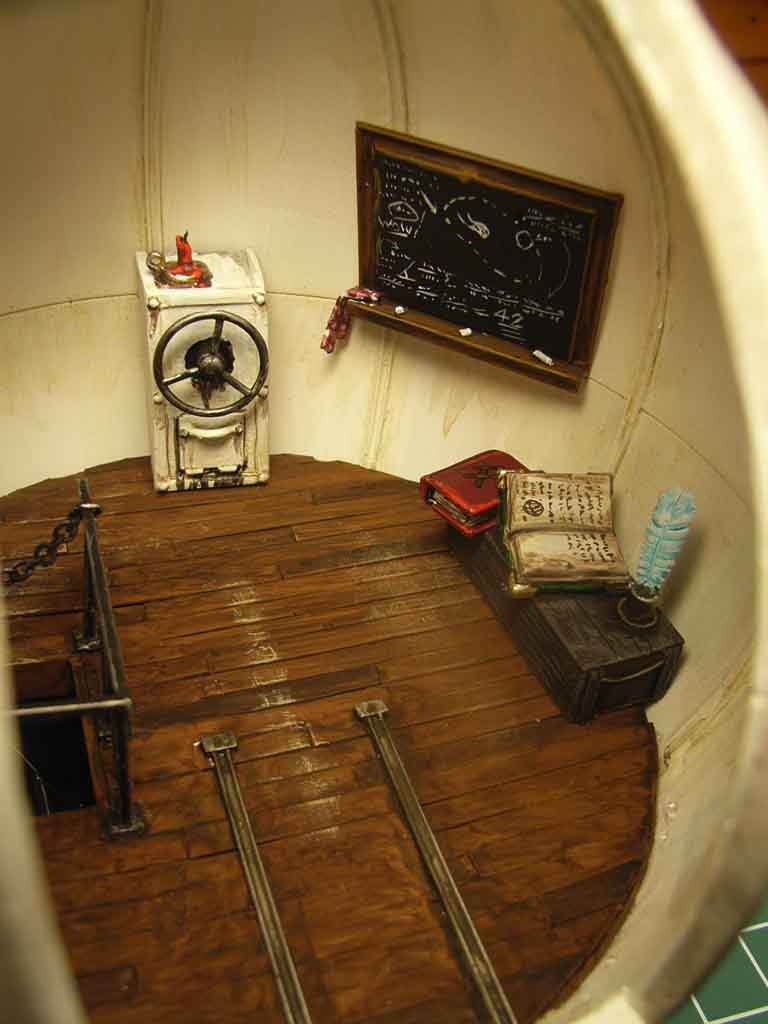
So; the mechanism for the rotation was made with some plasticard, -strip and some Tichy Train Group rivets. I then added the steering wheel from a 1/35 halftrack, and bits of plasticard cut offs for the maintainance hatch under the wheel. I used some old bits box wheel (from a 20 year old 1/144 Mig-27, if you really wish to trigger my slightly autistic memory for all the stuff in my bits boxes...), plastic tubing and a sliver of cut-off for the candle. An overdose of glue served as the molten wax.


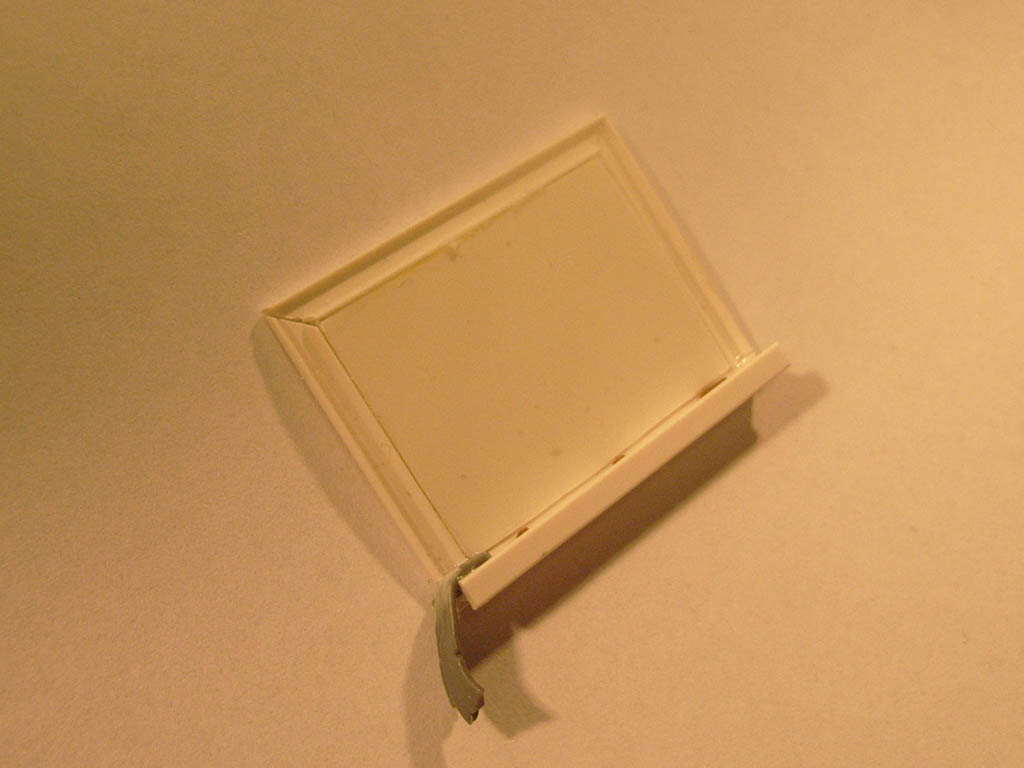
On to the blackboard, which was really simple; just a bit of plasticard, some plastic profile, a couple of plastic rod pieces for the bits of chalk and a 40K purity seal (sans seal) for the towel.


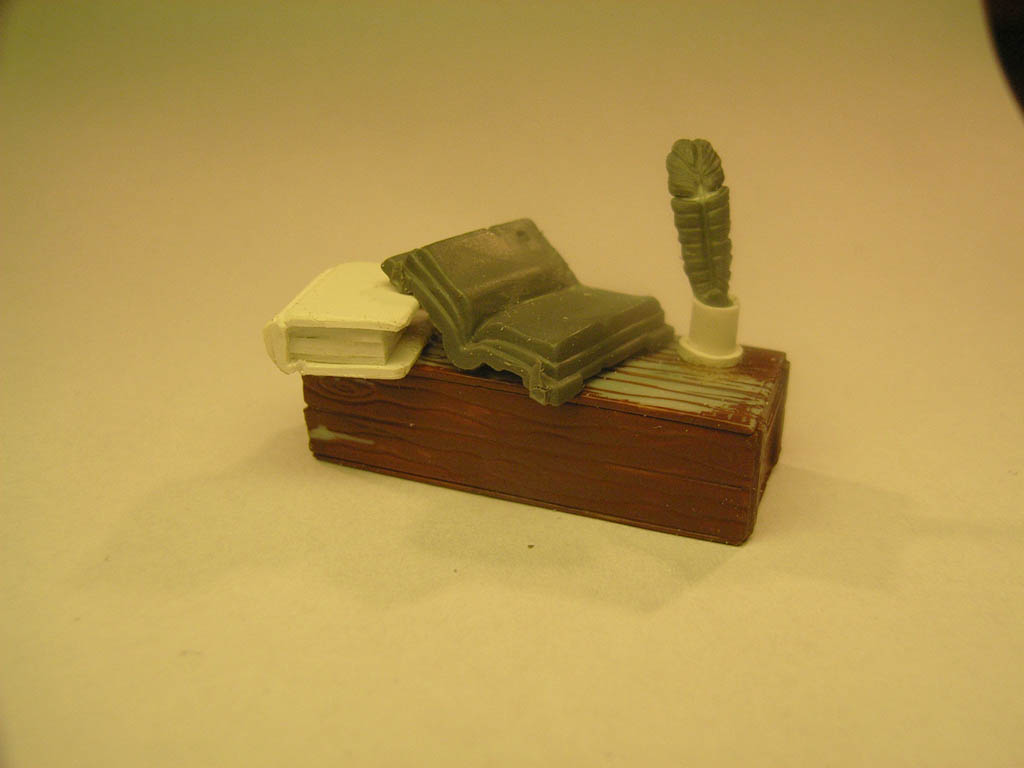
Next is the bookchest. Which is a bit of 1/35 stowage off the earlier mentioned halftrack. The open book is from a Skaven Plague Priest, with the hand cut off, and the closed book is a couple of bits of plasticard. The inkwell exists of 2 diameters of plastic tubing, and the quill is made form the top plume of some High Elf (who won't be missing it, trust me... :D ).


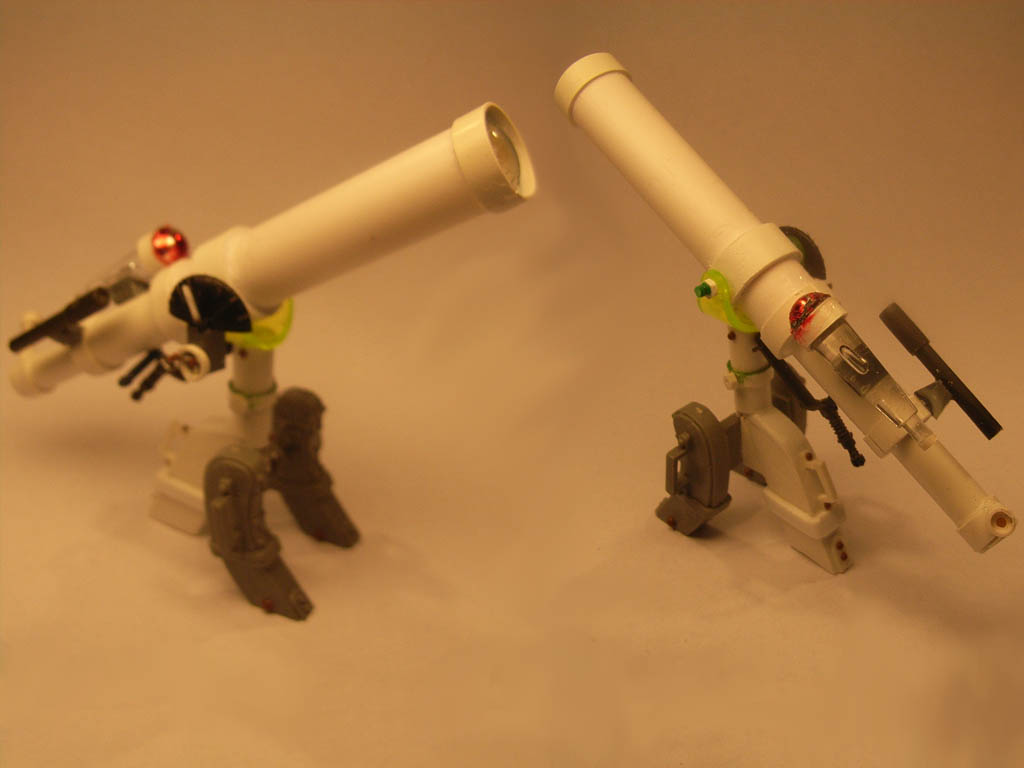
Finally, I glued some plastic profiles to the floor, to act as rails for the telescope, as by this time, I had already made a start on that, and I had foregone thinking about a way to deploy and retract it. So now, the two front legs of the telescope base have wheels inside, rolling on the rails, whilst the back leg is there to stabilise the contraption when in rest.

All right; the telescope. Basically, it is a collection of plastic tubing of many diameters. Cool detail is that the main lense is actually made from an old contact lense (don't need them anymore; got my eyes lasered a couple of years ago). Threst is made of different bits and bobs, the most notable being the front of the base, which is from an Empire cannon, and the swivel holding the telescope, which is a Lego helmet visor. One of the secondary scopes is made form a small flying base.


So, finally, I added some plastic profile to the inside of the sphere, to represent the framework of the dome.

However, first, I had added strips to the outside, showing the welds/folds/seams of the individual copper plates of the exterior. Here the cogs/sprockets can be seen well too:


Then came the scary part; I would have to fit the interior in first, and then close off the dome, as the floor would not fit through the door. So I painted the interior, and then went on with finishing the construction...


With the interior done, I went on to close the dome. I had already decided to not go with a horizontal sliding door, but with a door sliding up and down. Reason for this was the fact that this way, I could hide the fact that the sphere was not really closed at the top, and I feared that any attempt at smoothing and covering over the hole, would still be visible after painting. And also, this was easier... ;)

So, I did some measuring, and cut out the sides of the door from plasticard. With those as the sides, I made a box shape, that just happened to curve upwards (or downwards, depending on your relative position to it and the earth of course :P ). A rectangle of plasticard and some carefully bent corner profiles finished off the door. I wish I had started on it earlier, as it is the part I'm least satisfied with. It was made on the very last night, and could have been a lot smoother, straighter and, well, just better looking. But I suppose it works.


With the door ready, I realised the need for a ceiling, so in the wee hours of the night, I started construction on that. It was there, that I located the mechanism for opening and closing the door. A trackwheel (again from that poor halftrack) cut in half, with some more jewelry chain, surrounded by some plastic strip did the trick, and glued into place, this finished off the construction of the observatory!


And then came the painting of the outside...
« Last Edit: March 13, 2012, 09:53:54 PM by Daeothar »
Miniatures you say? Well I too, like to live dangerously...
Find a Way, or make one!

Offline Daeothar

  • Supporting Adventurer
  • Galactic Brain
  • *
  • Posts: 5790
  • D1-Games: a DWAN Corporate initiative
    • 1999legacy.com
Re: Daeothar's Trash Bash 2012 Entry (Text & Pic Heavy)
« Reply #1 on: March 13, 2012, 09:50:00 PM »


Painting the outside was really a quick and dirty job, that, considering the subject, works really well. I first undercoated the whole thing with gray spraypaint. This immediately bound all the parts together into one big object, as opposed to looking like a lot of transparent, white and yellow bits and bobs.

I started with the plaster of the base walls. I used an old technique I know works well for this kind of stuff; I tore some foam from blister packagings into small irregular bits, and dabbed the first coat of dark gray onto the undercoat. I then repeated that all over the plaster areas, with increasingly lighter mixes, with some yellowish brown thrown in, some dark brown and even black, before working back up to the lighter shades again, taking care to let the previous coat dry thoroughly first, before the next coat. This way, a texture, much like real (coarse) plaster is achieved.

Next up was the stonework.Loads of inking and drybrushing, washing and more drybrushing to get to the final result. Some darker,blueish gray tones were used for this, with near black for the cement. Some darker washes of brown were also used.

For the Brickwork, I went with a highlighted Vallejo Dark Fleshtone, with dark gray for the cement.A very, very light grey drybrush went over the entire surface, to bind it together. The door and signs were treated the same way as the inner floor: a basecoat of Snakebite Leather, with a small amount of Dark Fleshton added. Then several washes of Vallejo Dipping Solution (basically a darker GW Devlan Mud in a huge pot). And now for the secret ingredient... Just before each coat of the wash was dry, I'd brush it with a clean brush, everytime in the same direction. This created astriped pattern very close to that of woodgrain, as can be best seen in the pictures of the interior floor. Some boards were given an extra wash of a mix of the Vallejo stuff and diluted black, to create some difference in the colour of the individual boards. Overall a pretty effective illusion of wood, if I do say so myself...

Then; the dome. Trust me; this was one of the easiest parts. Basecoated with straight Vallejo Model Colour Green Sky, then washed with the same Vallejo stuff as the wood, sometimes strongly diluted, sometimes almost straight. I even took some off with a wet rag here and there, smearing it too. I tried to make vertical smears, working from a diskload of assembled reference material, which worked quite well; I even surprised myself there. To finish off, I diluted some of the base green with white and highlighted all edges very lightly, but also did some streaks here and there, to add even more texture to the copper.

The iron of the rotation disk, drainpipe, chimney etc, was done with (again) VGC Dark Fleshtone, with Boltgun Metal, and some black washes and streaking too.

I've left out a lot of the details and some other elements, but my keyboard is starting to protest my attemps at writing a novel about my entry, so I'll leave it at this for now. Any more questions, I'll be happy to answer of course. :)

Oh; one more thing. The theme. It was actually based on the free miniature that was handed out when buying a ticket at Crisis 2011, which represents Mercator. I thought he'd make the perfect occupant of the observatory. I even had all figured out how he'd look great with Hasslefree's village idiot I got recently (he IS in the first picture, but now beguiled by a sexy witch, whilst some dark elf cutpurse is preparing to rob him). Mercator (or Rupelmundius, as he called himself as well) would have been holding out a globe in his hand, at head height, whilst his dim audience scratched both his head and butt at the same time. But regretfully, I simply did not have the time to paint him up well enough to appear in even a blurry picture...

But here at least, is the colourpiece I wrote to accompany the observatory in the competition:

"Rupelmundus put down his quill and looked up, through the still opened window of his tiny observatory, at the first light of the new day. As usual, he had worked through the night. He was so close to resolving this cosmic puzzle, he could almost touch it. But science would not be served by him working himself to exhaustion.

He stood up from the book chest, which had been his improvised chair for many a night already, and with a groan, stretched his sore, aging body. He’d better ask Wort to retract the telescope and work the roof closing mechanism again, when he arrived from the village.

Which could be any minute now, he realized. He needed to be outside before his servant came in, as the observatory was cramped enough with one person moving about, let alone two. Especially if one those two was a well-meaning, but clumsy oaf, named Wort…

He blew out the single candle, and grabbed his hat. He made a few more hasty scribbles on the blackboard and made his way down the steel ladder to the ground floor. Outside, he could hear Wort already, singing loudly to himself, as he approached with Rupelmundius’ breakfast."
« Last Edit: March 13, 2012, 09:56:07 PM by Daeothar »

Offline Dr.Falkenhayn

  • Mastermind
  • Posts: 1540
  • guckst du?
Re: Daeothar's Trash Bash 2012 Entry (Text & Pic Heavy)
« Reply #2 on: March 13, 2012, 10:05:03 PM »
Hats off to you Ruben,this is truly amazing  :-* :o

Offline robh

  • Scatterbrained Genius
  • Posts: 3384
  • Spanish offworld colonies
Re: Daeothar's Trash Bash 2012 Entry (Text & Pic Heavy)
« Reply #3 on: March 13, 2012, 10:06:23 PM »
Agreed, an outstanding model. Really well done.

Offline Sangennaru

  • Galactic Brain
  • Posts: 5779
  • The Lazy One
    • The Lazy Forger
Re: Daeothar's Trash Bash 2012 Entry (Text & Pic Heavy)
« Reply #4 on: March 13, 2012, 10:09:42 PM »
Excellent model, and the concept is great. The blackboard is the finishing touch.

In my opinion the reason why it was "only" (wow, still great!) third is the painting: it is perfect for gaming, but maybe with all this level of details it deserved some weathering pastels and an airbrush! =)

really lovely, i very like all this! =)

Offline dampfpanzerwagon

  • Scatterbrained Genius
  • Posts: 2793
Re: Daeothar's Trash Bash 2012 Entry (Text & Pic Heavy)
« Reply #5 on: March 13, 2012, 10:14:05 PM »
Outstanding work.

A true master of the Scratch-Build. I take my hat off to you sir. Very well done. The initial images were good, but this extra information is just awesome.

Thank you for posting.

Tony
http://dampfpanzerwagon.blogspot.com/

Offline Andym

  • Supporting Adventurer
  • Galactic Brain
  • *
  • Posts: 6562
Re: Daeothar's Trash Bash 2012 Entry (Text & Pic Heavy)
« Reply #6 on: March 13, 2012, 10:30:56 PM »
WOW!! :o :o That interior is lovely!! The stairs! The mechanism. The books! And the blackboard!! (...and the answer is 42!! Nice!)

The is a fantastic model!

Offline Mason

  • Elder God
  • Posts: 21222
  • Eternal Butterfly!
    • Blind Beggar Miniatures
Re: Daeothar's Trash Bash 2012 Entry (Text & Pic Heavy)
« Reply #7 on: March 13, 2012, 11:48:56 PM »
 :o :o :o

Amazing!

I had been hoping that you would post a WIP of this, because it is brilliant and I want to steal the design!
I wondered what the base components were, and now I know.
Until you posted this, I thought it was great anyway, but the interior takes it to another level!

Thank you so much for the WIP, Ruben.
It is a fantastic concept, as all the entries for the Trash Bash were, and must have been an almost impossible task for the judges.
Brilliant, just brilliant (and stolen for future reference!).

 :-* :-* :-*

Offline bandit86

  • Scatterbrained Genius
  • Posts: 2053
Re: Daeothar's Trash Bash 2012 Entry (Text & Pic Heavy)
« Reply #8 on: March 14, 2012, 05:48:08 AM »
That was great!
Barbarella: What's that screaming? A good many dramatic situations begin with screaming...
http://bandit86.blogspot.com/

Offline marianas_gamer

  • Scatterbrained Genius
  • Posts: 3902
  • Our Man on Guam Watchman in the East
Re: Daeothar's Trash Bash 2012 Entry (Text & Pic Heavy)
« Reply #9 on: March 14, 2012, 07:59:32 PM »
The attention to detail is just fantastic.  I really like the wear and tear on the floor where the telescope has scraped and also where Rupelmundus stood when he was making his observations.
LB
Got to kick at the darkness till it bleeds daylight.

Offline _Si_

  • Bookworm
  • Posts: 76
    • BlokeCrafted
Re: Daeothar's Trash Bash 2012 Entry (Text & Pic Heavy)
« Reply #10 on: March 14, 2012, 08:23:41 PM »
That's fantastic, I love the inventive use of the parts and of course it really helps that you can paint!

So impressed with all the Trash Bash entries I've seen so far, you folks are incredibly talented.

Offline SirAlban

  • Librarian
  • Posts: 140
Re: Daeothar's Trash Bash 2012 Entry (Text & Pic Heavy)
« Reply #11 on: March 14, 2012, 11:32:39 PM »
Absolutly impresive  :-*

Offline haydn

  • Assistant
  • Posts: 25
Re: Daeothar's Trash Bash 2012 Entry (Text & Pic Heavy)
« Reply #12 on: March 16, 2012, 07:38:32 AM »
An excellent build from some very simple parts.
Many thanks for your notes on the build and paint techniques.
This will encourage others to kit bash parts.
life is a journey.
It how you tavel on that journey, that matters.

Online anevilgiraffe

  • Scatterbrained Genius
  • Posts: 2209
    • http://anevilgiraffe.blogspot.com/
Re: Daeothar's Trash Bash 2012 Entry (Text & Pic Heavy)
« Reply #13 on: March 16, 2012, 02:20:57 PM »
great model...  :o

Offline Coronasan

  • Scientist
  • Posts: 314
Re: Daeothar's Trash Bash 2012 Entry (Text & Pic Heavy)
« Reply #14 on: March 21, 2012, 10:46:53 PM »
Fantastic, I love all the fiddly detail bits.
So much to do, so little time...


Related Topics

  Subject / Started by Replies Last post
13 Replies
3634 Views
Last post January 24, 2012, 10:31:46 PM
by Roebeast45
44 Replies
8490 Views
Last post March 02, 2012, 04:47:33 PM
by Roebeast45
38 Replies
9497 Views
Last post March 13, 2012, 12:12:52 PM
by Commander Vyper
0 Replies
1028 Views
Last post February 15, 2012, 11:47:18 AM
by Roebeast45
4 Replies
1934 Views
Last post March 13, 2012, 12:08:16 PM
by Commander Vyper