*
Welcome, Guest. Please login or register.
April 25, 2024, 06:38:35 AM

Login with username, password and session length

Donate

We Appreciate Your Support

Members
Stats
  • Total Posts: 1690596
  • Total Topics: 118339
  • Online Today: 840
  • Online Ever: 2235
  • (October 29, 2023, 01:32:45 AM)
Users Online

Recent

Author Topic: Building the "Red Dragon" junk (Update 15.10.14 finished hull)  (Read 11749 times)

Offline matthais-mouse

  • Mad Scientist
  • Posts: 903
Re: Building the "Red Dragon" junk
« Reply #15 on: April 02, 2014, 04:41:31 PM »
This is amazing  :D
 lol such planning, much wow.
.: Logan's band of survivors of the battle of Ursun's teeth :.

For blog posts with more info here.....
http://let-the-galaxy-burn-again.blogspot.co.uk/
And the vlogs here....
https://www.youtube.com/channel/UCzyMQNtc1ANwIbEN80M-gwA

Offline meraklis

  • Assistant
  • Posts: 26
Re: Building the "Red Dragon" junk
« Reply #16 on: April 11, 2014, 02:52:32 PM »
whoever makes wooden kits has my utter respect! especially when they achieve such great results like you did! gongrats on that beautiful model!

Offline Admiral Benbow

  • The Queen's Own Gizmologist
  • Scatterbrained Genius
  • Posts: 2743
  • "Creativity is a drug I cannot live without."
    • The Benbow Workshop
Re: Building the "Red Dragon" junk
« Reply #17 on: May 03, 2014, 07:27:27 PM »
Hello, a major update today. I used the better part of my easter holidays to work on this, err, spanish kit. The problem is, it's no kit in the conventional sense as lots of parts are within the box, but they are only partly finished or just basic materials. Mostly basic materials like wood strips, rod, mountings and some precut plywood parts. And most of those precut things don't fit exactly, only partly or not at all. Don't know if that's a trademark of most wooden ship kits or just the spanish ones.  :( Much frustration programmed.

When all planks had been nailed and glued down onto the frame, everything was cut to length and shape and some hours of coarse, medium and then fine sanding came next on the workplan. A new base for the hull was cut from thin ply and glued down, sanded afterwards.


I decided to completey leave the second set of thin veneer strips out, they would have been glued on top of the first planks to hide all the tiny nails. Only more work, and for a wargames model which would be coloured and weathered anyway I even liked the rows of nails. Some pics from the net show chinese junks in absolutely washed-up and battered conditions, so that seemed suitable. Instead of that secaond set of strips the hull was painted with a Humbrol medium brown enamel thinly and got drying time of two days. Then it was sanded again and had a nice shine already (will be varnished later).

Then I started the deck and superstructure. Of course, everything had to be planked again, let dry and cut to shape before mounting to the appropriate places; did I say it's very time-consuming?  ::)


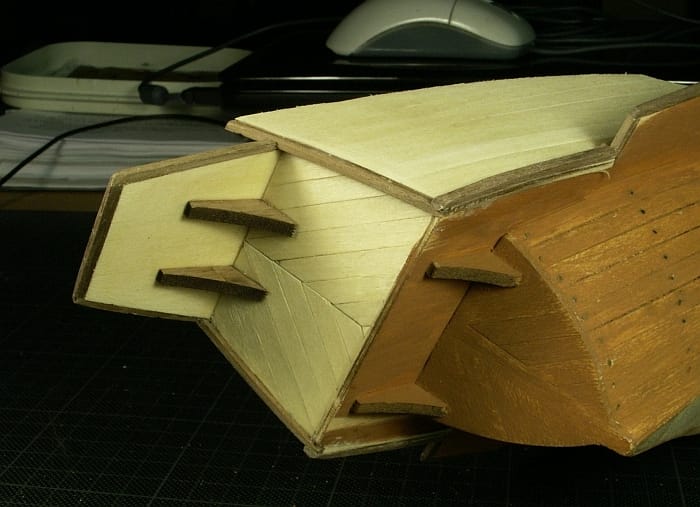
Then followed the worst nightmare, fixing the sides to the main hull. The precut front support for the sides was much too thinly constructed and couldn't stand any pressure; it broke, and I had to saw out another sturdier one. I started using white glue, but due to the thickness and rigidity of the planked plywood this only worked in the back parts of the hull. Next came a strong contact glue, but failed as it was very difficult to get some strong clamps in place. Du to the twisted shape of the bow my clamps slipped off again and again. In the end - after much swearing - I used a two-minutes two part epoxy, my hands and much fixing tape. It worked.  ;D


Most decks and balkonies got some outer hardwood strips afterwards, the after deck some supports and two accessions to the outer balkonies had to be cut into the side plates. Sanding again, of course ...


That's it so far. 47 hours of work. Yes, I'm keeping a man-hour log. I think most of the harder work is done, but lots of smaller things have to be added, and of course the masts, sails and rigging. Did I mention that the sails are just a large plain piece of fabric?  :D


« Last Edit: May 03, 2014, 07:34:43 PM by Admiral Benbow »

Offline Pijlie

  • Mastermind
  • Posts: 1252
    • Pijlie's blog
Re: Building the "Red Dragon" junk (Update 03.05.14 new pics)
« Reply #18 on: May 03, 2014, 07:47:10 PM »
Very impressive and the way you constructed the waterlined hull is brilliant.

I will be following your progress closely  ;D
I wish I were a glowworm
'cause glowworms 're never glum
How can you be grumpy
When the sun shines out yer bum?

http://pijlieblog.blogspot.nl/

Offline Ignatieff

  • Scatterbrained Genius
  • Posts: 2667
Re: Building the "Red Dragon" junk (Update 03.05.14 new pics)
« Reply #19 on: May 03, 2014, 07:56:39 PM »
Wow!!!

Brilliant!   :-* :-* :-*
"...and as always, we are dealing with strange forces far beyond our comprehension...."

All limitations are self imposed.  Work hard and dream big.

Offline gamer Mac

  • Galactic Brain
  • Posts: 8213
Re: Building the "Red Dragon" junk (Update 03.05.14 new pics)
« Reply #20 on: May 03, 2014, 08:02:16 PM »
Super model and some great skills on show :-* :-* :-* :-*

Online marianas_gamer

  • Scatterbrained Genius
  • Posts: 3905
  • Our Man on Guam Watchman in the East
Re: Building the "Red Dragon" junk (Update 03.05.14 new pics)
« Reply #21 on: May 04, 2014, 12:47:42 AM »
Very impressive  :o :o
LB
Got to kick at the darkness till it bleeds daylight.

Offline warburton

  • Mastermind
  • Posts: 1955
    • Classic40K painting blog
Re: Building the "Red Dragon" junk (Update 03.05.14 new pics)
« Reply #22 on: May 04, 2014, 10:46:32 PM »
47 hours! Still, it looks damn good! Very impressive.

Offline white knight

  • Galactic Brain
  • Posts: 6180
    • WK's Miniature Imperium
Re: Building the "Red Dragon" junk (Update 03.05.14 new pics)
« Reply #23 on: May 05, 2014, 10:28:43 AM »
I think it's common to wood shipbuilding kits that you have to do a lot of work yourself to cut down the planking to the correct size. Compared to a complete wargaming scratchbuild, it's not really timesaving.

Offline OSHIROmodels

  • Supporting Adventurer
  • Elder God
  • *
  • Posts: 27764
  • Custom terrain a speciality.
    • Oshiro modelterrain
Re: Building the "Red Dragon" junk (Update 03.05.14 new pics)
« Reply #24 on: May 06, 2014, 08:19:02 AM »
Certainly taking shape and I can sympathise with your struggles. I've had a couple of wooden ship kits to do in the past and they're not easy. Sometimes it's almost worth making all the bits yourself using the kit bits as templates  o_o

I'm sure you will do a cracking job of it though  8) 8)

cheers

James
cheers

James

https://www.oshiromodels.co.uk/

Twitter account -     @OSHIROmodels
Instagram account - oshiromodels

http://redplanetminiatures.blogspot.co.uk/
http://jimbibblyblog.blogspot.com/

Offline Driscoles

  • The Dude
  • Galactic Brain
  • Posts: 4327
Re: Building the "Red Dragon" junk (Update 03.05.14 new pics)
« Reply #25 on: May 06, 2014, 12:18:29 PM »
Great work Mr. Benbow !
, ,

Offline Turbo-Ben

  • Scientist
  • Posts: 389
    • Partisan-Con Mannheim
Re: Building the "Red Dragon" junk (Update 03.05.14 new pics)
« Reply #26 on: May 10, 2014, 10:43:52 AM »
47 hours? The guy will have to pay a lot! :o

I only built some smaller boats from scratch until now, but now I know if I want a djunk to go with my sampans that I will definetly scratchbuild it again instead of using a kit! ;)

Offline Centaur_Seducer

  • Scatterbrained Genius
  • Posts: 3412
    • Gubbspel
Re: Building the "Red Dragon" junk (Update 03.05.14 new pics)
« Reply #27 on: May 10, 2014, 11:48:01 AM »
You go admiral! I don't log the man hours on my build, since it would be very very depressing if the end result isn't top notch lol

Offline dampfpanzerwagon

  • Scatterbrained Genius
  • Posts: 2794
Re: Building the "Red Dragon" junk (Update 03.05.14 new pics)
« Reply #28 on: May 11, 2014, 10:03:22 AM »
Many years ago, my Father used to make these and boats in bottles. I have always admired the models (and the kits) but have absolutely no intention of ever building one!

I also look forward to seeing how this self-inflicted torture continues.

Good luck.

Tony

Offline Admiral Benbow

  • The Queen's Own Gizmologist
  • Scatterbrained Genius
  • Posts: 2743
  • "Creativity is a drug I cannot live without."
    • The Benbow Workshop
Re: Building the "Red Dragon" junk (Update 15.10.14 finished hull)
« Reply #29 on: October 15, 2014, 12:46:28 PM »
Couldn't work on the ship for some time, but managed to get the hull finished just now. This time I didn't document every step with pics, so here are the last ones and end result. My customer and I agreed to stop building the ship here, so masts, sails and rigging will be done by himself.

Last steps on the hull: getting the ruder in place (drilling through the complete hull ...), adding the last curved strips on the ships side and building the outer balconies. Another 98 single pieces for the balconies alone. After that the ship was painted and weathered to a nice battered finish.


Next step was building, painting and weathering all the details for the deck and gluing them in place; 106 single pieces.


So, that was it. In the end I would say that building such a kit can be fun if you have enough time and a good quality product. I wouldn't do it again for a wargames model as it's not worth the trouble. But, as always, learning a lot of new things and techniques has been a nice experience. Some last pics with a crew; not the correct ones, but I don't have any chinese pirates at all ...  ;)


 :)


Related Topics

  Subject / Started by Replies Last post
10 Replies
3432 Views
Last post March 31, 2010, 03:47:47 AM
by supervike
8 Replies
7352 Views
Last post March 27, 2013, 09:27:59 PM
by Conquistador
4 Replies
1850 Views
Last post July 20, 2013, 07:04:55 AM
by bandit86
0 Replies
998 Views
Last post September 14, 2014, 12:38:47 PM
by Raxxus
18 Replies
4496 Views
Last post September 18, 2016, 04:19:02 PM
by Rich H