Hello,
Superb paintjob !!! I like the shade's flesh horses !!!
Nikkobourges
Thanks.
Painting horses is challenging because it involves painting relatively large, smooth areas, gradual curves, and shallow recesses. Highlighting the crests of the gradual curves and shading the shallow recesses are the biggest challenges.
The easiest approach is to apply a base coat and perhaps a wash to the 'horse-flesh' and leave it at that. Depending upon what you want your final product to look like, this is a perfectly acceptable approach. The use of Games Workshop's contrast paints or Army Painters' Quickshade and dipping technique are both good ways to execute this approach.
Another approach is to paint or shade the recesses in such a way as to produce a very stark, obvious shading between the muscles. This approach can produce models that look quite good when viewed from 3+ feet away, which is how models are typically viewed on the table top, during game play.
Still another approach is to highlight and shade the curves and recesses in a much more subtle manner. This is my approach. These models don't look as good on the table top, but in my opinion, they look better in photographs and when closely inspected.
I achieve the subtle shading and highlighting by following the basic recipe of figure painting: basecoat, shading, and then highlighting. My first highlight coat is my base coat color, mixed very thin so that the shaded color that I am painting over shows through a bit. My second and sometimes third highlight layer are the same base coat color, but each time I highlight I add the color to an increasingly smaller area, focused on the crest of the muscle. It's only on the third or fourth layer of highlight that I begin to lighten the color of the highlight. Once again, each highlight color should be mixed quite thin, so that each layer of highlight is slightly translucent.
As I highlight the horse, I will inevitably find areas where the transitioning of colors isn't smooth enough. In these instance I will apply a very thin coat of wash to "repair" the areas that I F'd up, and if needed, re-apply highlights to these areas. So in reality, my process isn't a simple linear Step 1 to Step 6. It's more like Step 1 to Step 4, fix those areas I'm not satisfied with, go back to Step 3, continue on to Step 5, then possibly go back again. The process is really just me painting and fixing and painting and fixing again until I'm either satisfied with the result or I've given up and decided that I'm tired of messing with it.
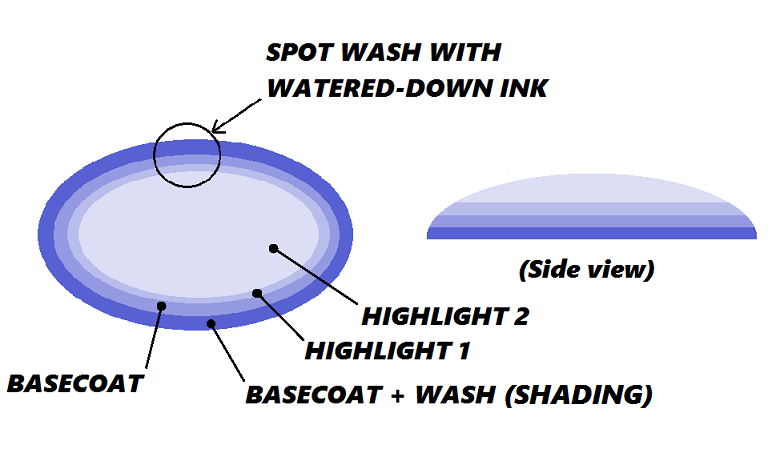
Below is an illustration I created in 2017 for my Britons' thread (see page 4 of that thread). I used it to illustrate the basics of highlighting and how I use thinned down washes/inks to "cheat blend".
Of course the process for painting black horses is a bit different because the base coat is the shade coat. Nevertheless, if the highlight transitions aren't smooth enough, I apply a very thin coat of black wash to the area, using a mixture of black paint and water or medium.


