So, an expected hiatus of 1 week turned into almost 3 weeks. This was mostly due to the weather, which did its very best to reach actual Tatooine-like temperatures, combined with a humidity more akin to that on Camino...

My painting desk is still situated on the top floor of our house, under a flat roof, so temperatures regularly topped 40 degrees C, at a humidity of 80%. So everything stuck to everything else, paint would simply not dry (I
did try), and I was sweating so profusively, it dripped from my forehead onto the mini under the brush, so I called it, and resigned myself to a vacation without hobby time.
I did manage to rewire the entire ground floor of the house, which was a mammoth task on its own, but that hardly qualifies as hobby time; that's just plain work

Yesterday though, after temperatures finally dropped to acceptable levels over the weekend, I finally managed to get some miniature work in!
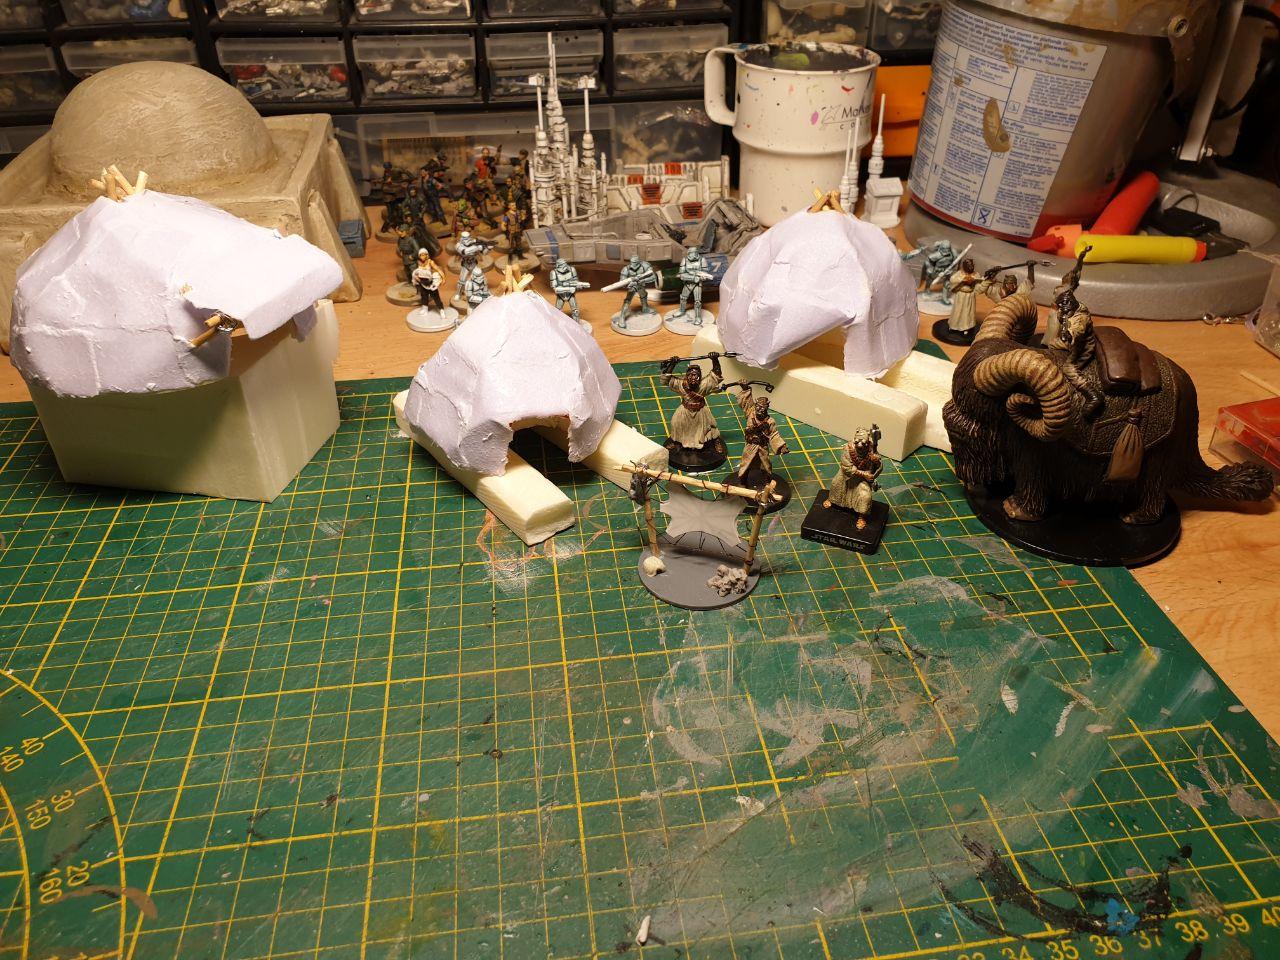
Originally, I had wanted to paint some more minis (read; Stormtroopers), but then I watched this Youtube clip of a guy making a Tusken Raider village from foam, and this seemed like the perfect little project to take on.
So I grabbed some 50mm XPS foam cut-offs, left over from building my table, and went to town on them with my foam-cutter. It was the perfect opportunity to try out the circle cutting accessory I bought from Shifting Lands a while back, and it works just great.
I started out with 3 cilinders, each 5cm high (obviously), and two with a diameter of 8cm and one of 10cm (this would be some sort of chieftain's tent).
The Youtuber used two 1 inch thick sheets glued together, so I think I had an edge there, but then; he was able to glue a smaller diameter layer on top of a larger one, so he already had a head start when shaping the huts/tents.
This proved to be the most challenging part of this build (and then only marginally so; this is a very easy project), as I used an extendable blade to make the cuts.
Now, I do have a very simple handheld foam cutter, with different, swappable, business ends, but it had decided to play hide and seek, and the most frustrating part of the build (so far
) was the hour I wasted trying to find it. So in the end, I had to settle for the knife...
By the time I got to the third hut, I had found a workable method to cut them, and the last one turned out much better than the previous two. I might opt to make a few more, to turn this hunting camp into a small village though.
His versions were perfectly hexagonal and dome shaped, with defined sides, but I purposely made mine a bit more haphazard, as I figured it fit the subject better.
I then cut out the doors, with a bit of interior space, just like my example on Youtube. Following that, I added broken off cocktail sticks to the top, to simulate the hut's framework and also some to door of the large tent, to form some sort of awning later on. Where the poles connected, I tied them together with some very soft metal wire, which I believe I once resqued from a piece of broken jewelry. It basically works like a piece of very thin floral wire I suppose (but this was free

).
Then for the fun part: I tore up small pieces of thick paper (or thin card I suppose ;P ), soaked them in a PVA/water mix, and stuck the pieces onto the huts, starting on the bottom, layering them as I worked up towards the top. I made sure I made some patched up areas here and there too, to aid in the haphazard look.
This was the first time I used this technique, and when checking the results this morning, I was really pleasantly surprised by how sturdy it had become. The foam makes them too light to use as terrain pieces in my opinion though, so I might embed some nuts and bolts into the bottom, to weigh them down a bit.
And all that's left to do now, is paint them!
Also, I also faithfully copied the Youtube guy's idea of a framework with a tanning hide. A simple (roughed up) cocktail stick frame, tied with the same soft metal wire I used before, and some thread tied and glued in strategic places to create a spider's web on the inside. I cut a hide from 0.5mm plasticard and duplicated that. I then used polystyrene glue to stick them together, sandwiching the wires. I still have to add some sort of pins to the places where the wires meet the hide.
To emphasise the savage nature of the Tusken Raiders, I added some human(oid) remains to the base as well.
Left to make is a campfire, but that's pretty easily done, and stills from the movies show some sort of conically shaped pottery stored next to the huts, so I might have a go at those too. All in all, I'm hoping I will be able to (nearly?) finish the entire set this evening.
In conclusion, this will be a nice objective for a Jedi in touch with his darker side, or a squad of Stormtroopers looking to pacify the region.
Now for an extra Bantha or two...
Oh; and during my vacation, I received a package of 3D printed Star Wars crates I bought from a seller on Ebay. He sold them in batches of 10, so I ordered two, since these are so ubiquous, and piles of them can be used as set dressing, cover, objectives, you name it.
But I was sorely disappointed when I received them;
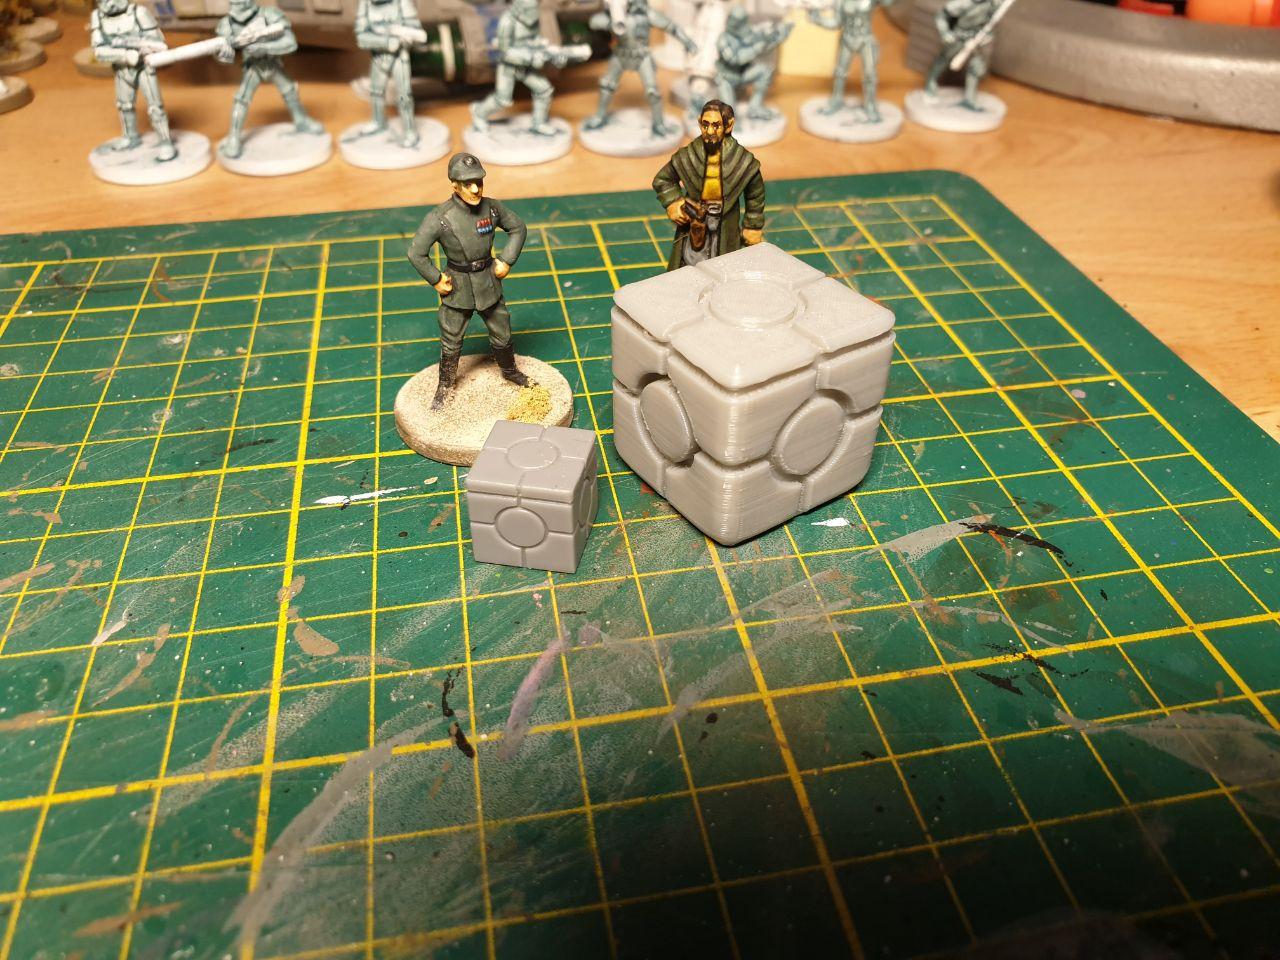
'Yeah, well, I told you not to inflate them too much, captain.'
I mean; really? They were advertized as compatible with Legion (the small crate is an original plastic Legion one), but they look more compatible with 3" action figures. Not to mention the printing layers on the product; this was actually one of the better ones.
After requesting to return them, I was fully refunded though, with the excuse that the person printing them had done so at the wrong resolution and not scaled down. So now to hunt for some better ones. Resin ones are probably a safer bet...


