*

Recent Topics

Author Topic: Atlantis expansion - Khosindan Light Railway  (Read 12630 times)

Offline Thunderchicken

  • Supporting Adventurer
  • Scatterbrained Genius
  • *
  • Posts: 3900
  • Amusingly clumsy.
Re: Atlantis expansion - Khosindan Light Railway
« Reply #15 on: July 24, 2011, 10:10:30 AM »
Thanks for the tutorial. I need to work on some track for BLAM so it's a great help.
Don't!

Offline Gluteus Maximus

  • Galactic Brain
  • Posts: 5427
Re: Atlantis expansion - Khosindan Light Railway
« Reply #16 on: July 24, 2011, 12:37:33 PM »
You've done a great job on the loco and tender! The track idea is a very good one too.

I could use one of these in Africa  :D

Offline gamer Mac

  • Galactic Brain
  • Posts: 8285
Re: Atlantis expansion - Khosindan Light Railway
« Reply #17 on: July 24, 2011, 01:50:39 PM »
Very cute :D
The track looks as if it is going to be cracking.
Keep up the good work.

Offline The_Beast

  • Supporting Adventurer
  • Galactic Brain
  • *
  • Posts: 5138
  • As my grandchildren see me...
Re: Atlantis expansion - Khosindan Light Railway
« Reply #18 on: July 24, 2011, 07:52:59 PM »
Every now and then I see Thomas 'stuff' in the thrift stores, think it might be convertible, and promptly get grossed out by the thought of 'slashing' the face off.

How weird is that?!?!?

Doug

Offline Dr DeAth

  • Scatterbrained Genius
  • Posts: 2885
    • My Little Lead Men
Re: Atlantis expansion - Khosindan Light Railway
« Reply #19 on: July 30, 2011, 09:40:08 PM »
I've made some progress on the track sections . . .

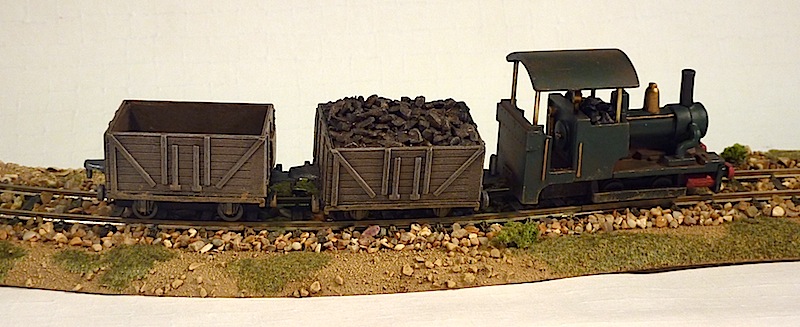
Picture of engine number one pulling 2 trucks along a finished piece of track. The last truck has had the original moulded ore removed and a floor added so that it can be used to carry troops or other items


Details of the track construction for those that are interested . . .

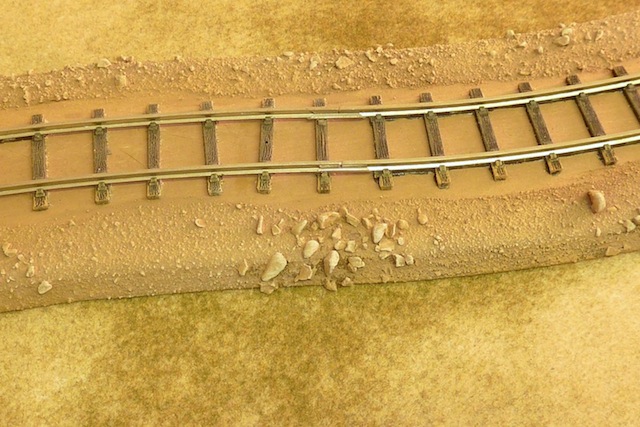
Following on from the previous work, the edges of the mdf trackbed were painted in a 50/50 mix of pva glue and emulsion (the same brown as they had already been painted). Patches of small stones were added and then it was all covered in coarse sand. It was then sprayed with a fine mist of water from a plant spray bottle - this dampens the sand and draws the pva into it to give a very strong bond when dry.


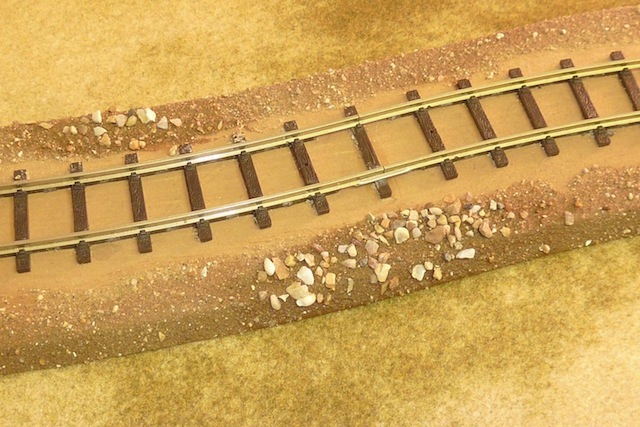
The sand and small stones came from a bag of builder's sand bought for £1.50 from B&Q. I sieved a quantity using a cheap metal sieve and separated out the larger grit to use as ballast. The alternative would be to use model railway ballast but my way's a lot cheaper :)

Once the PVA/paint mix was dry I repainted the edges in the base brown coat and then applied two lighter shades of drybrushing


Next came the ballasting. Working with the track piece flat on the workbench, I added the larger grit between the sleepers with an old teaspoon, brushing them out evenly using a dry old paintbrush - no glue was added at this stage. Once all the gaps between the speakers were filled I then sprayed it with water from the spray bottle to get the stones wet.


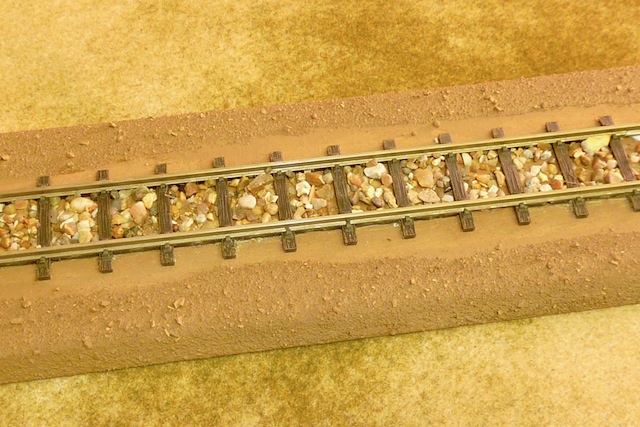
Using a craft syringe I added a few drops of a 50/50 PVA/Water mix to each pile of stones.  The piece was then set aside to dry thoroughly. Once dry, the process was repeated to ballast the outside of the track.  I decided to do the ballasting in two parts mainly because of the difficulty of handling the track piece with so many loose stones that would be on the piece if I did it in one go.


Once the ballast grit had all dried I applied patches of static grass and clumps of foliage with the 50/50 PVA/Water mix, again giving the finished piece a light misting of water to help draw the pva into the grass and give it a strong bond. One thing worth mentioning is that consideration needs to be given to the ends of each track piece to avoid unnatural looking joins. If one piece is flocked and another isn't, an odd looking straight line will result. I've decided not to apply any flock to the ends of the pieces to avoid this.

Hope you find this useful.

Next on the agenda, a pair of flat bed trucks . . .


Photos of my recent efforts are at www.littleleadmen.com and https://beaverlickfalls.blogspot.com

Offline Mason

  • Elder God
  • Posts: 21228
  • Eternal Butterfly!
    • Blind Beggar Miniatures
Re: Atlantis expansion - Khosindan Light Railway
« Reply #20 on: July 30, 2011, 09:46:37 PM »
Nice tutorial on the track-building process and TOP TIP with the water misting!
Didnt know that one.
Thanks,
Paul.

Offline gamer Mac

  • Galactic Brain
  • Posts: 8285
Re: Atlantis expansion - Khosindan Light Railway
« Reply #21 on: July 30, 2011, 11:24:12 PM »
Great stuff :-* :-* :-*
Brilliant tutorial as well.
Thanks

Offline Dr DeAth

  • Scatterbrained Genius
  • Posts: 2885
    • My Little Lead Men
Re: Atlantis expansion - Khosindan Light Railway
« Reply #22 on: August 06, 2011, 08:02:13 AM »
Finished the first track sections (all the wiggly bits).  Just got 3 more long straights, a few short straights (so I can cater for different width and lengths of tables) and two stations to complete the track project.


Offline chantyam

  • Scientist
  • Posts: 222
Re: Atlantis expansion - Khosindan Light Railway
« Reply #23 on: August 06, 2011, 08:35:15 AM »
This is just great stuff as I'm currently trying out ideas for a steam powered "rail car" using an Iornclad tank and a number of "S"? scale track from Brigade Games  so the tips on the basing of the track will come in very handy thanks.
gan canny kidder!

Offline OSHIROmodels

  • Supporting Adventurer
  • Elder God
  • *
  • Posts: 28255
  • Custom terrain a speciality.
    • Oshiro modelterrain
Re: Atlantis expansion - Khosindan Light Railway
« Reply #24 on: August 06, 2011, 09:04:04 AM »
Agree with Mason on the water misting, I've used very thin pva in a mister but didn't think you could use water itself  8)

Are you going to leave the ballast as it is or give it a bit of a dry brush to tie it together?

cheers

James

Offline Belgian

  • Scatterbrained Genius
  • Posts: 2734
    • Wargame News and Terrain
Re: Atlantis expansion - Khosindan Light Railway
« Reply #25 on: August 06, 2011, 09:44:54 AM »
I need that railway and a train!  :-*
Wargame News and Terrain Blog, daily updated with the latest wargame news

Interested click https://wargameterrain.blogspot.com/

Offline Dr DeAth

  • Scatterbrained Genius
  • Posts: 2885
    • My Little Lead Men
Re: Atlantis expansion - Khosindan Light Railway
« Reply #26 on: August 06, 2011, 09:59:17 AM »

Are you going to leave the ballast as it is or give it a bit of a dry brush to tie it together?


I'd not thought about drybrusing the ballast tbh, I'll give it a go on a test piece and see what it looks like.


Offline Pappa Midnight

  • Mastermind
  • Posts: 1657
  • Web-Fu 10th Dan Blackbelt
    • Pappa Midnight Presents Displaced Miniatures
Re: Atlantis expansion - Khosindan Light Railway
« Reply #27 on: August 06, 2011, 12:44:39 PM »
Missed this one!  :o
It always amazes me how people can see potential in "toys" which appear to have no use for wargaming at all.
Really first class work there and the track is awesome aswell.

PM
I don't want to achieve immortality through my work; I want to achieve immortality through not dying.

Offline Traveler Man

  • Mastermind
  • Posts: 1556
    • The Hetzenberg Chronicles
Re: Atlantis expansion - Khosindan Light Railway
« Reply #28 on: August 06, 2011, 04:42:59 PM »
Thanks for the tutorial. Very fine work, and inspirational. I saw a batch of railroad track of similar scale for toy trains in a local dollar store recently. I'll have to get some next chance I have.
"It's amusing, it's amazing, and it's never twice the same: It's the salt of true adventure, and the glamour of the game."

Talbot Mundy, The Ivory Trail.

http://ajstable.blogspot.com
http://hetzenberg.blogspot.com

Offline Dr DeAth

  • Scatterbrained Genius
  • Posts: 2885
    • My Little Lead Men
Re: Atlantis expansion - Khosindan Light Railway
« Reply #29 on: August 07, 2011, 10:30:25 AM »
Few more WIP shots;

Makeshift buffer stop so I can have the track ending mid table.


Same process as before for the trackbed. Polystyrene block cut to basic shape and fixed with pva.


Ready for painting and ballasting. The polystyrene block has been covered with coffee stirrer 'planks' leaving sufficient length above the top of the polystyrene to allow for an infill of ballast.

Flatbed truck - another Ertl Thomas conversion, this time using the bottom half of a milk tanker.


Wooden sheet planking has been cut to size and stuck directly to the plastic with impact adhesive. I got the wooden planks from a local model boat shop. Very useful if you want to do large areas of planks, such as decking.


Single 'plank' sides added made from coffee stirrers.


Related Topics

  Subject / Started by Replies Last post
9 Replies
3141 Views
Last post November 14, 2008, 01:03:29 AM
by wolfgangbrooks
3 Replies
2758 Views
Last post February 01, 2009, 08:29:49 PM
by Braxandur
31 Replies
8810 Views
Last post July 06, 2011, 03:33:22 AM
by isaanmini
13 Replies
3395 Views
Last post March 11, 2010, 04:40:55 PM
by rob_the_robgoblin
13 Replies
2536 Views
Last post May 22, 2021, 07:56:08 PM
by Metternich