Hi folks,
This figure is the Deep Soldier for the Fortune Hunter force for DeepWars. The game is coming out later this year and was funded in Kickstarter but there is still a pre-order option. For some information on the game see this page.
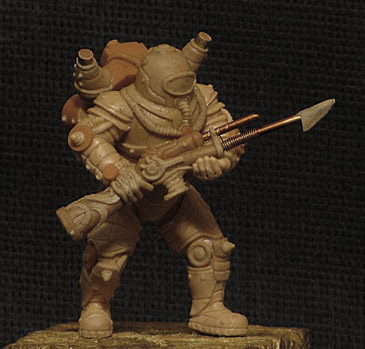
http://www.antimatter-games.com/deepwars.htmHere is the sculpt without paint or base - before casting. This figure is cast in resin.
To start, the figure was primed in white, leaving off the gun arm.

The next step was to give the whole figure a wash of a mix of burnt sienna ink (Liquitex) + Indian Yellow (Golden Fluid Acrylics) + matte medium. This was mixed about 1/3 for each part and was left a bit gloppy, adding a touch of water but mainly leaving it a thick wash. While it looks strange, the idea behind this is to create an underlying color of bronze that will show through below the later layers.

The next step is the big one, as it controls the overall color of the model. This is a wash of Burnt Umber ink + Turquoise ink (Liquitex) + matte medium. It has a dual purpose, one, to shade the figure in the cracks and crevices, and two, to change the overall tone to a dark bronze. If doing a quick gaming mini this is probably all you need, but we want something with more depth.


The next step involves highlighting with a mix of a touch of Burnt Sienna ink and mostly Golden Highlight (Reaper MSP), up to pure Golden Highlight. The trick with this type of highlighting is to use a thinned layer of paint, maybe 80% water and build up layers of highlight with quick strokes of the brush. I call it scrubbing as the the quick strokes seem to be scrubbing the paint around. Other folks call it feathering but the idea is the same, to use quick brushstrokes which allow the paint only a short time to dry. Final highlights on edges are done with Golden Highlight + water at about 50/50. Thick enough to be opaque but still smooth enough to come off the brush. A sharp point is very useful for following the lines on all of the armor plates. What you have here now is an "underpainting" that is shaded and highlighted and needs color and tone.


Now the color work can start. The underpainted model is glazed with shaded of blue-green and brown, mostly different mixes of Burnt Umber, Sienna and Pthalo blue and Turquoise. These glazes are not washed on, but are actually painted on and are typically 90% water or more since the ink is so pure of color. It does not take much to change the color tone, so use the glazes sparingly. One thing about this technique is that it necessarily messes up the clean highlighting work done in the previous step. There is no real way around this unless the glazes are applied perfectly.


The glazed model is then re-highlighted with ink mixed with Golden Highlight, up to Ivory, especially on the edges of armor plates. The glass was painted with Turquoise and blue ink mixed with Ivory. The trick for the small windows was to paint an oval in the middle, leaving an outline of "metal". The oval was highlighted and the metal given a small edge highlight so it looks like there is a border around the glass. Additionally, some blue highlights were added to the left side of the model to make it look like a blue glow was coming from above in that direction. This was done with Pthalo Blue ink and Ivory in thin layers, practically a glaze.


The right arm and gun were painted using the same techniques, then attached when the body was done. The gold on the gun was done with Indian Yellow as the base, shaded with Burnt Umber and Sienna ink and highlighted with Golden Highlight. Part of the goal here is to use a limited palette. The worn spear was simply black washes over white, highlighted with gray and white.


Finally, the base was painted to look like a mottled seafloor, with many glazes of different colors of ink and highlights done with many speckles with the brush tip. Some additional blue highlights were added and glazes of turquoise to tie it all together.


