*

Recent Topics

Author Topic: My step by step building process  (Read 2328 times)

Offline snitcythedog

  • Supporting Adventurer
  • Scatterbrained Genius
  • *
  • Posts: 2893
    • Snitchys blog
My step by step building process
« on: 05 March 2015, 11:47:52 AM »
I figured that I would show my step by step process for constructing buildings.  I generally start with the windows since I can prefabricate them so they can be installed all at once and will not slow the building process down.  These were made using stencil paper as the base since it is a fairly sturdy material and cuts easily.  I cut the individual panes out and left space for the coffee stirrer sheeting on the sides.  I used thin wood coffee stirrers to sheet the front and back face.  This helps build up the window in layers and makes them a bit more realistic.  The exterior framing of the window was done with thicker coffee stirrers and a Popsicle stick to represent the sill.  All gaps will be attended to once the windows are in place.   
Hope you like the finished product.  It took me about two or three hours for these twelve windows. 

Snitchy sends. 
A bottle of scotch and two aspirin a day will greatly reduce your awareness of heart disease.
http://snitchythedog.blogspot.com

Offline snitcythedog

  • Supporting Adventurer
  • Scatterbrained Genius
  • *
  • Posts: 2893
    • Snitchys blog
Re: My step by step building process
« Reply #1 on: 21 March 2015, 10:44:30 AM »
Real life usually interrupts my thought process.  
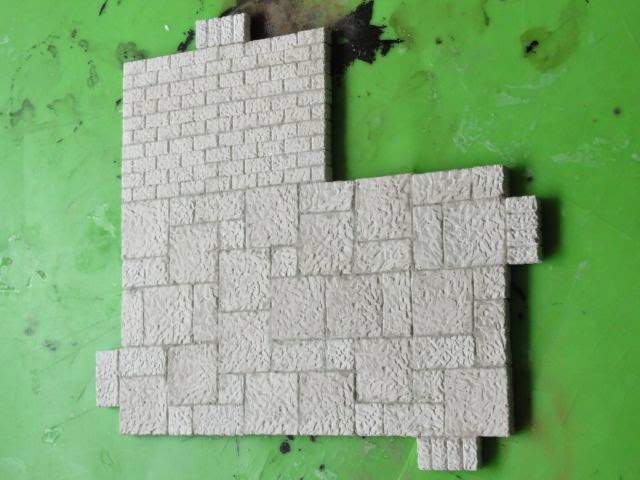
I started on the floor.  Cast in hirst arts tiles.  I glue them together face down to create a level surface.  Then the back is reinforced with more glue and putty.  When it is completely set I filled all gaps on the top surface.  
Then I built up the walls.  I edged the bottoms and sides with Hirst blocks and added rough panels to fill the walls.  Windows were added in and shimmed into place using coffee stirrers.  The walls were then capped and doors framed with popsicle sticks.
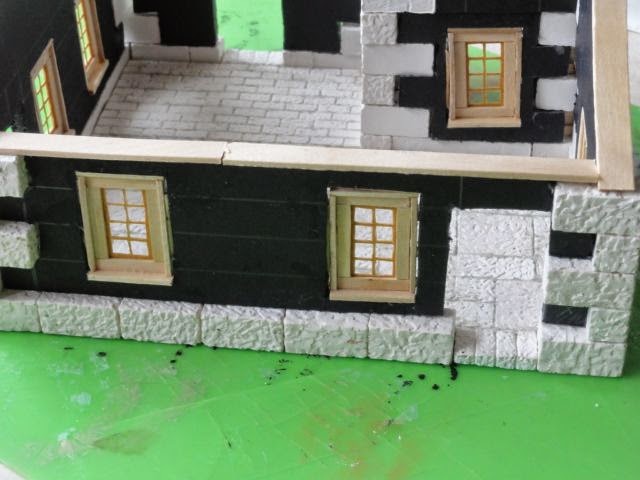
 
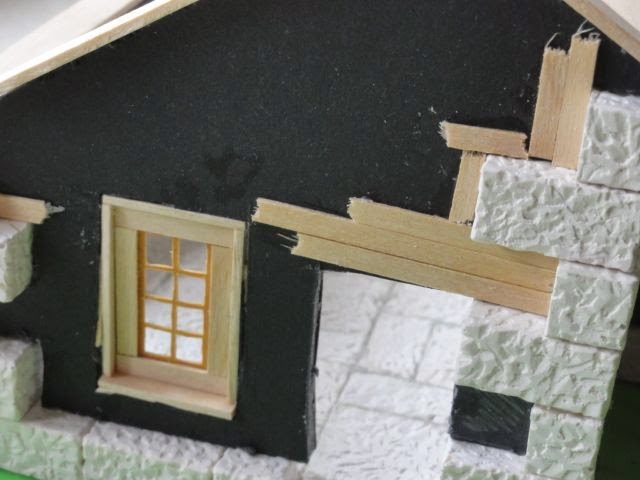
Gaps were then filled with more coffee stirrers.
When these had set I glued the entire surface of the wall and covered it with cheap clay kitty litter.  Then super glue was dribbled over all the kitty litter to protect it with a hard acrylic surface and to bond it in place.  This will give me a surface similar to flint nodules.  
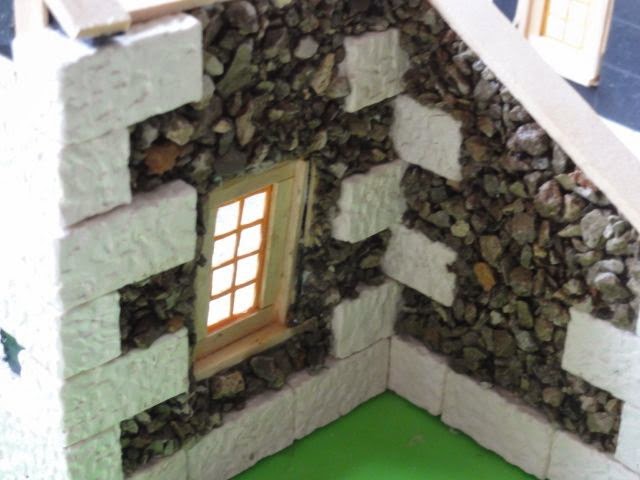
Now to finish up.  
Hope you like.
Snitchy sends.
« Last Edit: 21 March 2015, 10:49:03 AM by snitcythedog »

Offline matthais-mouse

  • Mad Scientist
  • Posts: 902
Re: My step by step building process
« Reply #2 on: 21 March 2015, 02:05:56 PM »
Cant wait to see the painted result as this looks fantastic.
I always wanted to try the hirst block system but havent had the spare money to purchase and try them just yet.

.: Logan's band of survivors of the battle of Ursun's teeth :.

For blog posts with more info here.....
http://let-the-galaxy-burn-again.blogspot.co.uk/
And the vlogs here....
https://www.youtube.com/channel/UCzyMQNtc1ANwIbEN80M-gwA

Offline Wirelizard

  • Scatterbrained Genius
  • Posts: 3234
  • Needs More Zeppelin!
    • The Warbard
Re: My step by step building process
« Reply #3 on: 21 March 2015, 06:21:53 PM »
Cant wait to see the painted result as this looks fantastic.
I always wanted to try the hirst block system but havent had the spare money to purchase and try them just yet.

There's various vendors who sell pre-cast Hirst blocks, which seems like a useful way to try them out on a small project before committing to buying the molds.

Several years ago half a dozen of us clubbed together and bought half a dozen molds in a combined order; as far as I know they're now resting on a shelf in someone's gaming room, which is unfortunate. I know it's been a few years since I've used them.

The cheap kitty litter for flint stonework looks great so far, can't wait to see it with paint on it.

Offline matthais-mouse

  • Mad Scientist
  • Posts: 902
Re: My step by step building process
« Reply #4 on: 21 March 2015, 06:52:20 PM »
I shall have to have a look on the net to see if i can find one of those vendor haha :)


Offline Vermis

  • Scatterbrained Genius
  • Posts: 2433
    • Mini Sculpture
Re: My step by step building process
« Reply #5 on: 21 March 2015, 09:45:30 PM »
Looking good! :) All the blocks and coffee stirrers and things come together nicely.

(Hope it was fresh kitty litter)

Offline snitcythedog

  • Supporting Adventurer
  • Scatterbrained Genius
  • *
  • Posts: 2893
    • Snitchys blog
Re: My step by step building process
« Reply #6 on: 21 March 2015, 11:36:44 PM »
(Hope it was fresh kitty litter)
Flavour crystals removed and all.
Snitchy sends.

Offline Captain Blood

  • Global Moderator
  • Elder God
  • Posts: 19742
Re: My step by step building process
« Reply #7 on: 21 March 2015, 11:38:10 PM »
The flint walling looks very effective already  :-*

Offline pocoloco

  • Scatterbrained Genius
  • Posts: 3848
Re: My step by step building process
« Reply #8 on: 22 March 2015, 08:27:57 AM »
Thanks for the how-to, looking fab already  8)

Offline Kes

  • Bookworm
  • Posts: 82
Re: My step by step building process
« Reply #9 on: 22 March 2015, 12:15:45 PM »
Very cool, looking forward to the next step.


Related Topics

  Subject / Started by Replies Last post
4 Replies
3200 Views
Last post 05 September 2008, 10:19:17 AM
by jet
20 Replies
9177 Views
Last post 03 April 2009, 08:03:38 AM
by Remington
31 Replies
19409 Views
Last post 18 October 2009, 10:32:37 AM
by Belgian
33 Replies
23399 Views
Last post 05 February 2011, 12:26:25 AM
by carlos marighela
29 Replies
38300 Views
Last post 02 April 2014, 01:25:02 PM
by Atheling