*
Welcome, Guest. Please login or register.
April 28, 2024, 01:41:18 AM

Login with username, password and session length

Donate

We Appreciate Your Support

Members
Stats
  • Total Posts: 1690921
  • Total Topics: 118357
  • Online Today: 657
  • Online Ever: 2235
  • (October 29, 2023, 01:32:45 AM)
Users Online

Recent

Author Topic: Comm/ops Centre scenery - Finished  (Read 11999 times)

Offline eilif

  • Scatterbrained Genius
  • Posts: 2383
    • Chicago Skirmish Wargames
Re: Comm/ops Centre scenery. The first post is a big one with lots of pics
« Reply #15 on: March 20, 2015, 10:09:03 PM »
Very nice work. I like your balance between angle, depth and rise of steps. It's a hard balance to get looking right while still being useable, but I think you got it.

Offline Elk101

  • Supporting Adventurer
  • Elder God
  • *
  • Posts: 10530
Re: Comm/ops Centre scenery. The first post is a big one with lots of pics
« Reply #16 on: March 21, 2015, 09:22:35 AM »
Stylish work,  especially on those window frames and roller shutters.

Offline JoeRugby

  • Scientist
  • Posts: 206
Re: Comm/ops Centre scenery. The first post is a big one with lots of pics
« Reply #17 on: April 03, 2015, 08:38:58 PM »
Thanks guys

Not a lot of hobby time over the last few weeks, most of my time has been spend doing up my house before I move in.

My experience with lack cat bases seems to have been the same as others, absolutely no communication since I placed my order so I've put in a dispute on PayPal to get my cash back. Such a shame. :'(

I lost patience waiting for the rest of the interior to be finished so I glued the back wall on and textured the exterior walls.


Just stippled poly filler and sealed it with watered down PVA to make it stronger.

Hoping to get the exterior painted this weekend.

Thanks for looking if anyone knows anywhere else that makes some affordable keyboard models please let me know.

Offline pocoloco

  • Scatterbrained Genius
  • Posts: 3848
Re: Comm/ops Centre scenery. The first post is a big one with lots of pics
« Reply #18 on: April 04, 2015, 11:53:59 AM »
Texture on the walls looks great  8)

Dunno if Pardulon models have suitable items for you in their range?

http://pardulon-models.com/en/


Offline Gunbird

  • Scatterbrained Genius
  • Posts: 2297
  • With miniatures, anything is possible!
    • 20mm and then some
Re: Comm/ops Centre scenery. The first post is a big one with lots of pics
« Reply #19 on: April 04, 2015, 12:11:53 PM »
Zinge Industries perhaps? I've got a few hand scanners, switches, nob, bobs and dooads from them and they are really neat and clean cast stuff.

http://zinge.co.uk/
Who is Gunbird? Johan van Ooij, Dutch, Mercenary Gamer, no longer mobile and happy to live life while it lasts >> http://20mmandthensome.blogspot.com/

Offline JoeRugby

  • Scientist
  • Posts: 206
Re: Comm/ops Centre scenery. The first post is a big one with lots of pics
« Reply #20 on: April 05, 2015, 02:08:44 PM »
Cheers both ill take a look when I get a chance.

I managed to get the exterior painted and weathered yesterday.


The bare wall at the front is going to have a C2 stencil on it (to add a bit of colour)

I also fixed the roof, so it's now less warped and sits flush with the walls

That leaves me with the following to do before I'm finished

Ground floor
Buy AK interactive lenses to add warning light to generator.
Paint and add door to chain link fence

1st floor exterior
Print out C2 stencil and paint on

1st floor Interior
Add switches and door handles to interior
Order and add keyboards to Ops room
Paint and glue down Ainsty office chairs

Roof
Build "communications" tower - will be about 4-5" tall with a maintenance platform/sniper nest at 3" again in keeping with Deadzone.
Build Roof AC vents
Texture and paint

Better get back too it then :)

Thanks for looking


Offline JoeRugby

  • Scientist
  • Posts: 206
Not done anything hobbywise for a while until today.

Started off by making the comm tower frame.

Just Mounting board and plasticard and a lot of measuring.

Then the initial bit of paint went on.

Red and white like a contemporary telecom tower (adding a bit more colour to what is otherwise a predominantly grey piece) . I used a sponge and masking tape to get the lines but it's run a bit so I'll need to clean that up.


And here it is dry fitted with a Mars attacks marine for scale.

There will be a walkway (e.g snipers nest) between the two platforms which I will try to get done tonight.

Thanks for looking

P.s. I finally got my stuff from black cat bases it was shipped the last day of the PayPal dispute I'd put in place.
« Last Edit: May 31, 2015, 07:49:03 PM by JoeRugby »

Offline pocoloco

  • Scatterbrained Genius
  • Posts: 3848
That's nice colourful piece, well done!  8)

Need to try to make one for myself at some point in near future.

Offline The Gray Ghost

  • Mastermind
  • Posts: 1657
  • Beware The Gray Ghost
Awesome  :-*
I used to be with it, but then they changed what it was. Now what I'm with isn't it anymore and what is it seems weird and scary.

Offline Constable Bertrand

  • Scatterbrained Genius
  • Posts: 3520
    • Make and Paint Blog
What a detailed building! That's fantastic, the lights, the switches, wiring, it all goes together so well, smashing work!

I saw some red and white towers in Japan, and you're right, much more exciting than mostly grey ;)

Cheers
Matt.

Offline JoeRugby

  • Scientist
  • Posts: 206
Thanks all. :)

With your motivation I managed at get a little bit more done yesterday.

Platform was made and the tower assembled.


I also glued it down at the same time I was adding my PVA sealer to the roof.

Still need to make and add, a ladder, railing around the platform and a fuse/manual control box to put on the platform as well.( so there's a reason for the platform being there)

Once I've done those bits I'll start work on a satellite dish and other antennae for the tower.

Here it is at the moment. Standing in at 12" tall


So close yet so much fiddly stuff to still do :(

Thanks for looking

Offline Mason

  • Elder God
  • Posts: 21222
  • Eternal Butterfly!
    • Blind Beggar Miniatures
All round superb work.
Brilliant!
 :-* :-*


Offline huesped

  • Mad Scientist
  • Posts: 546
  • "-El Emperador no es tan magnánimo como yo"
Impressive work!!!!!!!!!!!!! :o :-* :-* :-*

Offline Peithetairos

  • Scientist
  • Posts: 484
    • DaggerandBrush
This is some seriously stunning work. Thank you also for the detailed WIP photos, really makes it easy to see how you constructed it. I think the final building looks the part and has nice weathering and in general a very good laypout to make for interesting gaming. The interior detail is equally impressive.

Did you consider to add a bit more rust and dust effects to make it look more gritty or is this a structure still in constant use? I understand the steps of the staircase are not in scale to place miniatures safely on them? I think that is a good design decision, but would wonder if there is a way to have them more in scale, but also provide for miniatures climbing them.

Offline JoeRugby

  • Scientist
  • Posts: 206
Thanks all

Did you consider to add a bit more rust and dust effects to make it look more gritty or is this a structure still in constant use? I understand the steps of the staircase are not in scale to place miniatures safely on them? I think that is a good design decision, but would wonder if there is a way to have them more in scale, but also provide for miniatures climbing them.

There is more weathering to come, I want to to look appropriate a few different genres.

With the stairs problem the only way I could think of was to made a tool it would provide the mini with the extra base space and allow you to have 5mm x5mm steps. This was too much work for me to be honest. :)

Because of a minis base depth the height isn't that bad. Maybe I could chop 5mm off the step length. Hmmm

A little bit more progress has been made.

The tower platform has been made and painted.
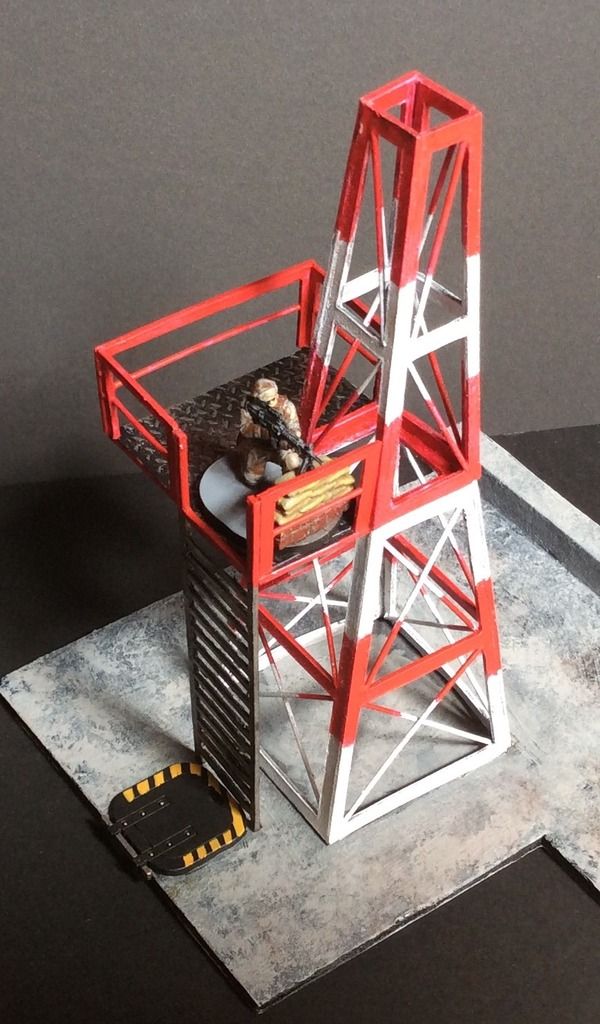

I made a handrail for the steps (was told to by health and safety) and painted on a stencil.
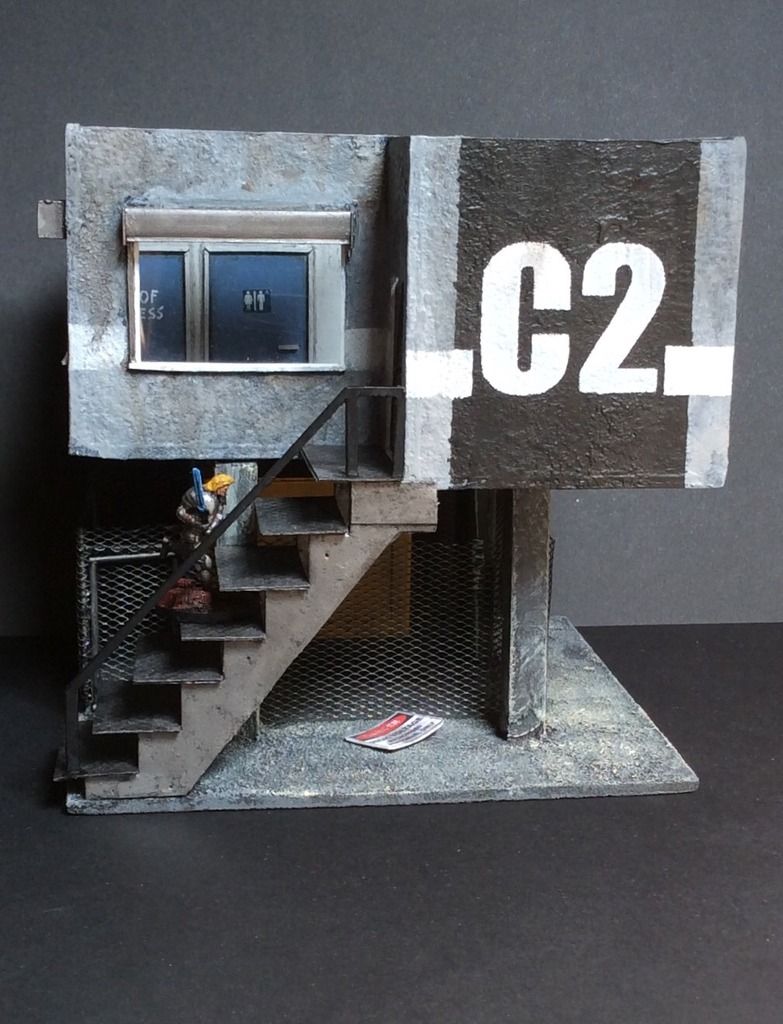

Here's what I need to still do to finish this off. (Prepared to be bored by my wall of text)

Roof
Satellite/coms array (all to do)
Maintenance/ control panel ( to be painted and glued)
Cables (not sure about this yet)
2 air conditioner/ vent units. (All to do)

1st floor
Keyboards (to be painted and fixed
Switches x2 (all to do)
Door handles x3 to be painted and added)
Keypad/ lock for entrance (to be painted and added)
Fire extinguishers x2 (to be added)
Add some spotlights to the C2 stencil
Paint a small wayland yutani logo below the C2
Paint employees only on the entrance
Add a fire exit sign on the interior.

Ground floor
Add an Ak interactive lense to the generator (need to buy when I've got a job again)
Maybe add some street debris.

All
More weathering so it looks more lived in, to fit in more game systems/ have a bit more narrative about it.

Thanks for looking and congratulations if you read through my boring list :)


Related Topics

  Subject / Started by Replies Last post
7 Replies
4127 Views
Last post September 04, 2007, 12:56:56 AM
by xeoran
12 Replies
2771 Views
Last post February 14, 2009, 10:56:58 AM
by Ramshackle_Curtis
3 Replies
2171 Views
Last post July 04, 2011, 07:10:01 AM
by magokiron
82 Replies
19276 Views
Last post July 30, 2013, 08:50:52 PM
by Sixmilletoe
6 Replies
2957 Views
Last post April 21, 2015, 12:39:19 PM
by Patrice