*
Welcome, Guest. Please login or register.
March 28, 2024, 05:15:51 PM

Login with username, password and session length

Donate

We Appreciate Your Support

Recent

Author Topic: Dr Mathias's Arboreal Extravaganza - Briar and Bramble Patches - Aug. 2021  (Read 195309 times)

Offline magokiron

  • Mastermind
  • Posts: 1394
Re: Dr Mathias's Arboreal Extravaganza - Bamboo Tutorial Added 2/18/13
« Reply #45 on: February 19, 2013, 06:46:42 AM »
Dr Mathias you're more than a GENIOUS!

Thanks for sharing your creativity and ingenuity with us lesser mortals.

I'll try some of your techniques.

Thanks again and best wishes.
I know you're too old to play with toy soldiers. So give them to me... NOW!

Offline pocoloco

  • Scatterbrained Genius
  • Posts: 3848
Re: Dr Mathias's Arboreal Extravaganza - Bamboo Tutorial Added 2/18/13
« Reply #46 on: February 19, 2013, 06:53:40 AM »
Many thanks for sharing a great tutorial! The end result is superb.

Offline fluffy05

  • Scientist
  • Posts: 404
    • One Painters Crusade
Re: Dr Mathias's Arboreal Extravaganza - Bamboo Tutorial Added 2/18/13
« Reply #47 on: February 19, 2013, 07:04:30 AM »
I normally hate to laugh at anothers misfortune but your Step 7 from the Making Babmoo Tutorial made me laugh so hard I nearly fell out of my chair  lol

Probably because I have had similar experiences with Super GLue  :?

'The German today is like the June Bride; he knows he is going to get it, but he doesn't know how big it is going to be.' - Gen. Richard "Windy" Gale, 6th Airborne Division Commander

Offline Mjolnir

  • Librarian
  • Posts: 142
Re: Dr Mathias's Arboreal Extravaganza - Bamboo Tutorial Added 2/18/13
« Reply #48 on: February 19, 2013, 07:21:34 AM »
I'am so very impressed :-*
Fantastic tutorials
Thank you for sharing!

Offline Blackwolf

  • Potato Cup 3 winner
  • Supporting Adventurer
  • Galactic Brain
  • *
  • Posts: 6225
Re: Dr Mathias's Arboreal Extravaganza - Bamboo Tutorial Added 2/18/13
« Reply #49 on: February 19, 2013, 07:55:13 AM »
Lovely stuff Doc.! :-* Been doing some trees myself ;)
May the Wolf  Walk With You
http://greywolf1066.blogspot.com.au/

Painting Clubs Joined: APC,MPC, PPC,PAPC,LPC.

Offline Centaur_Seducer

  • Scatterbrained Genius
  • Posts: 3412
    • Gubbspel
Re: Dr Mathias's Arboreal Extravaganza - Bamboo Tutorial Added 2/18/13
« Reply #50 on: February 19, 2013, 10:23:53 AM »
He's back!

Lovely, Matt :-*

Offline WuZhuiQiu

  • Mastermind
  • Posts: 1198
Re: Dr Mathias's Arboreal Extravaganza - Bamboo Tutorial Added 2/18/13
« Reply #51 on: February 19, 2013, 01:05:17 PM »
Thanks, and thanks for the heads-up! How did you model the stone lanterns?

Offline Dr Mathias

  • LPL Champion (S6,S7) Bronze Medalist (S5)
  • Galactic Brain
  • Posts: 4490
  • Purveyor of the one-and-only Miracle Elixir!
    • Dr. Mathias's Miniature Extravaganza
Re: Dr Mathias's Arboreal Extravaganza - Bamboo Tutorial Added 2/18/13
« Reply #52 on: February 19, 2013, 02:42:46 PM »
I normally hate to laugh at anothers misfortune but your Step 7 from the Making Babmoo Tutorial made me laugh so hard I nearly fell out of my chair  lol
It got a lot of laughs, I posted it on my Facebook as well :)
I wasn't too bothered by it, I was smiling most of the time myself.

Thanks, and thanks for the heads-up! How did you model the stone lanterns?

The lanterns are made from Sculpey polymer clay. I made all the basic shapes (base, lantern, cap, and finial) and gently pressed them with a bit of broken concrete to give them an eroded texture. After they were baked I drilled the holes. They're serviceable and dirt cheap but very soft edged and asymmetrical. I'd like to redo them some day, or buy them from a professional.

Thanks for the comments everyone! Next up: Cherry Tree Tutorial (arriving 2015).
« Last Edit: February 19, 2013, 02:47:21 PM by Dr Mathias »
a mixture of quick parts, sarcastic humour, reserve, and caprice.
Dr. Mathias's Miniature Extravaganza

Offline Admiral Benbow

  • The Queen's Own Gizmologist
  • Scatterbrained Genius
  • Posts: 2743
  • "Creativity is a drug I cannot live without."
    • The Benbow Workshop
Re: Dr Mathias's Arboreal Extravaganza - Bamboo Tutorial Added 2/18/13
« Reply #53 on: March 01, 2013, 04:28:54 PM »
Superb tutorials! I'll try some for future projects.
 :-*

Offline joekano

  • Mastermind
  • Posts: 1200
    • My blog: Major Thomas Foolery
Re: Dr Mathias's Arboreal Extravaganza - Bamboo Tutorial Added 2/18/13
« Reply #54 on: March 01, 2013, 04:45:27 PM »
I've been looking for ideas on how to model bamboo - thanks for the excellent intructions!

Chris
"Gentlemen, you can't fight in here, this is the war room." -President Merkin Muffley
http://majorthomasfoolery.blogspot.com/

Offline Hammers

  • Amateur papiermachiéer
  • Moderator
  • Elder God
  • *
  • Posts: 16070
  • Workbench and Pulp Moderator
Re: Dr Mathias's Arboreal Extravaganza - Bamboo Tutorial Added 2/18/13
« Reply #55 on: March 04, 2013, 09:41:00 AM »
These are fantastic, Dr Mathias.
I'll move the thread to How to.

Offline Dr Mathias

  • LPL Champion (S6,S7) Bronze Medalist (S5)
  • Galactic Brain
  • Posts: 4490
  • Purveyor of the one-and-only Miracle Elixir!
    • Dr. Mathias's Miniature Extravaganza
Re: Dr Mathias's Arboreal Extravaganza - Cherry Tree Added 4/22/13
« Reply #56 on: April 23, 2013, 04:53:18 AM »
"How did you make the cherry trees?" is probably the terrain-related question I am most frequently asked. At long last, I started a tree from the beginning so I could document it for you. I have to admit I am reluctant to give up some of these secrets, but...

Flowering Tree Tutorial


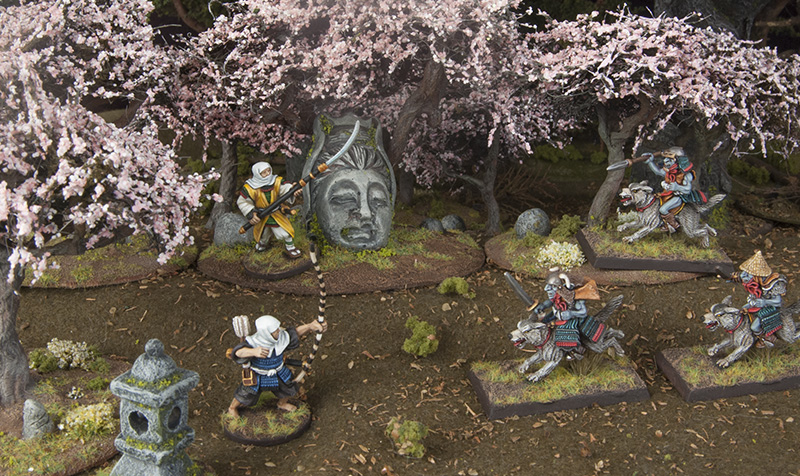
There are a lot of steps, however it produces an end result I am happy with. This isn't as time consuming as I remembered from my first time around. I think most of my efforts were spent discovering the optimum petal effect, and this time I knew what to do right away. Profit from my errors!

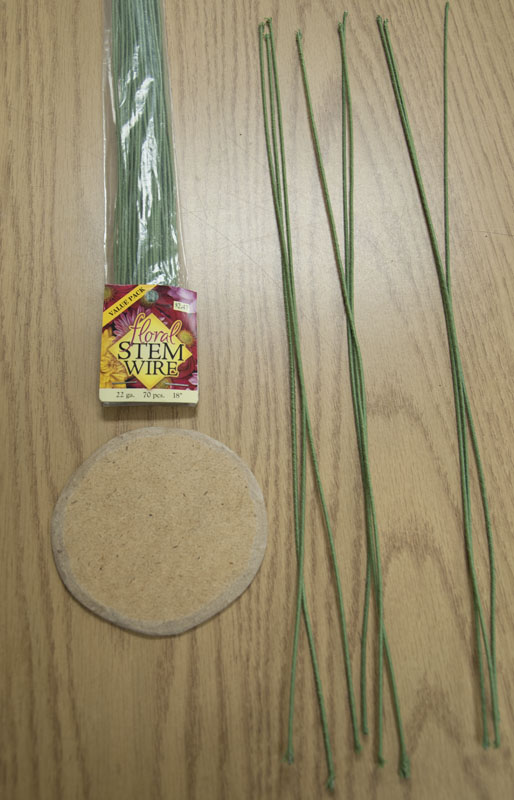
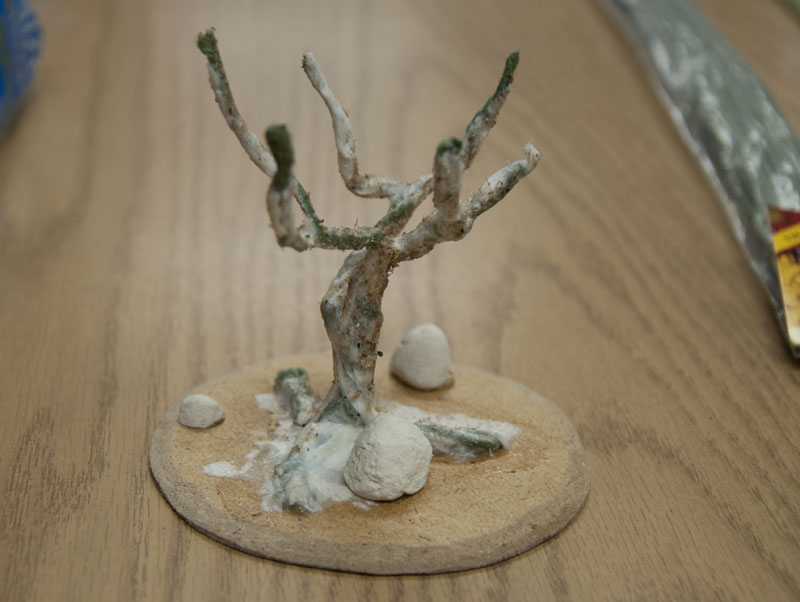
1. Create a basic tree. In this case, I used the twisted floral wire method. I used a Masonite/hardboard base, twisted some wires together, and hotglued the tree form to the base.


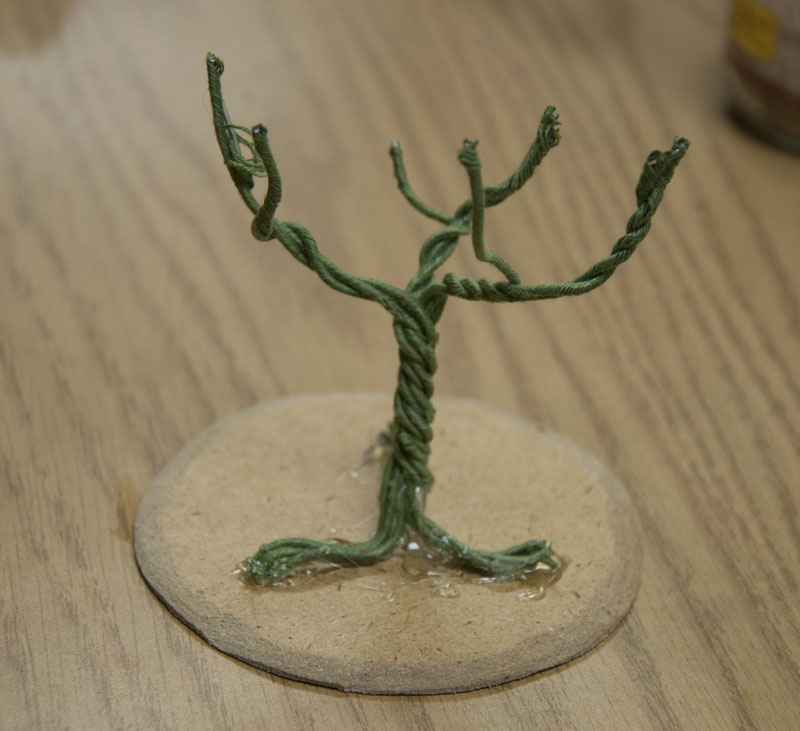
Not very pretty, this was a half-assed job. The branches should have been splayed apart a little more realistically so that they transitioned more fluidly to the small branches and twigs. It's very important to actually look at the type of tree you want to make. They all have their peculiarities of proportion.

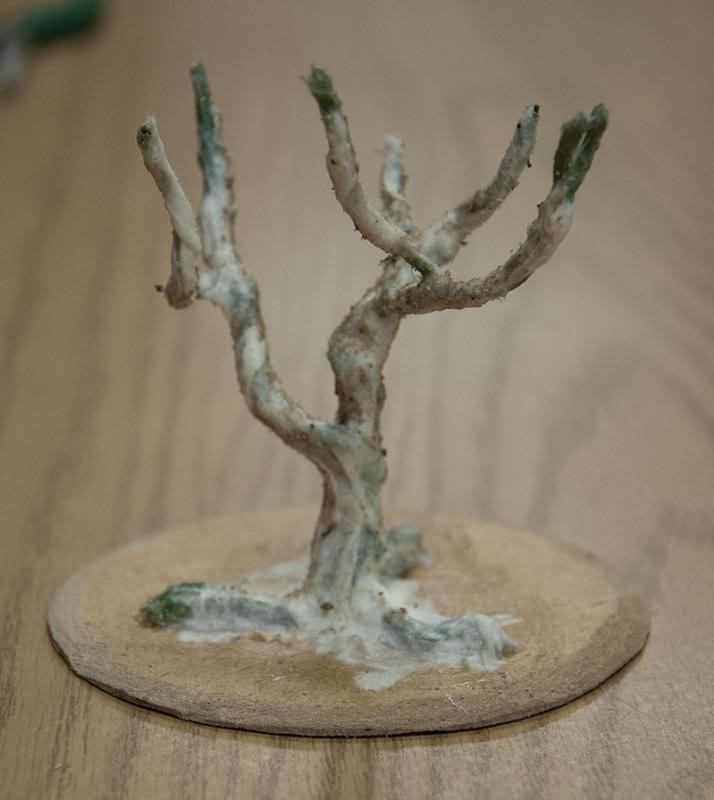
2. Paint the trunk and branches with clear acrylic polymer medium or thinned white glue. Cover the trunk and branches with bathroom toilet tissue, and apply another layer of glue or medium. I sprinkled a light dusting of sawdust while it was still wet because I happened to have some laying nearby.


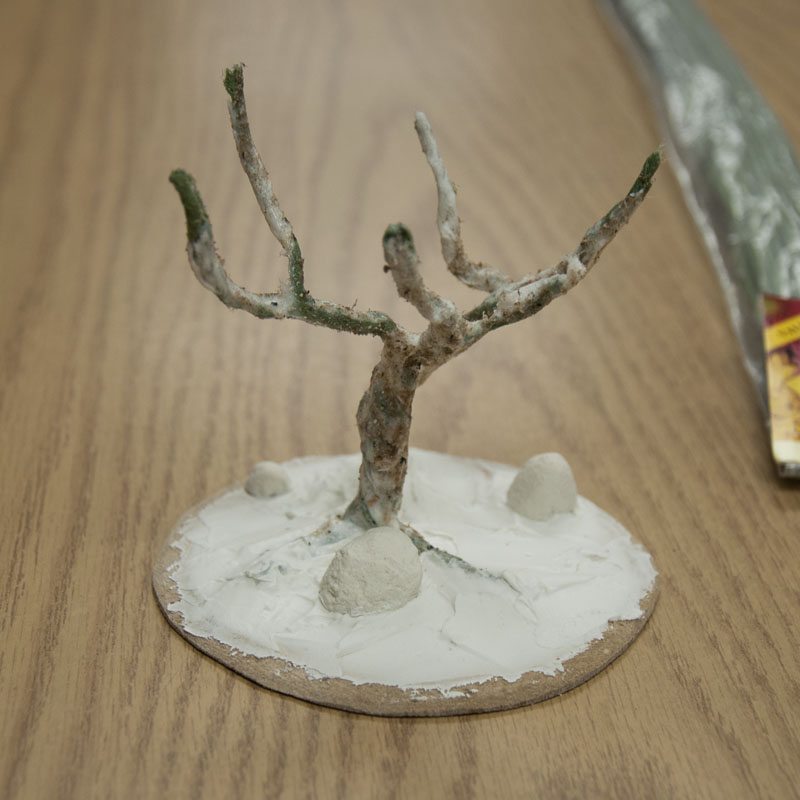
3. Add basing materials. I made a bunch of rounded stone forms out of Sculpy polymer clay. I used a little piece of broken concrete to assist with the shaping of the rounded forms, which helps to give it a pock marked weathered texture. I like using Sculpey stones because I can easily cut them in half after baking them, which gives them a nice flat bottom for gluing. Follow that with a filler. I use a drywall spackle, normally used for filling cracks in walls.


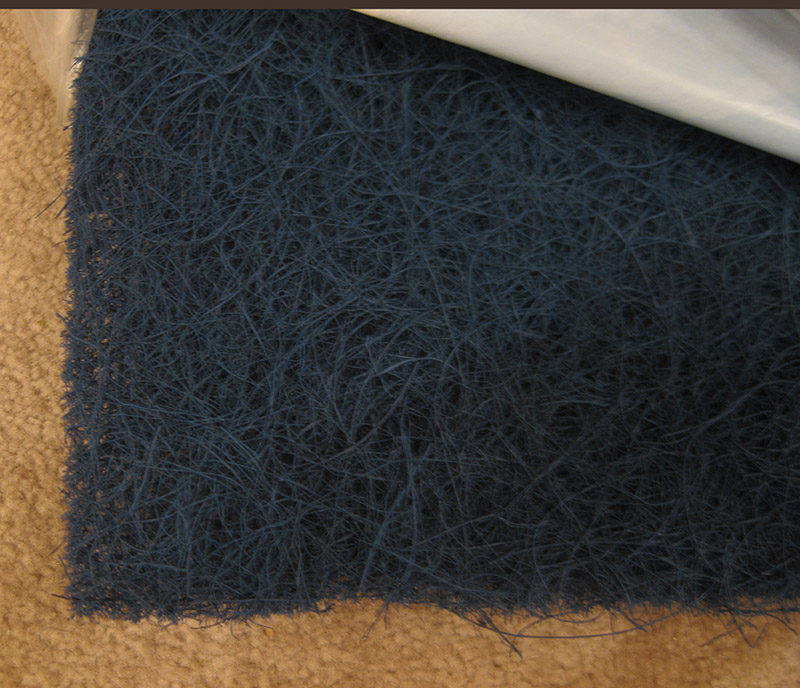
4. Here's my big secret for foliage. Please pretend, for my sake, that I'm the first person to have come up with this.

Buy a 'cut it yourself' furnace filter that has a random organic look. I've seen them in blue and green- go for the green, for obvious reasons. I've used blue and it works fine, it just needs more careful paint coverage. I've also seen filters that look 'fuzzy'... avoid those.


It should look like this:


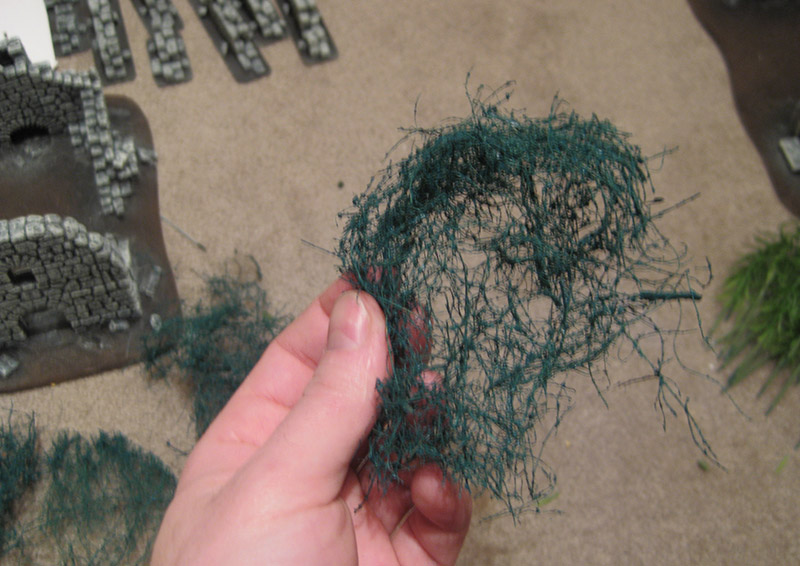
5. Cut off a section of the filter, and using a pair of scissors and your hands, tear and tease the fibers apart. I use a pair of pinking scissors to trim the bunches up so that the cuts have a more irregular and natural edge. I think it looks better to use multiple pieces instead of one layer. This stuff makes awesome thorn branch fences/zaribas/bomas for those of you that game Africa.


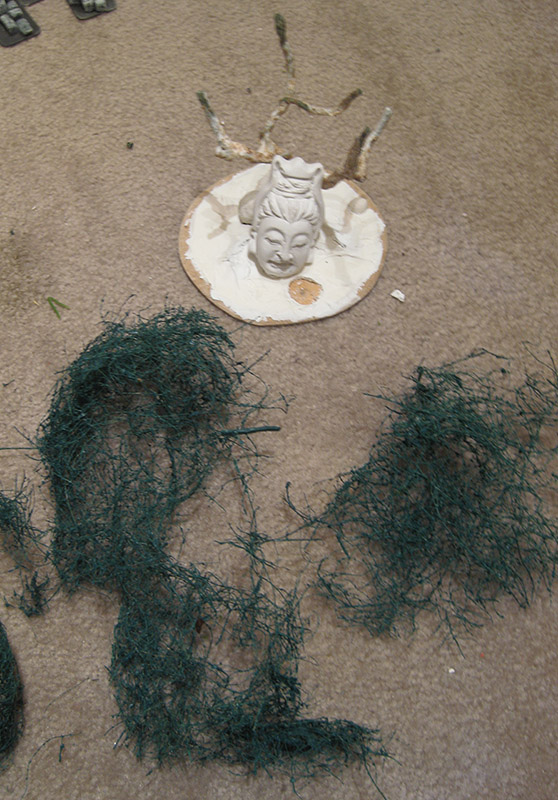
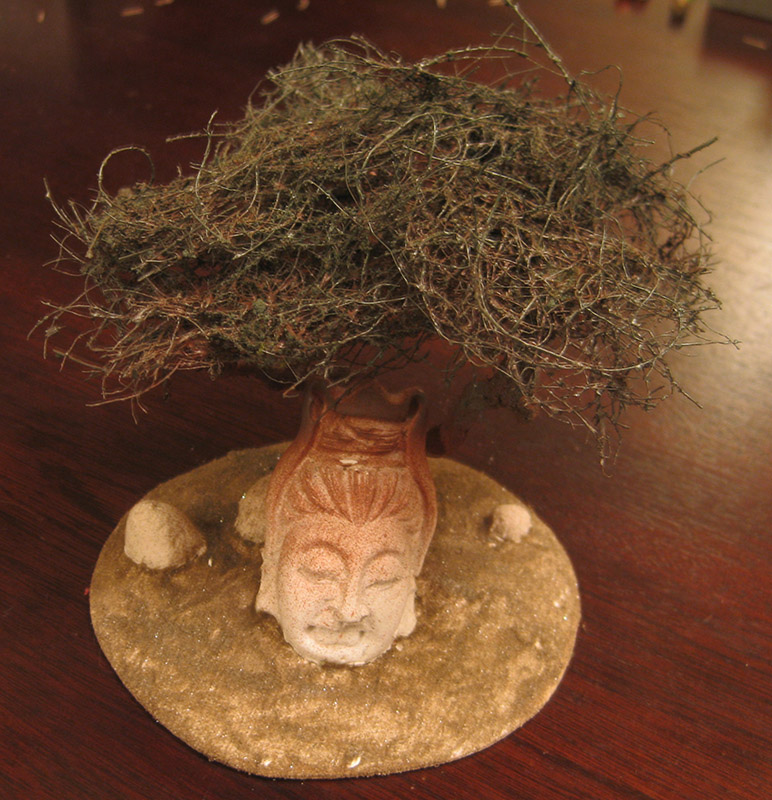
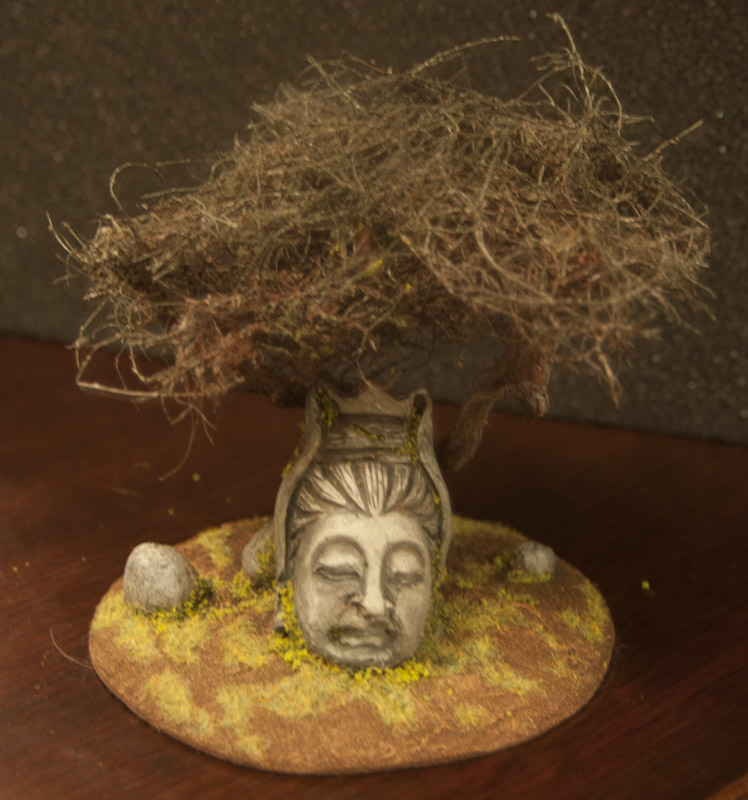
Careful observers will see that I decided to add a Buddha head to the base. No reason to make another tree like the others I have...

6. Use hot glue to affix the foliage to the tree trunk.


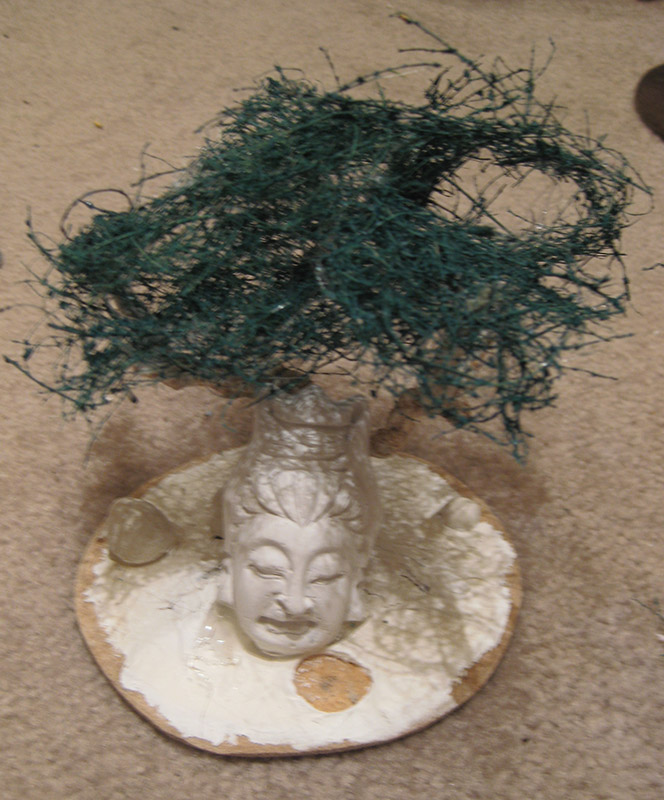
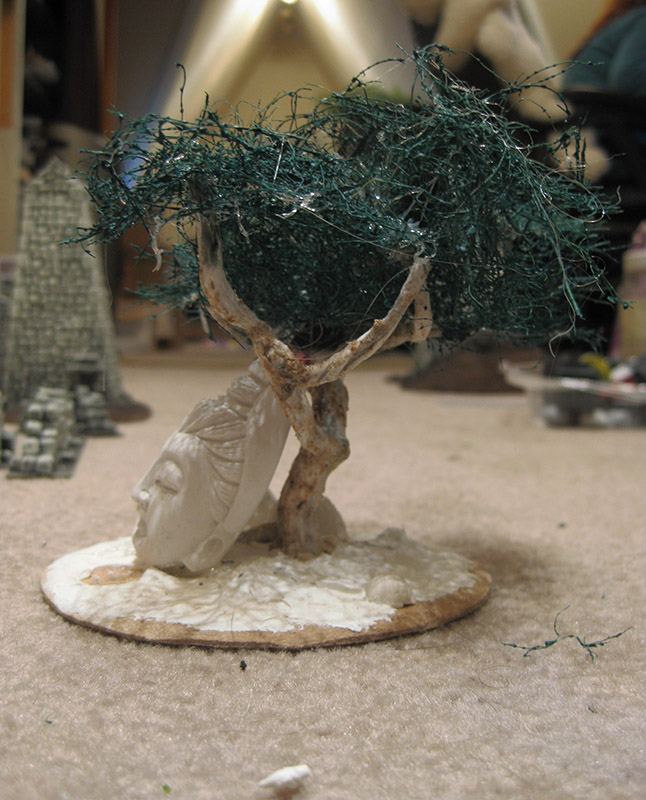
7. Spray the tree from below with a reddish or brown spray paint. I used a rust color. Spray from the top with  a mid green. If you have some fine flock, sprinkle a little on while the paint is wet, but don't overdo it. When the flowers are in full bloom the little green buds are not visible much, at least on the tree I have in my yard.


8. At this point I thought it would be wise to finish off the base. I glued fine sand on, then painted everything. Be sure to take a good look at trees... they're not brown. I use a three tone method on terrain... base, light drybrush, lighter drybrush. Static grass and flock for moss. Sorry for the crappy photos  ::)


Petals

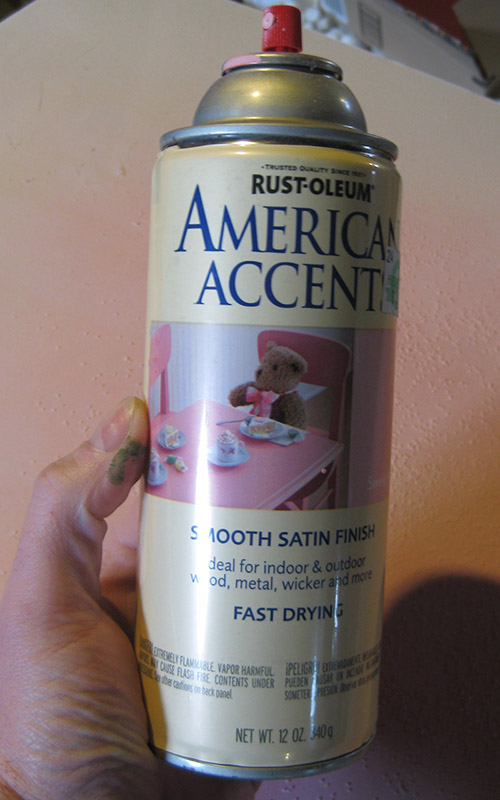
Here's where things get a little weird. You will be spray painting glitter.

Make sure you get the right kind! Look for a glitter that isn't iridescent. It will all be glossy, that's okay... but if it is pearly or translucent you will have a princessy tree that glimmers and sparkles no matter how many times you spray it. I found a white opaque glitter from Kitkraft that ended up working well. Prepare to be astounded by the sheer diversity in the types of glitter out there... its mind-boggling. 


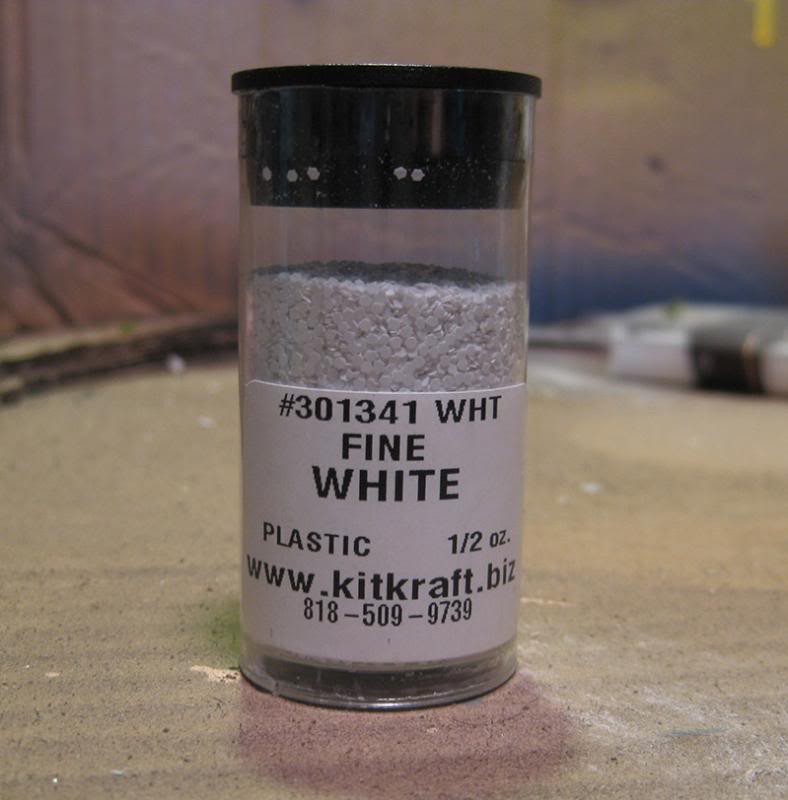
I used 'fine' white. There's even smaller sized glitter flakes. I'll try that for a different type of tree or shrub sometime.

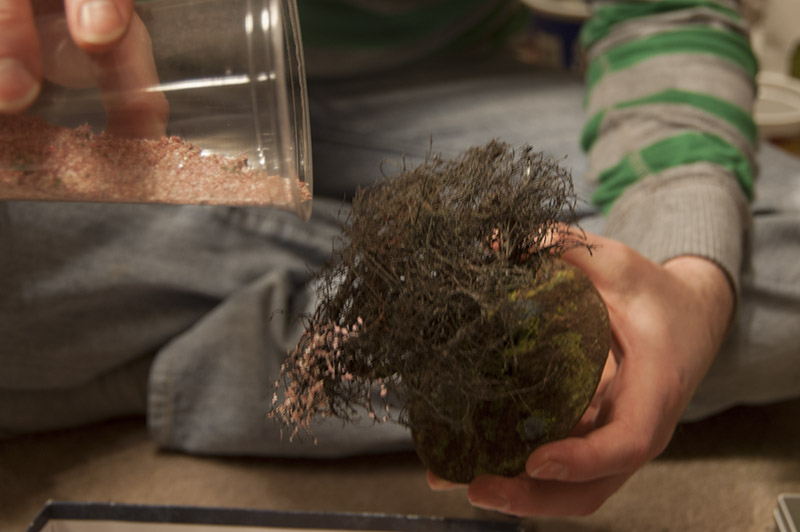
1. Scatter the glitter evenly over a smooth surface that you don't mind painting. I used a piece of foam core. Be warned, you will probably end up with glitter in every room of your house.


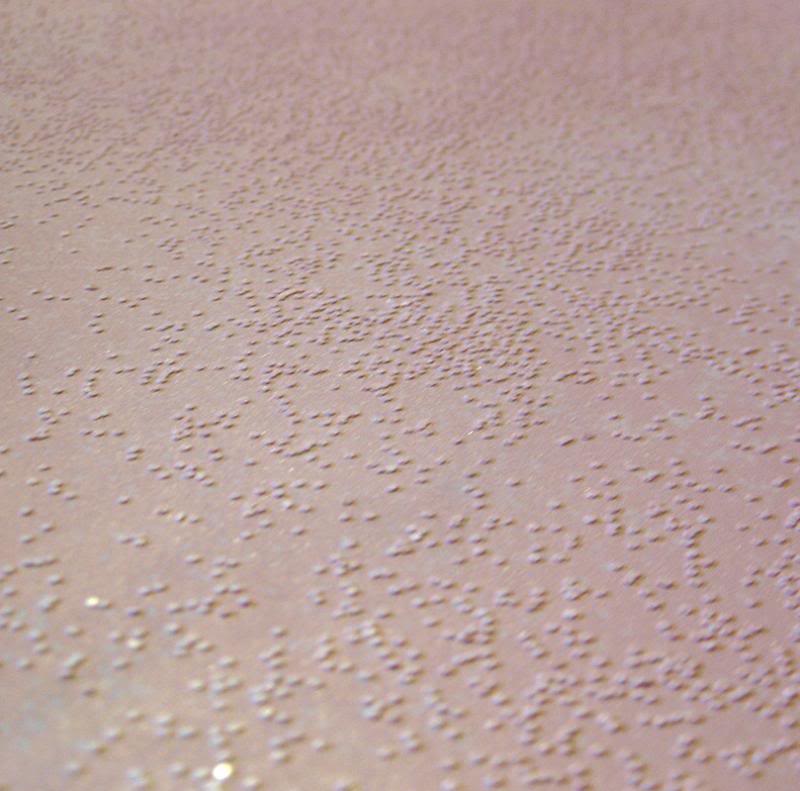
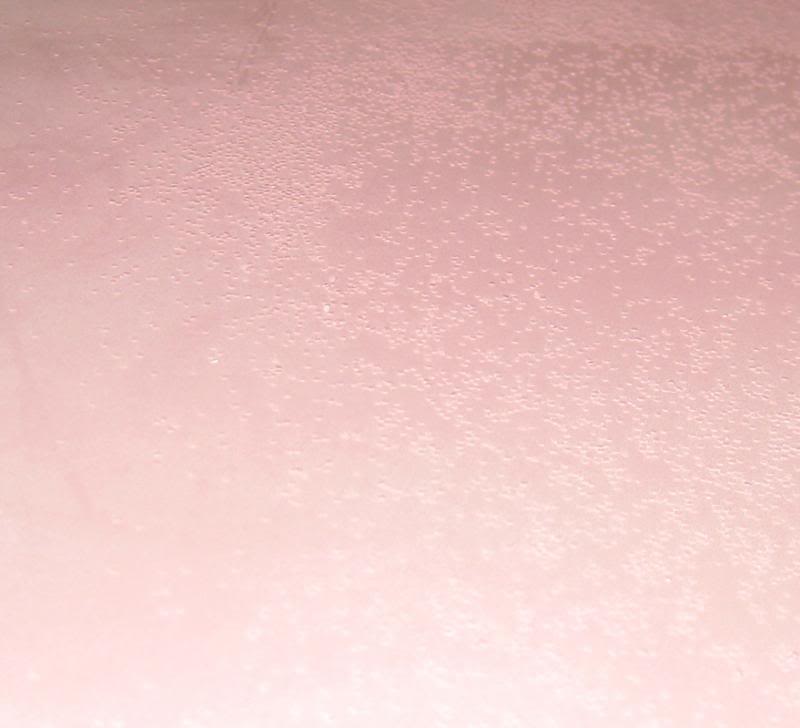
2. Spray the glitter lightly with a pink satin color. If you go too heavy they will be hard to scrape up. The first time I did this I was using iridescent glitter that was pink and white mix, and I had to spray it several times with white primer to kill the sparkle. Trust me, start with white opaque.


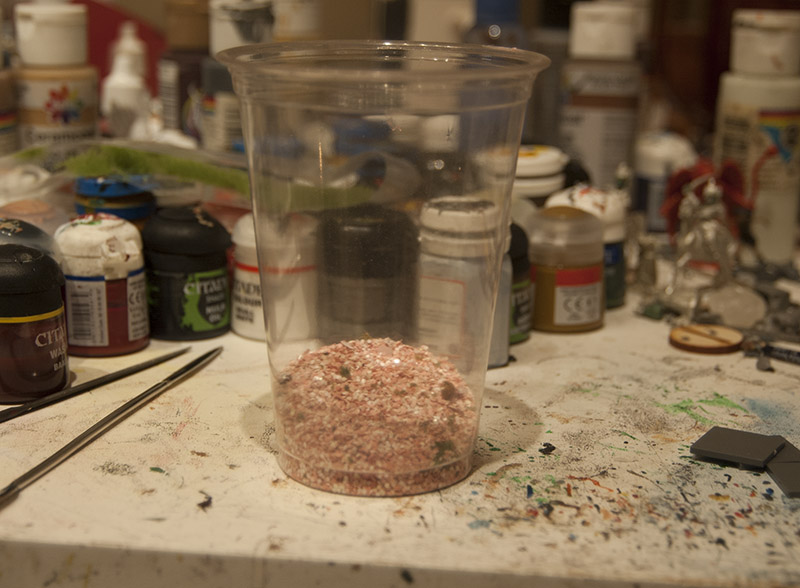
3. Scrape the glitter up, slowly, carefully, or they will scatter to the four winds.


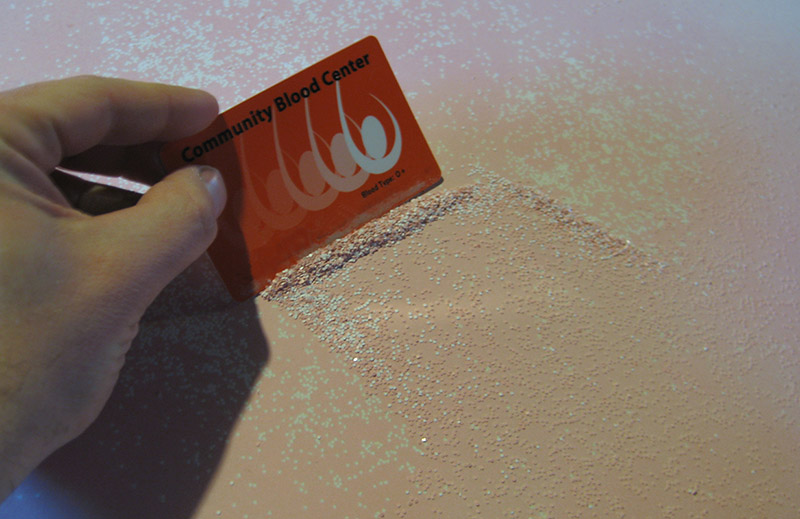
If you want them to be more pink, spread them again and spray a second time.


Back to the tree.

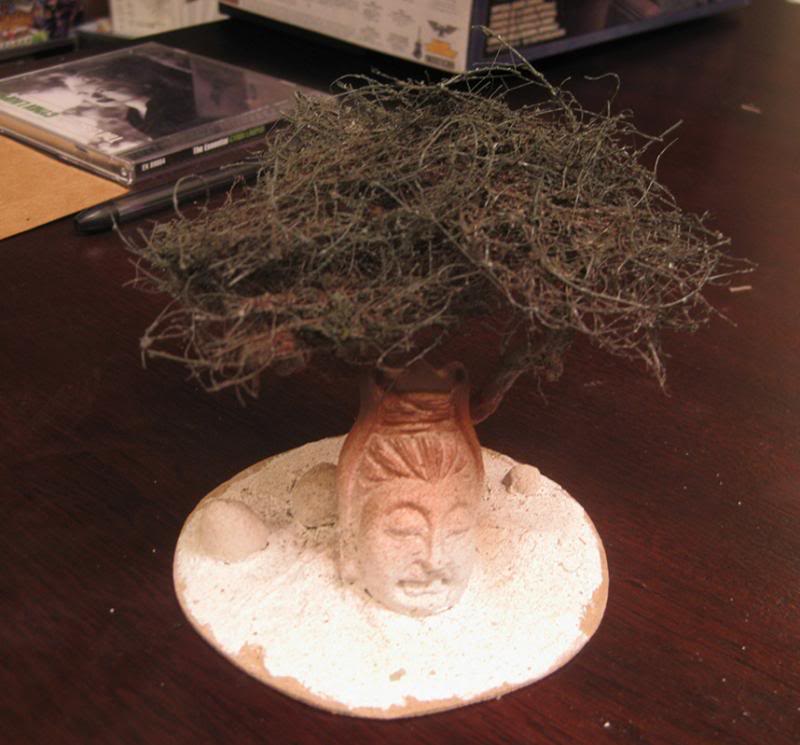
9. Use a light pink 'puffy paint' to apply little dots, about a quarter of the tree at a time, then pour on the petals you made. They will stick to the puffy paint blobs and give a nice flower effect. It goes quicker than you might think.


10. After the paint has dried overnight hit it with a very liberal matte spray or dull coat. After that I sprayed a heavy coat of clear Plasti-Dip over the whole tree. I like my terrain to be bulletproof... doubly so on this stuff because I don't want glitter coming off!


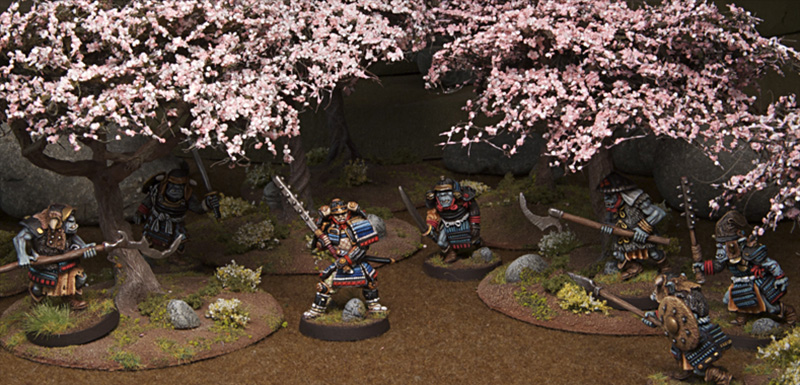
I hope this tutorial is useful. I'm really pretty happy with how these trees look, in person and in photos.

I'm now accepting voting for the next tutorial... acacias, baobabs, or Arthur Rakham style thickets are what I'm considering. None of which I have yet made...
« Last Edit: January 12, 2020, 05:13:35 PM by Dr Mathias »

Offline Dr. The Viking

  • Galactic Brain
  • Posts: 5845
  • Rowdy, Hostile and Wrong Inc.
    • Dr. The Vikings Miniature Games Hell
Re: Dr Mathias's Arboreal Extravaganza - Cherry Tree Added 4/22/13
« Reply #57 on: April 23, 2013, 05:10:32 AM »
Amazing thread!!!

I think the idea of using pearls/whatever for flower pots is almost what takes me back the most!


My Empire - where everything I ever did is collected:

http://www.c0wabunga.com

Offline Blackwolf

  • Potato Cup 3 winner
  • Supporting Adventurer
  • Galactic Brain
  • *
  • Posts: 6225
Re: Dr Mathias's Arboreal Extravaganza - Cherry Tree Added 4/22/13
« Reply #58 on: April 23, 2013, 05:12:24 AM »
Nice tutorial :) I do my trees the same way,except for the filter stuff,have to look for some,as for the glitter,very clever!


Arthur Rackham please ;)
« Last Edit: April 23, 2013, 05:15:18 AM by Blackwolf »

Offline Centaur_Seducer

  • Scatterbrained Genius
  • Posts: 3412
    • Gubbspel
Re: Dr Mathias's Arboreal Extravaganza - Cherry Tree Added 4/22/13
« Reply #59 on: April 23, 2013, 05:33:52 AM »
Perfect, Matt! :)


Related Topics

  Subject / Started by Replies Last post
296 Replies
84707 Views
Last post February 08, 2017, 09:49:06 AM
by obsidian3d
8 Replies
3100 Views
Last post July 05, 2010, 04:03:32 AM
by mweaver
11 Replies
3779 Views
Last post January 15, 2011, 05:00:16 PM
by archangel1
15 Replies
4894 Views
Last post May 09, 2016, 06:45:27 PM
by shandy
1 Replies
1065 Views
Last post October 07, 2017, 02:13:39 AM
by Greylegion