A friend wrote to ask how I paint eyes. I wrote the following (long winded) reply. Others might find this information useful, so I’ve decided to post it here as well.
Below is a guide for painting fairly-good tabletop quality eyes on miniatures. To get the best results, you need to be fairly good at painting fine detail. Before we get to the step-by-step part, I think it will be helpful to discuss painting fine detail.
LIGHTING AND VISIONIf you can't clearly see what you are painting you are going to have hard time getting your paint exactly where you want it, so it's critical that your painting area is properly lit. Painting directly under a good desk lamp or two should suffice. Also, if your vision makes it difficult (or impossible) to see close objects well, you will need to use corrective lenses or a painting-aid device with a magnifying glass
STEADY YOUR HANDSFor me, the best way to steady my hands is to rest the side my hands on the edge of my painting table and for both hands to be in contact with the model. My left hand holds the model by its base. The ring finger and sometimes the pinkie finger of my right hand gently press against he model from the opposite direction. With the model and my hands firmly held in place, the only thing moving are the fingers manipulating the brush -the thumb, index, and middle finger of my right hand.
 FINE MOTOR SKILLS
Fine motor skills are the coordination between small muscles, like those of the hands and fingers, with the eye. People aren't born with the degree of fine motor skills required to paint really fine detail, so if you find this task difficult, rest assured that with sufficient practice you can improve your fine motor skills. Much in the same way that an athlete trains his or her body and mind to perform at a high level, time spent painting minis will train the muscles in your hands and develop the neural pathways in your brain that you need to improve your hands' dexterity.
THIN YOUR PAINTPainting fine detail is much easier when you use paint that has been thinned with water. How much water you need to add depends upon characteristic of the paint you are using. The ingredients in some paints, like many yellows and some metallics, make the paint a bit thinner than most other paints. A paints characteristics can vary from color to color, from manufacturer to manufacturer, and even pot to pot depending upon the age of he paint and its previous exposure to air. My point is that each pot of paint can be different, so there is no one recipe for how much water you need to add to properly thin paint for fine detail work.
As a rule of thumb, your paint should be thin enough that it easily flows off the brush with very light contact with the model, but it shouldn't be so thin that when you touch the model with the brush tip, the paint rushes off the bristles and pools onto the model.
BRUSH LOADBy "brush load" I mean the amount of paint you put on your brush's bristles. To paint fine detail you need to use a brush with a very fine point. When loading your brush to paint fine detail you want to your brush's bristles to retain a very fine point. If you load your brush with too much paint, you will have a hard time controlling the proper application of the paint to exactly those areas you want to the paint to go.
I use the side of my finger or the surface of a plastic paint palette to remove the excess paint from my brush and to 'sharpen' its loaded tip. I don't use the paper towels that I use to clean my brush because I don't want to inadvertently pick up any stray paper fibers.
WHEN TO PAINT THE EYESFor me, painting eyes typically involves a certain amount of touch up work in and around the eyes, so I prefer to tackle the eyes after applying a base coat and flesh wash to the skin, but before starting in on the skin's post-wash highlights.
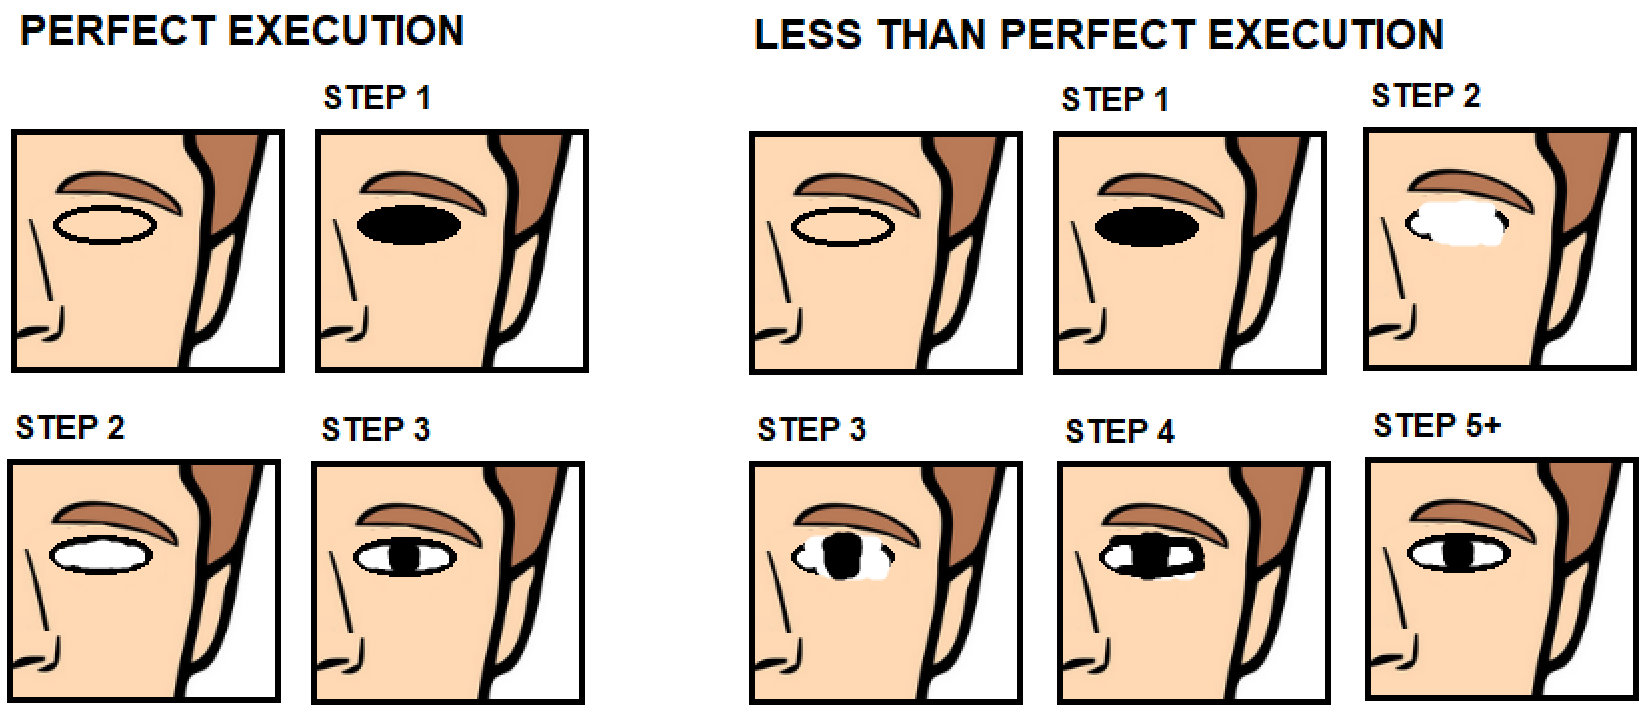
"PERFECT" EXECUTIONIf you are very skilled at fine detail work (or very lucky) you can complete the task in three steps.
Step 1. Paint the eyeball black. If the model doesn't have a defined eyeball, then using black paint, paint a short line or narrow oval where the eyeball should be.
Step 2. Leaving a thin black outline around the outside of the eyeball, paint the inside of the eyeball white.
Step 3. Using black paint, paint a tiny circle on the eye to represent the iris and pupil. The top and bottom of the iris & pupil should touch the upper and lower borders of the black lining around the eyeball. If the eyeball is very narrow, you needn't worry about painting a circle, a simple vertical line will suffice.
LESS THAN PERFECT EXECUTIONEven though I've been painting minis for decades, I still screw up painting eyes. Sometimes I screw up so badly that I have to use the tip of a hobby knife to dig out all the paint I applied to the eyes and start over from scratch. Since this is a sad reality that many of you will experience as well, here's how you paint eyes, the hard way.
Because your mistakes may cause you to applying multiple layers of paint to one very small area of the model (e.g. a corner of the eye or the area around the iris)
it is very important that thin your paint properly and that you don't apply any one layer too thickly.
Step 1. Paint the eyeball black. If the model doesn't have a defined eyeball, then using black paint, paint a short line or narrow oval where the eyeball should be.
If you screw up this initial step, you can use the color that you used to paint your skin tone's base coat to touch up and properly shape the black eyeball.Step 2. Leaving a thin black outline around the outside of the eyeball, paint the inside of the eyeball white.
Once again, if you screw up and paint white over the black outline, don't worry. You can fix it later. Step 3. Using black paint, paint a tiny circle on the eye to represent the iris and pupil. The top and bottom of the iris & pupil should touch the upper and lower borders of the black lining around the eyeball. If the eyeball is very narrow, you needn't worry about painting a circle, a simple vertical line will suffice.
If you screw up this step, you can use white paint to touch up and properly shape the iris. If you screwed up Step 2, put the iris where you think it would be if you hadn't screwed up Step 2.Step 4.
If you screwed up Step 2, you can attempt to repair the broken black border by painting a very thin black outline around the white portion of the eye. Painting such a thin outline might be difficult, so if you screw it up, don't panic, you can still fix it.Step 5+. I call this Step 5+ because it may take several tries to get everything just right. Starting from the iris and work outward, fix all of your mistakes. First, make sure the iris the the right shape and in the correct location. Then make sure that the white parts of the eye are properly shaped. Then make sure that the black border is properly shaped and roughly the same thickness all around. If you used your skin tone's base color to touch up and reshape the outside of the eye, you can apply the tiniest amount of flesh wash to the areas of skin you touched up. If the flesh wash leaks into the whites of the eyes, quickly dab the eye with the edge of paper towel or the bristles of a damp brush to remove the wash before it dries.