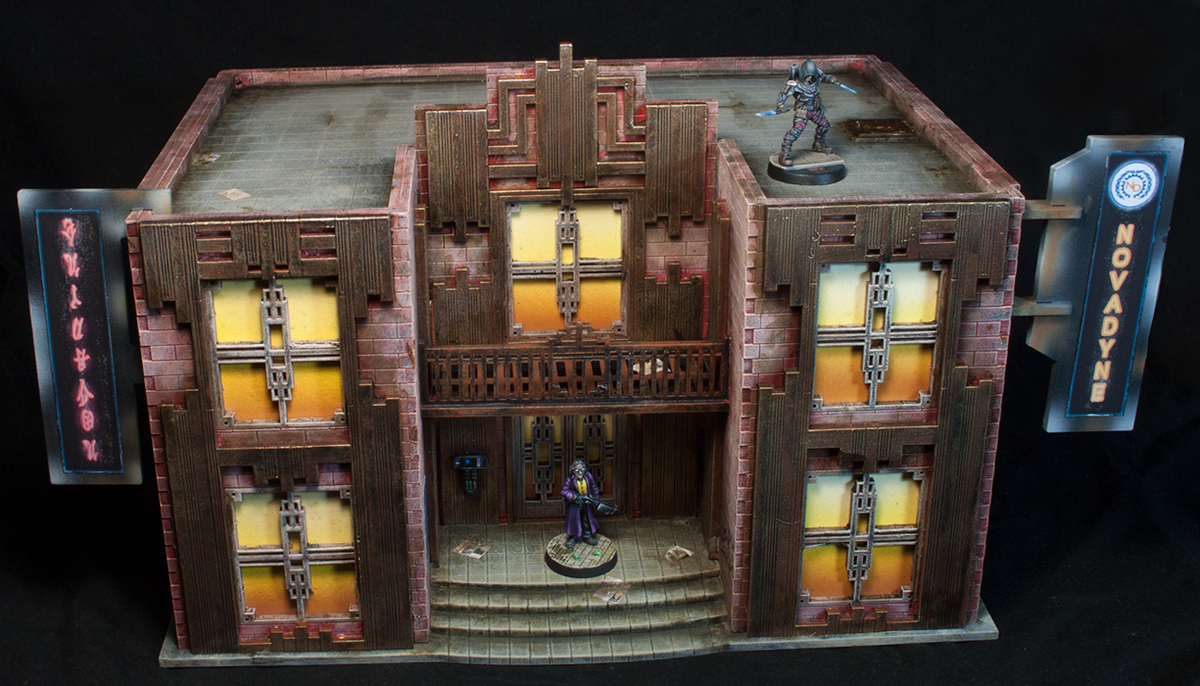
UPDATE! Knights of Dice buildingTime for an update and this one took me lots of hours of work. It's one of the Knights of Dice buildings, I think the best MDF buildings you can get. Nobody beats them in design, cutting and looks. Assembly was a breeze...but it took me some time to think it all through. The building involves a lot of windows, and I wanted to have something behind them (I didn't want open windows staring into an empty building!). So I decided to place painted card behind them. But that meant I had to first paint the building, then do the windows and glue them and finally glue the building to the ground piece.
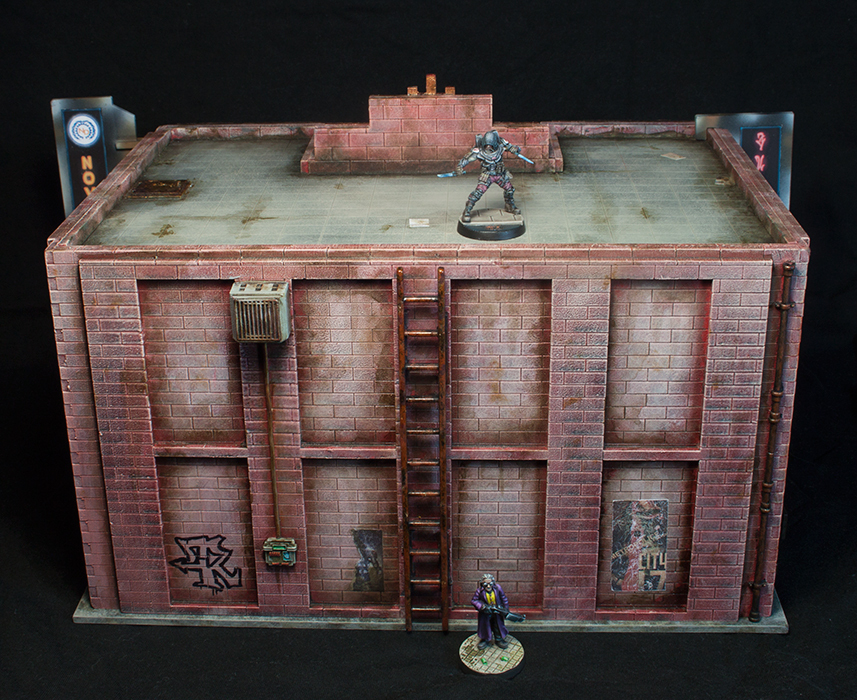
But before I started painting it was time to pimp the building and make it a bit more Cyberpunk. So I added two ads (from BP Laser), one added by cutting the MDF so I can slide it on top of the building and the other by using some magnets. I connected some soldering wire and plastic tubing to them with two Antenociti touch pads, so somebody can change the ads if they want. Also, a Pulp Alley power box was added. On the back is an AC unit, also with cables and touch pad. An old toy ladder was perfect in size as the escape ladder. Yes, it's actually too big, but it is what it is. Two Pulp Alley rainpipes were connected to form a single rainpipe (with a hole in the building, so the rain can run into the pipe). On top I added a Pulp Alley trapdoor, perfect to get on top. On the front and on the sides I added more touch pads, but now to gain entry to the building itself.
For painting I simply sprayed them Montana Brick Red which was then heavily washed with brown and black. After this I applied several drybrushes, by adding grey and bone to a dark red to get a pinkish color. I varied it in tone to get a grungy effect. The window frames were quickly painted with a medium brown and were drybrushed by adding grey to the brown. Same goes for the side doors, but I also added more brown to them. The gold parts were painted with gold, which was heavily shaded with varying brown and some green colors. I really wanted to get the shine down and make them dull as hell. The roof was done with a greyish brown and once again I added more and more light grey for drybrushing.
Then it was time for...magic! Once again, Modelmates Track Dirt is the star. So much fun. Just apply it like a madman, don't think too much and don't be careful. Do not be careful! Then take a wet brush and blend the stuff around. So easy and so much fun. And the effect is insanely cool. Really, buy that stuff.
Rust was added to several places with dry pigments or with paints, all of the touch pads were painted and it was time for the cool details. I printed loads of posters on A4 stickers, cut these with a scalpel and simply stuck them on. Then with my finger (or a rubber tip shaper) I erased some of the ink to make them more old. Then once again some Track Dirt and voila...dirty posters. For the graffiti I used three laser cut decals and I also did several with a permanent marker. Why use paint, when you can do it with a marker eh

The windows were all airbrushed with white, yellow and light brown. Initially I intended some of the windows to be black to simulate the lights were off...but I simply forgot. I also thought about adding some silhouettes...but I also forgot! Doh! Once I stuck the clear packing tape over them I remembered, but it was too late. I glued them on the inside of the building.
The two ads were all airbrushed. Just to get them quickly done. I had made some neon ads in InDesign, cut them from paper with a scalpel and glued them on.
Finally the ground plate. I sprayed this with a tan Montana can and then applied some sprays with Modelmate brown spray. I rubbed some of it off and then drybrushed it twice with a khaki color (second time with bone added). Finally some more grime with...Track Dirt!
I also printed some newspapers. So I cut them with a scalpel, drenched them in Vallejo Matt Varnish and simply placed them here and there on the building.
And finally...I glued the building to the ground plate. DONE!!
Damn, loads of work but I am very happy with it. And finally a big, high building for my table. I'm so glad this one's done and I'm looking forwards to the next building for this table!